In the intricate world of computer hardware, the motherboard is your system’s backbone. However, even the most advanced and reliable motherboards are not immune to occasional hiccups, and one of the most dreaded signals of distress is the appearance of a red light. In this article, we’ll walk you through the simple steps to fix the red light error on your motherboard.

“Is my motherboard dead?” could be the first question to pop up when seeing the red light on your motherboard. The answer is no. It is not dead if there’s a red light on the motherboard, but everything else works fine. Now, let’s understand what this red light on your motherboard means.
Understanding the Red Light on a Motherboard
Start by looking for labels like CPU, DRAM, BOOT, and VGA next to the LEDs on your motherboard before diving into the troubleshooting guide. Knowing these labels will make pinpointing the source of any problems easier.

1. CPU Light
Reasons why the red light next to the CPU label is active:
- Outdated BIOS
- Incompatible CPU
- Improper CPU installation
- Faulty CPU
- Connection issues
2. DRAM Light
Possible causes why you see red light next to DRAM:
- Improperly seated RAM
- Incompatible RAM
- RAM clamps are not secured
- Faulty RAM
- CPU pin issues
3. BOOT Light
Potential reasons why the BOOT light is on:
- No OS is installed
- Improperly connected HDD/SSD
- Faulty SATA port
- Booting from a non-bootable drive
- Dead or corrupted HDD/SSD
- BIOS detection issues
4. VGA Light
Here’s why the red light next to the VGA might be on:
- Improper GPU/PSU connections
- Unsecured PCIe socket latch
- Incorrect GPU slot or damage
Also Read: How to choose the right PC parts
How to Fix the Red Light Error on Your Motherboard
Now that you know what the red light on the motherboard means, let’s find out how to solve the issue.
1. Ensure Proper Cable Connections
The cables are responsible for power supply, data transfer, and peripheral connections. Loose connections or improperly seated cables can lead to power irregularities, data transmission failures, and overall instability, triggering the red light error.

Ensuring proper cable connections is paramount when addressing the vexing issue of a red light error on your motherboard. Here’s how you can do so:
Step 1: Turn off your computer and unplug it from the main power supply.
Step 2: Check all the cables connected to your motherboard. Plug them in tightly and ensure they’re in the right places.
Step 3: Unplug and replug the cables to be sure they are in a snug fit.
Step 4: Look for any damaged cables and replace them if needed.
Step 5: Finally, turn on your computer. Hopefully, the red light is gone.
2. Replace Faulty Hardware

Once you’ve ensured all the cables are correctly attached, you can examine your motherboard for any visible signs of damage, such as burned areas. If you find any faulty component, such as a malfunctioning RAM module or a damaged graphics card, replace it with a new one.
This method is particularly effective because it directly targets the source of the problem, providing a more permanent solution compared to software-based troubleshooting. Additionally, resolving hardware issues contributes to the overall stability and reliability of the computer system, preventing future errors and ensuring smooth operation.
3. Disconnect and Reconnect Peripherals

If you encounter a red light on your motherboard with no display, systematically unplugging and replugging all external devices, including your keyboard, mouse, external hard drives, and graphics card, can quickly fix it. This helps ensure secure connections and may resolve the issue.
Note: This approach may not work for all red-light errors, especially those related to internal components.
4. Verify or Reset BIOS Settings
The BIOS (Basic Input/Output System) is a crucial component that initializes hardware during the computer’s boot-up process. Errors in BIOS settings can lead to system instability, and the red light on the motherboard often indicates a critical issue that needs attention.

However, you can quickly address this by verifying the BIOS settings on your device. To do so, enter your BIOS and manually check all the settings. Additionally, pay close attention to parameters such as CPU frequency, RAM timings, and storage configurations. Incorrect settings in any of these areas can trigger the red light error. Make the necessary adjustments and ensure that all configurations align with your hardware specifications.
You can also go ahead and reset the BIOS on your device. Here’s how it’s done:
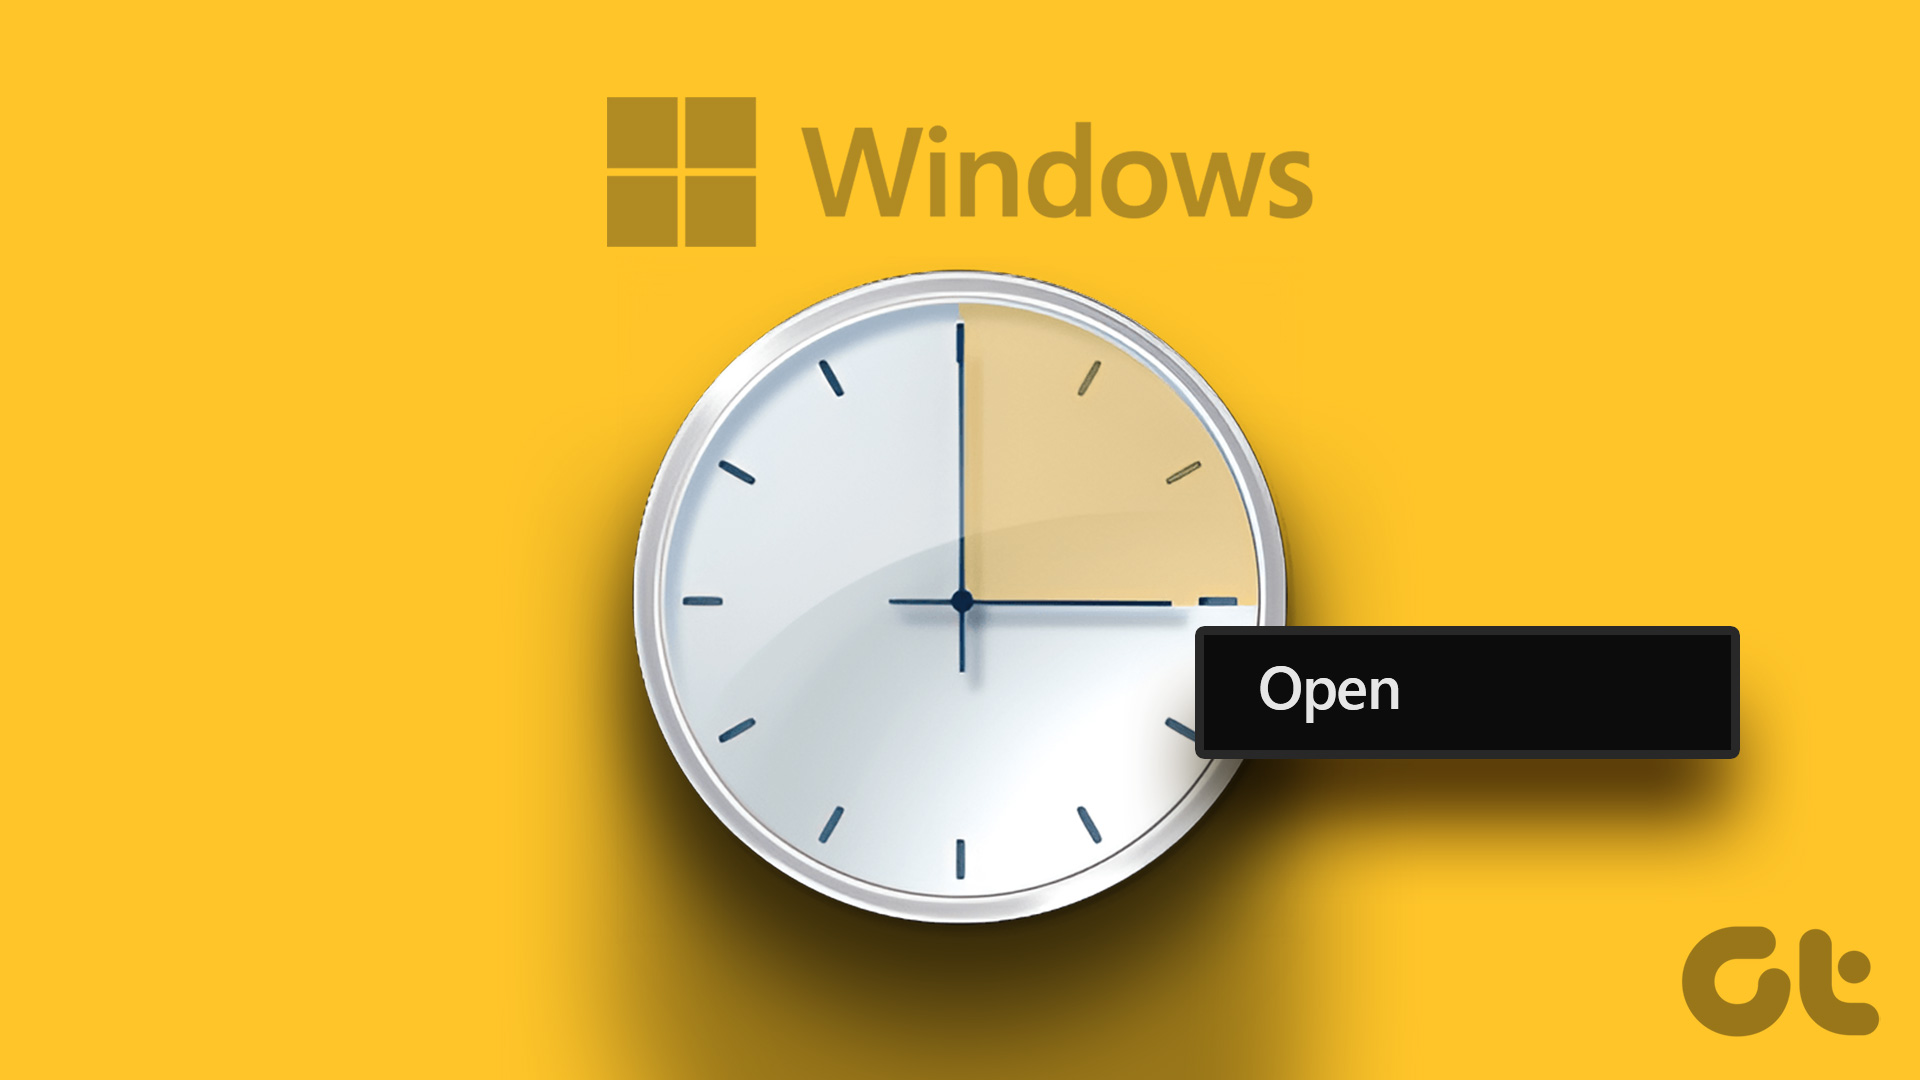
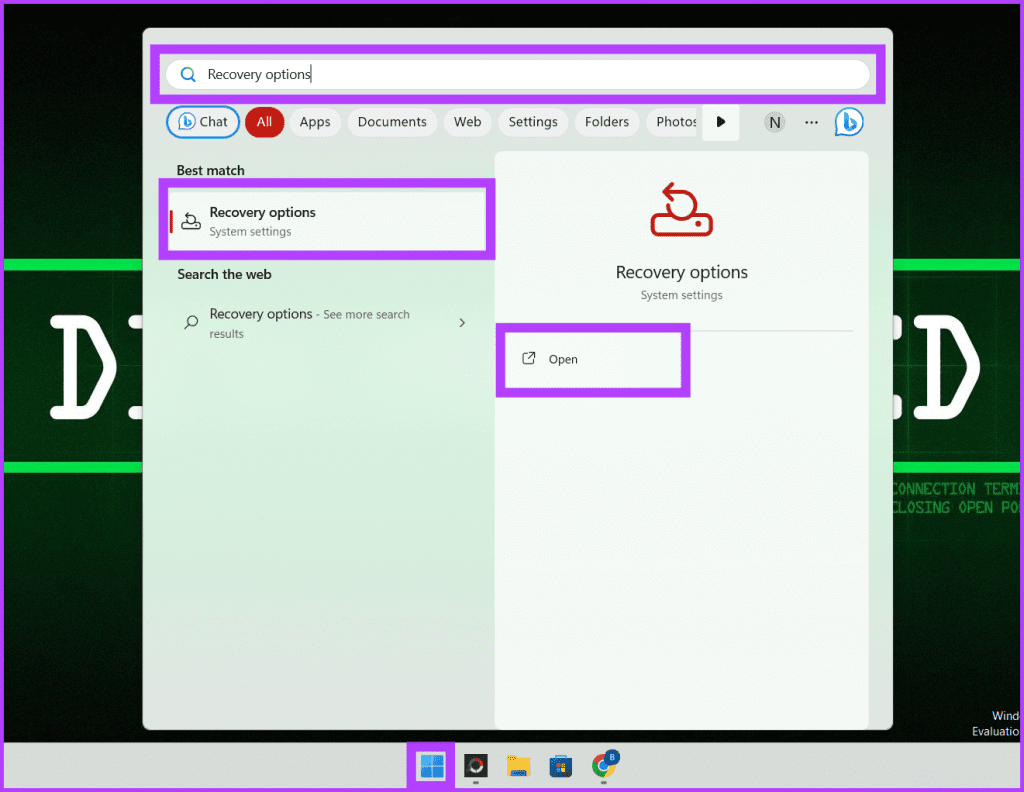
Step 1: Press Windows + S on your keyboard, type Recovery options, and click Open.
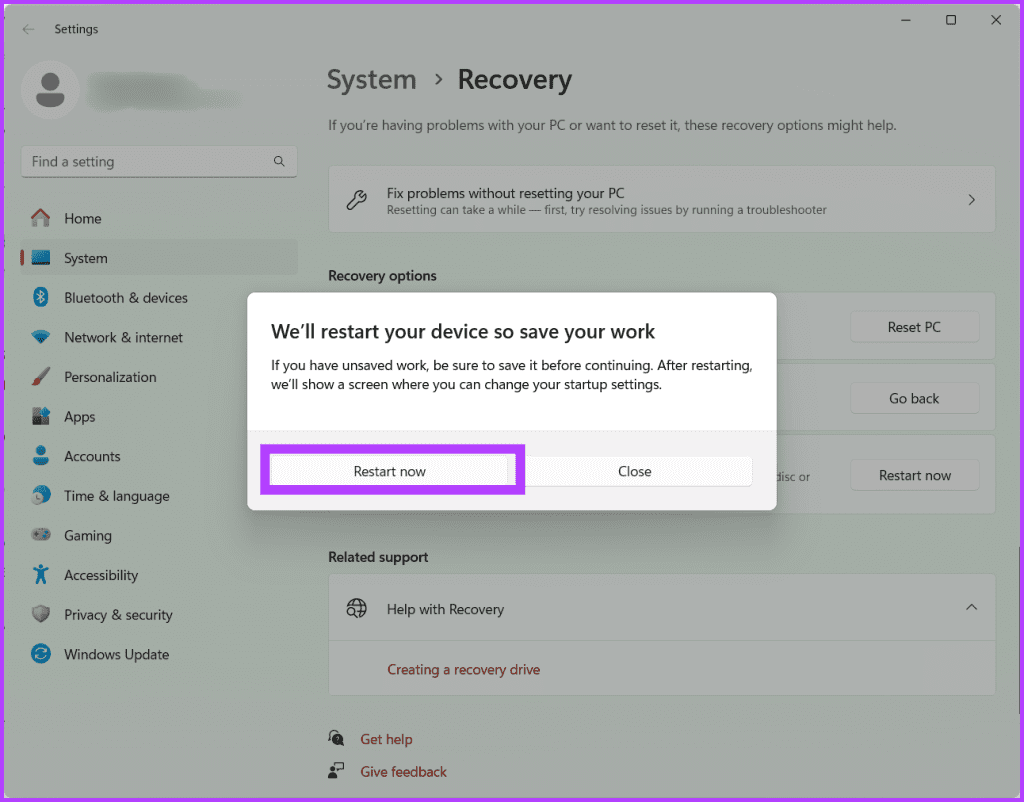
Step 2: Next to Advanced startup, press Restart now.

Step 3: Select Restart now again to confirm.
Step 4: Now, your computer will restart. Select Troubleshoot once done.

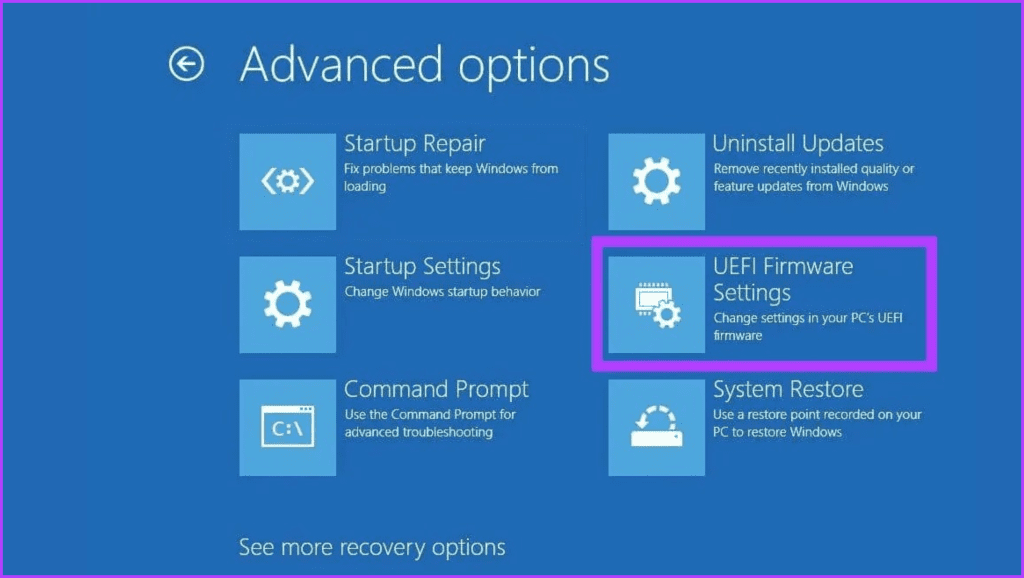
Step 5: Go to Advanced options.

Step 6: Choose UEFI Firmware Settings.
Step 7: To reboot your computer and access the BIOS screen, click the Restart button.
Note: The BIOS screen may look different on your PC, depending on your motherboard.

Step 8: Press F9 on your keyboard to choose Setup Defaults and click Yes.

Step 9: Finally, hit the F10 button to exit the BIOS screen and save the changes.
5. Assess RAM and GPU Functionality
Assessing RAM and GPU functionality is an effective solution if you see a red light on the motherboard with no display, as these components are integral to your system’s overall performance and stability. If the RAM or GPU is faulty, replacing the problematic component with a working one can resolve the issue.

You can start by checking the RAM modules. Ensure that they are securely seated in their respective DIMM slots. If you have multiple RAM sticks, remove them one by one, clean them with a cloth, and place them in the slots again one at a time, booting the system after you place each stick back.
If the red light persists, it may indicate a faulty RAM module. Consider testing each module individually or replacing them with known good ones to determine if the issue lies with the RAM.

Next, turn your attention to the GPU. The graphics processing unit is crucial in rendering visual information on your display. Ensure the GPU is properly inserted into its PCI Express slot and that any additional power connectors are securely connected.
If possible, test the system with a different GPU or onboard graphics to see if the red light error persists. A malfunctioning GPU can contribute to system instability and trigger motherboard indicator lights. Once done, check if the red light on your motherboard persists.
Also Read: How to fix computer turns on but no display on Windows
6. Reset and Replace the CMOS Battery
The CMOS (Complementary Metal-Oxide Semiconductor) is a critical component in a computer system responsible for storing the system’s BIOS settings, including information about the hardware configuration, date, and time.

The CMOS battery is a small coin-cell battery on the motherboard that supplies power to the CMOS chip to ensure that these settings are retained even when the computer is powered off. When the CMOS battery is low on power, or the settings become corrupted, it can lead to various issues, including the dreaded red light error on the motherboard.
Resetting the CMOS involves clearing the stored settings on the CMOS chip to default values. This can be achieved using a jumper on the motherboard or removing and reinserting the CMOS battery. By doing so, any corrupted or conflicting settings triggering the red light error are wiped clean, allowing the motherboard to start with a fresh configuration.

Over time, these batteries can lose their charge, resulting in erratic behavior and malfunctions. When the battery can no longer supply sufficient power to the CMOS chip, it can lead to a red light error. Installing a new CMOS battery ensures a stable power supply to the CMOS chip, preventing the recurrence of errors associated with insufficient power.
7. Consider Purchasing a New Motherboard

If you’ve tried all the fixes above and the red light error on your motherboard persists, upgrading to a new motherboard can be a comprehensive solution. The newer motherboards offer compatibility with modern components and features, improved power delivery, and enhanced stability. Additionally, they come with updated BIOS and firmware for better hardware compatibility, leading to potentially smoother operation and helping rectify the issue.
Also Read: Best gaming CPU under $200
Get Your PC Back
Many modern motherboards have clear labels that make it easy to determine why the red light is on. Even if yours doesn’t have labels, simple actions like adjusting components and checking connections can get your computer working again. We hope the steps above have helped you fix the red light on the motherboard.
Was this helpful?
Last updated on 05 January, 2024
The article above may contain affiliate links which help support Guiding Tech. The content remains unbiased and authentic and will never affect our editorial integrity.


