When Should You Change the Priority Level of a Program
By default, Windows 11 assigns different priority levels to each process based on its importance. Ideally, you wouldn’t need to tinker with it. However, if you want to devote more resources to a specific app or program, you can change its priority level.
Windows has six priority levels: Realtime, High, Above Normal, Normal, Below Normal, or Low. It’s worth noting that increasing the process priority level for too many apps and programs can also cause system instability. Hence, only modify process priority for a program when it is necessary.
Method 1: Change Process Priority via Task Manager
Task Manager is a handy utility that lets you manage various apps, processes, and services on Windows. You can also use it to change the priority levels for apps and programs. Here’s how.
Step 1: Press Ctrl + Shift + Esc on the keyboard to launch the Task Manager.
Step 2: Head over to the Details tab and locate the .EXE process for your program. Right-click on it, go to Set priority, and select from the available options.
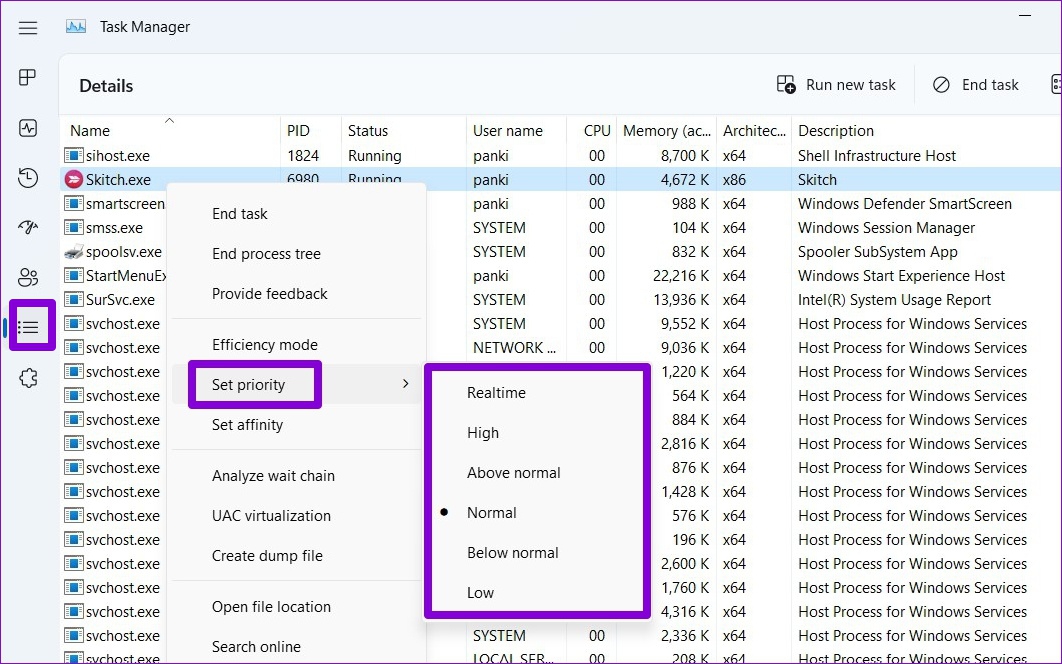
Step 3: Click on Change priority to confirm.

Once you complete the above steps, your program will operate on the specified priority level until you close it.
Method 2: Change Process Priority Using Command Prompt
If you’re an avid Windows user who prefers to make changes via the Command Prompt, you can also change the priority level of a program by running a command. Here’s how.
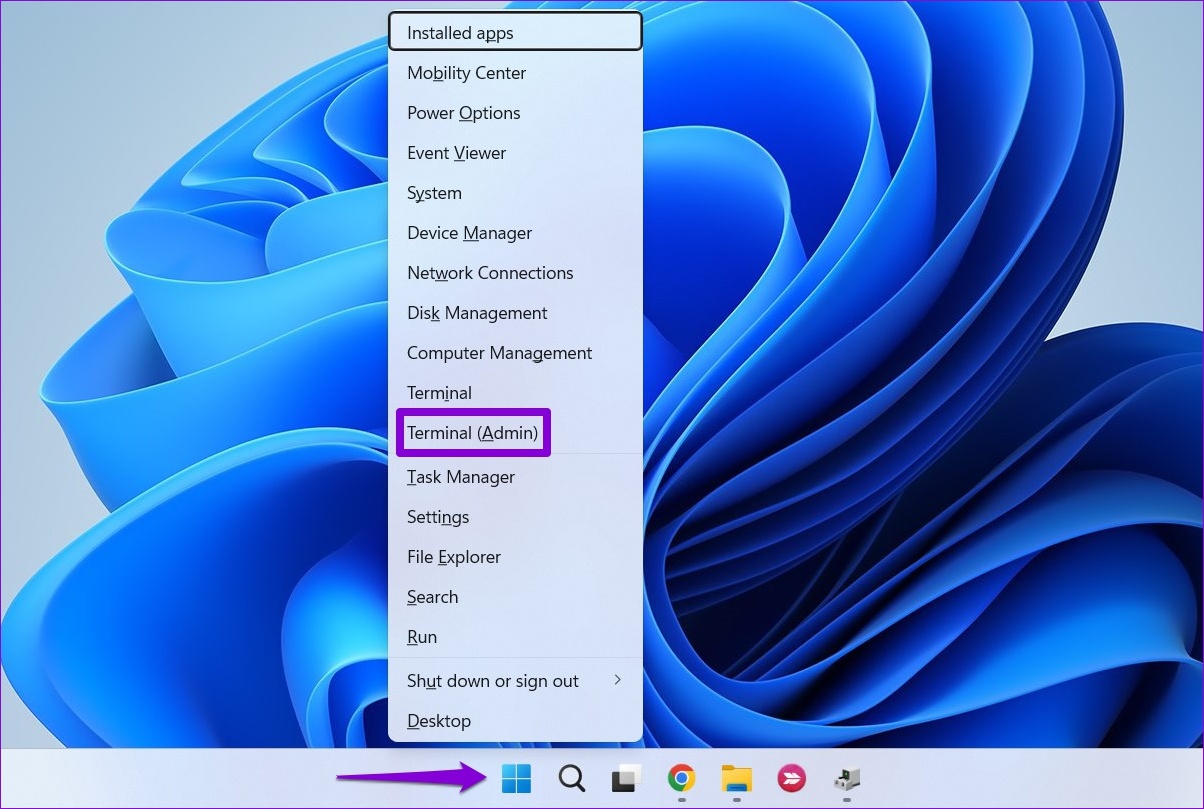
Step 1: Right-click on the Start icon and select Terminal (Admin) from the list.
Step 2: In the console, paste the following command and press Enter.
wmic process where name="ProcessName.exe" CALL setpriority "PriorityLevel"
Replace ProcessName in the above command with the actual name of the process. Similarly, replace PriorityLevel with the priority level you want to use: Realtime, High, Above normal, Normal, Below normal, or Low.

Once you execute the command, your program will run at a different priority level.
Method 3: Change Process Priority by Creating a Shortcut
If you want Windows to always launch a program at a certain priority level, you can also create a custom desktop shortcut for it. This will eliminate the need to change the priority level every time you launch that program.
Step 1: Right-click on your program and select Properties.

Step 2: Copy the file path mentioned in the Target field.

Step 3: Right-click anywhere on the empty space on the Desktop, go to New, and select Shortcut.

Step 4: In the Shortcut wizard, type the following path in the box.
cmd.exe /c start "ProgramName" /Priority "FilePath"
Replace ProgramName in the above command with the actual name of your program and Priority with any priority level: Realtime, High, Above normal, Normal, Below normal, or Low. Also, replace FilePath with the path copied in Step 2.

Step 5: Enter a suitable name for the shortcut and click Finish.

And you’re good to go. You can use this shortcut to run your program at the specified priority level.
Was this helpful?
Last updated on 21 June, 2024
2 Comments
Leave a Reply
Read Next
 Top 9 Ways to Fix Unable to Change Default Programs in Windows 10
The apps offered by Microsoft are great.
Top 9 Ways to Fix Unable to Change Default Programs in Windows 10
The apps offered by Microsoft are great.
 5 Ways to Fix Startup Programs Not Launching on Windows 10 or 11
Try Basic Fixes Install Windows updates: A buggy or outdated Windows build could cause such issues.
5 Ways to Fix Startup Programs Not Launching on Windows 10 or 11
Try Basic Fixes Install Windows updates: A buggy or outdated Windows build could cause such issues.
 4 Ways to Fix Unable to Install Programs or Software on Windows 11
Try Basic Fixes Check program compatibility: Programs and games that worked perfectly on Windows 10 may not necessarily be compatible with Windows 11.
4 Ways to Fix Unable to Install Programs or Software on Windows 11
Try Basic Fixes Check program compatibility: Programs and games that worked perfectly on Windows 10 may not necessarily be compatible with Windows 11.
 3 Ways to Run Old Programs in Compatibility Mode on Windows 11
Method 1: Modify Program Properties You can configure a program to run in compatibility mode by modifying its properties.
3 Ways to Run Old Programs in Compatibility Mode on Windows 11
Method 1: Modify Program Properties You can configure a program to run in compatibility mode by modifying its properties.
 3 Ways to Repair Broken Apps and Programs In Windows 11
Method 1: Using Apps and Features in the Settings App The first step for the native or third-party app is to use the Settings app.
3 Ways to Repair Broken Apps and Programs In Windows 11
Method 1: Using Apps and Features in the Settings App The first step for the native or third-party app is to use the Settings app.
 7 Ways to Force Uninstall Programs on Windows 11
Method 1: Uninstall Programs Using the File Explorer Step 1: Firstly, open the Start Menu, type the name of the program you want to uninstall in the search bar, and choose
7 Ways to Force Uninstall Programs on Windows 11
Method 1: Uninstall Programs Using the File Explorer Step 1: Firstly, open the Start Menu, type the name of the program you want to uninstall in the search bar, and choose
 How to Access the Old Add or Remove Programs Panel and Other Classic Features in Windows 10
Windows 10 is a dramatic improvement over its predecessors in terms of both speed and stability.
How to Access the Old Add or Remove Programs Panel and Other Classic Features in Windows 10
Windows 10 is a dramatic improvement over its predecessors in terms of both speed and stability.
 How to Prevent Users From Running Certain Programs on Windows 11
Method 1: Prevent Users From Running Certain Programs via the Group Policy Editor The Local Group Policy Editor on Windows makes it easy to apply system-wide changes on a computer.
How to Prevent Users From Running Certain Programs on Windows 11
Method 1: Prevent Users From Running Certain Programs via the Group Policy Editor The Local Group Policy Editor on Windows makes it easy to apply system-wide changes on a computer.
The article above may contain affiliate links which help support Guiding Tech. The content remains unbiased and authentic and will never affect our editorial integrity.


Does not work ! Win10 is lowering process priority after some time (pretty quick) and then app begin to choke, VLC MP crashes after some time video playing, browser video stream being cut off … atc. For browser there is more than one .exe so if u want increase the whole god damn PP u have to level up every god damn exe manually just to get crippled by Win again.
This stupid integrated win10 app management is total crap. At the end u get over-chooke’d prehistoric DOS alike comp (that was also 100x overpriced in their time). So why we buy performance hardware for MS to manage to cripple performance every god damn time ? And why user still has to tamper with OS ? No wonder people are highly modifying OS and wiping out all the crap and garbage MS puts in !
Chaning the priority in the Task Manager does NOT set the priority permanently. That is FALSE. It only set it until you close it. You have to do it again every time you reopen the app, which is NUTS!