Fix 1: Configure the User Profile Service
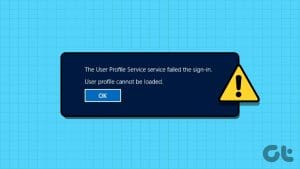
If the User Profile Service on your PC is not set to run automatically, you could encounter the “User Profile Service failed the sign-in” or “User Profile Service failed the logon” error on Windows. Here’s how to fix that.
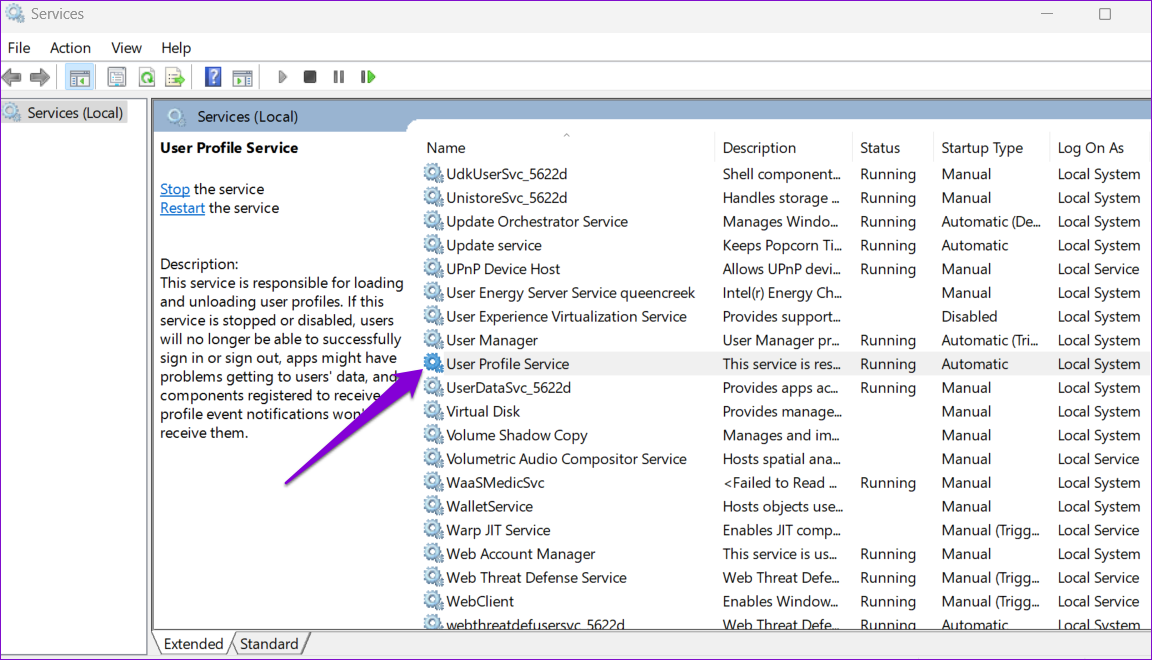
Step 1: Press the Windows key + R to open the Run dialog box. Type services in the text field and press Enter.
Step 2: In the Services window, locate the User Profile Service on the list. Double-click on it to open its properties.
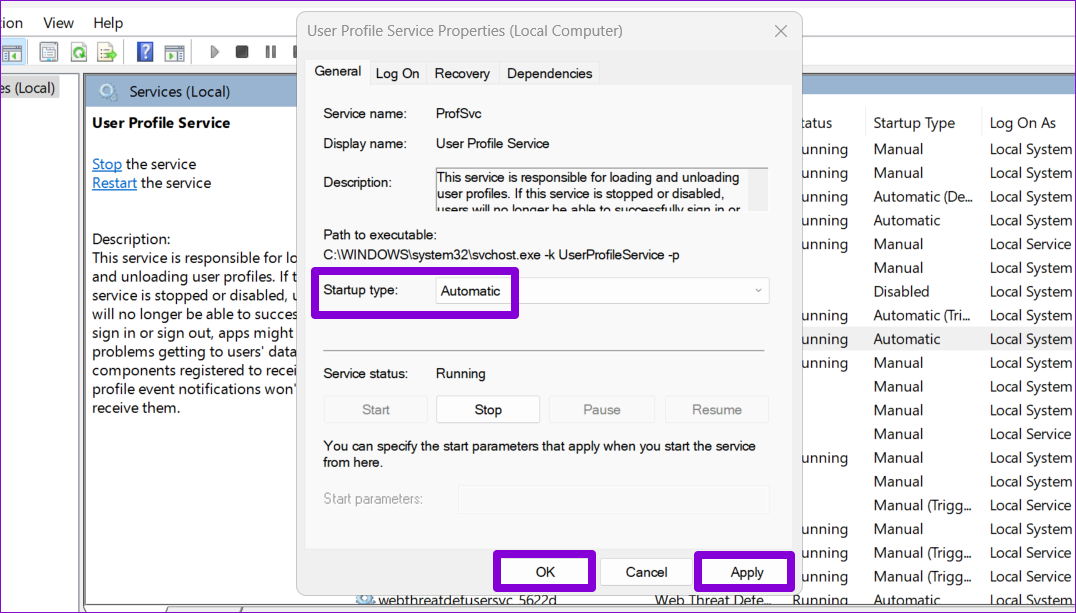
Step 3: Click the drop-down menu next to Startup type and select Automatic. Then, hit Apply, followed by OK.
Restart your PC after this and check if the error persists.
Fix 2: Replace the NTUSER.DAT File
Windows creates an NTUSER.DAT file for each user account on your system. If the NTUSER.DAT file associated with your user profile has become corrupted, you will have trouble signing into Windows. Here’s how to fix it.
Step 1: Press the Windows key + E to open File Explorer and navigate Local Disk (C:) > Users.
Step 2: Click the View menu at the top and go to Show > Hidden items.

Step 3: Double-click the folder associated with your user account. Right-click the NTUSER.DAT file and select the cut option.

Step 4: Return to the Users folder and double-click the Default folder. Then, press Ctrl + V to paste the NTUSER.DAT file inside the folder.

Step 5: Return to the Users folder, select the problematic user account folder, and click the trash icon at the top to delete it.

Fix 3: Run SFC and DISM Scans
Issues with your PC’s system files can also cause such anomalies. Hence, it’s a good idea to scan your PC’s system files by running the SFC (System File Checker) and DISM (Deployment Image Servicing and Management) scans.
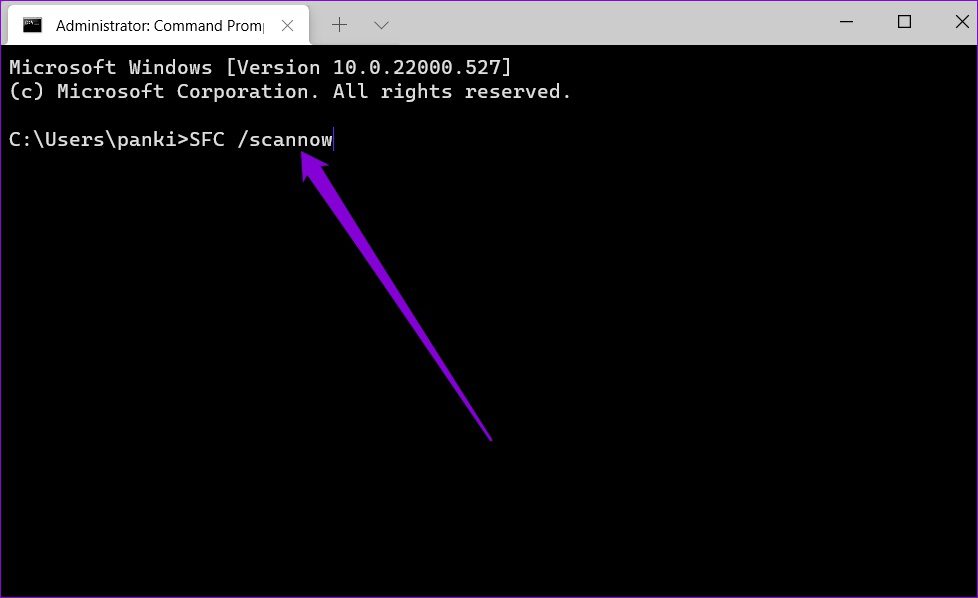
Step 1: Right-click the Start icon and select Terminal (Admin).

Step 2: Paste the following command in the console and press Enter to run the SFC scan.
SFC /scannow
Step 3: Run the DISM scan by entering the following commands one by one and pressing Enter after each command:
DISM /Online /Cleanup-Image /CheckHealth
DISM /Online /Cleanup-Image /ScanHealth
DISM /Online /Cleanup-Image /RestoreHealth

Wait for the scan to complete and restart your PC.
Fix 4: Edit Registry Files
Incorrect or corrupt registry entries can also trigger the “User Profile Service failed the sign-in” error in Windows 11. If so, you must edit these entries using the Registry Editor.
Step 1: Press the Windows key + R to open the Run dialog box. Type regedit in the box and hit Enter.
Step 2: In the Registry Editor window, paste the following path in the address bar at the top and press Enter.
Computer\HKEY_LOCAL_MACHINE\Software\Microsoft\Windows NT\CurrentVersion\ProfileList

Step 3: Within the ProfileList key, look for any duplicate entries. If there are multiple entries with identical names, one of them will have a .bak extension at the end of its name.
Step 4: Select the duplicate entry and press F2 to rename it. Replace the .bak extension with .ba and hit Enter.

Step 5: Rename the other duplicate entry and add the .bak extension at the end of its name.

Step 6: Select the entry with the .ba extension and remove the .ba extension.

Step 7: Double-click the State key in the right pane, set its value data to 0, and hit OK.

Restart your PC one more time and see if you can log in as before.
Fix 5: Perform a System Restore
If all else fails, consider performing a system restore to fix the error. This will undo any incorrect changes that may have caused the error on your PC.
Step 1: Click the search icon on the taskbar, type create a restore point, and press Enter.

Step 2: Under the System Protection tab, click the System Restore button.

Step 3: Select Recommended restore and click Next to continue.

Step 4: Click Finish to proceed.

Was this helpful?
Last updated on 26 April, 2024
Read Next
 How to Fix Windows 10’s User Profile Cannot Be Loaded Error
Logging in to a computer is as easy as typing a password (if any) and tapping the sign-in button.
How to Fix Windows 10’s User Profile Cannot Be Loaded Error
Logging in to a computer is as easy as typing a password (if any) and tapping the sign-in button.
 5 Fixes For a Corrupted User Profile on Windows 11
Basic Fixes: Update the computer: Windows updates often include bug fixes and patches and may correct the corrupted user profile.
5 Fixes For a Corrupted User Profile on Windows 11
Basic Fixes: Update the computer: Windows updates often include bug fixes and patches and may correct the corrupted user profile.
 6 Fixes for “The Operation Failed” Error in Microsoft Outlook for Windows
Fix 1: Open Outlook in Safe Mode Running Office apps like Outlook in safe mode can help you determine if one of the add-ins is responsible for the issue.
6 Fixes for “The Operation Failed” Error in Microsoft Outlook for Windows
Fix 1: Open Outlook in Safe Mode Running Office apps like Outlook in safe mode can help you determine if one of the add-ins is responsible for the issue.
 4 Fixes for “This Interaction Failed” Error in Discord for Windows
Try Basic Fixes Update the Discord app: You may be getting the "This interaction failed" error due to an outdated or buggy Discord app.
4 Fixes for “This Interaction Failed” Error in Discord for Windows
Try Basic Fixes Update the Discord app: You may be getting the "This interaction failed" error due to an outdated or buggy Discord app.
 4 Fixes for “Failed to Load Module” Error on Twitch
Try Basic Fixes Ensure Twitch servers are working: Before trying anything, it's a good idea to ensure that the Twitch servers are working.
4 Fixes for “Failed to Load Module” Error on Twitch
Try Basic Fixes Ensure Twitch servers are working: Before trying anything, it's a good idea to ensure that the Twitch servers are working.
 How to Fix “Windows Installer Service Could Not Be Accessed” Error
Common Fixes Restart your PC: Press the Windows + X shortcut to open the Power User Menu, select Shut down or sign out, and click on Restart.
How to Fix “Windows Installer Service Could Not Be Accessed” Error
Common Fixes Restart your PC: Press the Windows + X shortcut to open the Power User Menu, select Shut down or sign out, and click on Restart.
 5 Fixes for Logged in With a Temporary Profile Error on Windows
Try Basic Fixes Disable the antivirus program: Sometimes antivirus programs on your PC can interfere with Windows and force it to log you in with a temporary profile.
5 Fixes for Logged in With a Temporary Profile Error on Windows
Try Basic Fixes Disable the antivirus program: Sometimes antivirus programs on your PC can interfere with Windows and force it to log you in with a temporary profile.
 6 Ways to Fix Failed to Load Web Page Error in Steam for Windows
Fix 1: Terminate Steam Processes and Reopen the App The "Failed to load web page" error in Steam can occur if one of the app processes is experiencing issues.
6 Ways to Fix Failed to Load Web Page Error in Steam for Windows
Fix 1: Terminate Steam Processes and Reopen the App The "Failed to load web page" error in Steam can occur if one of the app processes is experiencing issues.
The article above may contain affiliate links which help support Guiding Tech. The content remains unbiased and authentic and will never affect our editorial integrity.