Google Docs is a great tool to have in your arsenal, whether you’re writing a project report, book, or journaling. While it maintains ease of use, it also packs some helpful and resourceful features and you might be missing out on those hacks. So, here’s a compilation of some amazing Google Docs tips and tricks for Windows and Mac users.
Google has consistently updated Google Docs to match the need of the hour, from collaboration to web publishing. The platform has become so cohesive, you might not need any other app. Don’t believe me? Check these Google Docs tips and tricks out for yourself.
Hacks to Maximize Productivity in Google Docs
Between AI, automation, and shortcuts you can concentrate on writing or creating the document. All menial yet time-consuming tasks can be smartly handled with these time-saving hacks.
1. Shortcut to Quickly Open a New Document
How do you open a Google Doc? The usual steps are to open Google Docs home and click + to open a new document. And while it’s not a complicated process, there’s a much easier shortcut you should follow instead.
It’s just one step, simply type docs.new or doc.new in any browser of your choice. If you’re logged into a single Gmail account, it will directly open a document from that account.

However, if you’re logged out or have multiple accounts logged in, it might ask you to choose the account and log in.
Tip: The trick also works for Google Sheets (sheets.new) and Google Slides (slides.new).
2. Use the Outline to Organize Your Document
Facing trouble navigating a long document? It’s time to utilize the Outline feature. Go to View and tick Show Outline; you can also use any of these keyboard shortcuts,
- For Windows: Ctrl+Alt+A or Ctrl+Alt+H
- For Mac: Cmd+Option+A or Cmd+Option+H

An outline icon will appear in the sidebar, click it. Each heading you create will appear here, allowing a nested overview of the outline in real-time.
3. Add a Quick Auto-Generated Summary of Your Document
Part of Google’s Smart Canvas (a workspace designed to simplify collaboration), the Summary feature uses AI to create a quick summary suggestion. Although it’s not set in stone, you can use the summary or some parts of it, or completely discard it and write a fresh one.
To start, ensure the Outline feature is enabled. Click the + icon Summary and wait for the document to auto-generate a summary. Be patient, as it might take some time depending on the document size.


Once done, press the tab key to accept the summary and then you can make changes to it. To edit it later, click the Pencil icon.
4. Make Add-Ons Your Best Friend
What extensions are to Chrome browser, Add-Ons are to Google Docs. Depending upon the task at hand, they can simplify and quicken things around. Check out our guide to using Add-Ons and making the most of them.

Notably, You can find a suitable Add-On for almost any task from building customizable charts to converting documents to Google forms; from plagiarism check to citation tools. So, happy exploring!
5. Take Google Docs Offline
Want to tinker with documents on the go whether you’re traveling or the internet connection isn’t stable? Take the Google Docs offline so you can read, write, or make edits to them without an internet connection.
All changes will sync to the Drive once reconnected. However, this trick only works with Chromium-Based Browsers, as you’ll need a Google Docs Offline extension.
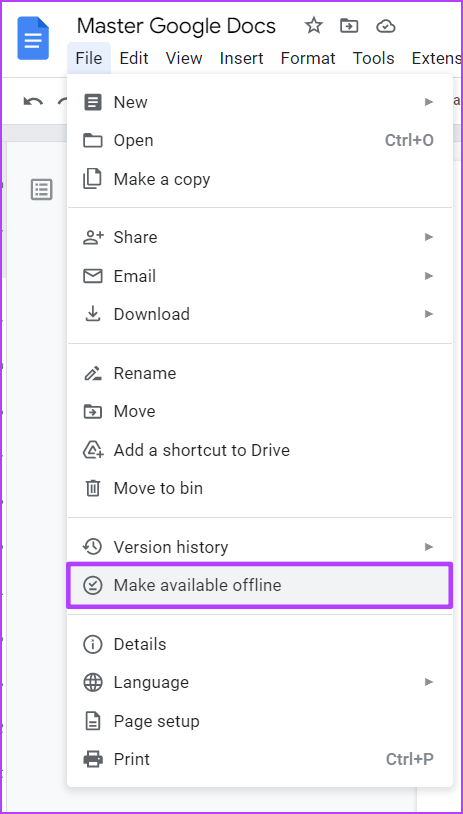
Once you have downloaded the extension, simply open the document you want to take offline, click File, and select Make Available Offline.
Tip: For more detailed instructions, check out our guide on how to use Google Docs offline on Mac.
6. Use Dictation in Google Docs
Is your speaking speed considerably better than your typing speed? (Most of us would agree). So, let’s put the better skill to work with the built-in voice-to-type feature.
Notably, the folks at Google have dubbed the dictation setting as Voice typing. And here’s how you can enable and use Voice typing in Google Docs.
Go to Tools and select Voice Typing, you can also use Ctrl/Cmd+Shift+S. If you’re using the feature for the first time, give the necessary permissions. Now, a Microphone icon will appear, click it to start or stop recording.


In addition to entering text, Voice typing allows you to enter punctuations, insert page breaks, or manage formatting.
7. Avoid Google as Much as Possible
Most of us switch tabs to Google often. However, that might get distracting, time-consuming, and at times irritating. But the good news is that you don’t have to as Google Docs can handle some of these tasks.
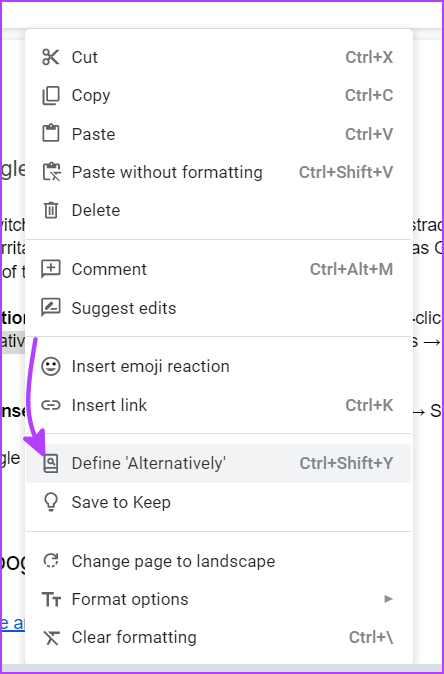
Check definitions or find synonyms: Select the word, then right-click and select Define ‘word’. Alternatively, you can press Ctrl/Cmd+Shift+Y or go to Tools → Dictionary → search for the word.
Search and insert images from the web: Go to Insert → Image → Search the web → Select and insert images.

Get Citations and bibliographies within Docs: Go to Tools → Citations. Here, select the Format, Source type, Accessed by, enter the URL, and select Search or Cite manually.
Preview Google Maps: When using a Google Maps link, you can preview the location in Google Docs. Click the location link, then the Map icon and a preview will appear in the right corner.

8. Create Text Replacement for Regularly Used Words
A neat trick to speed up your typing. We all have some terms, sentences, and terminology, we use often in our documents. The idea is to create unique substitutions and let Google Docs work its magic.
Go to Tools → Preferences → Substitutions → enter the text and replacement → click Ok.


9. Find Settings Quickly
We have been talking about so many settings here. And while there are clear instructions involved, it can get confusing remembering all of that. So, we have a hack to fix that problem as well.
Press Alt+/ to open up a menu of all available functions. Then type in the function, for instance, Title, page, etc., and select the one you were looking for.

Smart Google Docs Tips and Tricks for Collaboration
Gone are those days when your team member needed to sit next to you. Now you can be at two ends of the world and still working together, thanks to such collaborative platforms.
Google is pretty great for creating and managing collaborative projects. And here are some precious Google Docs tips and tricks to make things easier.
10. Get More With a Simple @
As soon as you type @ anywhere in the document, you will see a drop-down menu of options.


The @ menu is actively updated and can be used to add links to people, files, and calendar events. You can also add prebuilt templates (building blocks) and smart chips (dropdowns, checklists, tables, charts, and more).
Moreover, type letters, numbers, or symbols after the ‘@’ to narrow down the search, allowing you quicker and smoother access to contacts and a variety of assets.
11. Use Suggestion Mode to Manage Edits Between the Team
While a collaborator can track changes from the Activity Dashboard (the Sensex-like icon), it can be tiresome if there are multiple creators. The user who is making the changes can tag and add comments. However, it can be time-consuming.
So, the best solution from our experience is the Suggestion mode. Here, you’re not directly making changes to the document. Instead, the changes are marked, waiting for approval.

To invoke Suggestion mode, click the Editing button or the small pencil symbol and then select Suggesting. Go ahead and suggest the changes.

12. Give Emoji Reaction
Aren’t emojis a great communication tool? Maybe that’s why all major communication apps from WhatsApp to Instagram supports emoji reaction. Remarkably, so does Google Docs and Instead of typing a comment, you can react with an emoji.
In Google Docs, select the words, lines, or paragraphs you want to react to and right-click. Select Insert Emoji Reactions, find, and click the emoji.

Additionally, at times, when you select some text, a shortcut bar pops up on the right edge of the page. Select the Emoji icon and use emoji reaction. (You can also add comments or suggest edits from here).
13. Email Document Directly to Collaborators
One method is to download the document, go to your mail account, attach the document and send it. Or you could simplify things by mailing the document from Google Docs.
Go to File → Email, and select any one of the following options,
- Email this File
- Email collaborators
- Email draft
Note: The email will be sent via the primary email address associated with your Google account.
14. Create Interlinks in Your Google Docs
Whether you want to link a different word document, spreadsheet, or slides from your drive or create a jump-to to a certain section in the current document, all can be done.
All you have to do is, press Ctrl/Cmd+K. Here, instead of entering a link, search for the document or the headings of the current document.

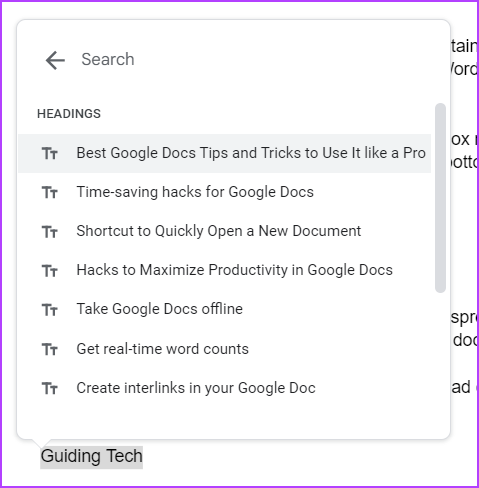
You can also select something from recent/related suggestions or click Headings and Bookmarks, to see more interlinking options.
15. Manage Sharing Preferences
Don’t want to share the document anymore or change sharing controls or want to give up the ownership? All can be managed. Click the blue Share button. Here you can view who has access to the document.
To give or take editing rights, click the button next to the collaborator’s name and select the preferred option. You can also Remove their access or Transfer ownership.

16. Publish the Document on the Web
Well, no Google Docs isn’t secretly competing with WordPress. But it does allow you to publish the document on the server and anyone with the link can view it. For instance, you can publish announcements or documents for every team member to view.
Go to File → Share → Publish to web → select between Link and Embed and hit publish. Additionally, click the ‘Published content and settings’ and check ‘Automatically republish when changes are made’.

Google Docs Formatting Tips
Writing a document is one part of the story, the next and most crucial part is to format it. And if you have an OCD for properly formatted documents, here’s your haven.
17. Create a Pageless Document
Page breaks are essential when prepping a document for printing. However, they can be a pain when creating wide and long tables or inserting images. Thankfully, we have just the solution. Simply create a pageless document on Google Docs on Windows, Mac, and iPhone/Android apps.
18. Create a Table of Contents in One Tap
Another cumbersome task that you can automize and complete in minutes. A particularly useful hack for book writing, dissertations, official documentation, and similar documents.
Go to Insert → Click Table of contents → Select a preferred option. Notably, you can either add the table from the start (and keep refreshing it) or create one after the document is done.
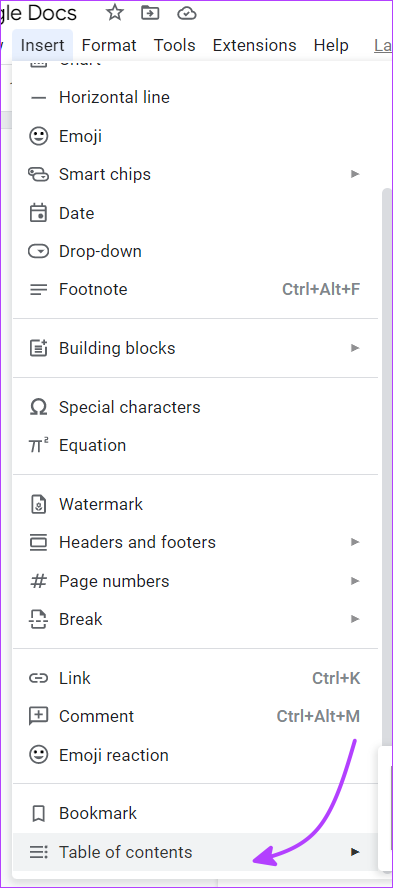
Tip: You can also insert emoji or special characters from the Insert menu or press Alt+/ and type in emoji or special characters.
19. Change Text Case in Google Docs
There are times when you need everything in shouty capitals. And times, when you need everything to be in lowercase. Instead of changing things manually, let Google Docs handle it.
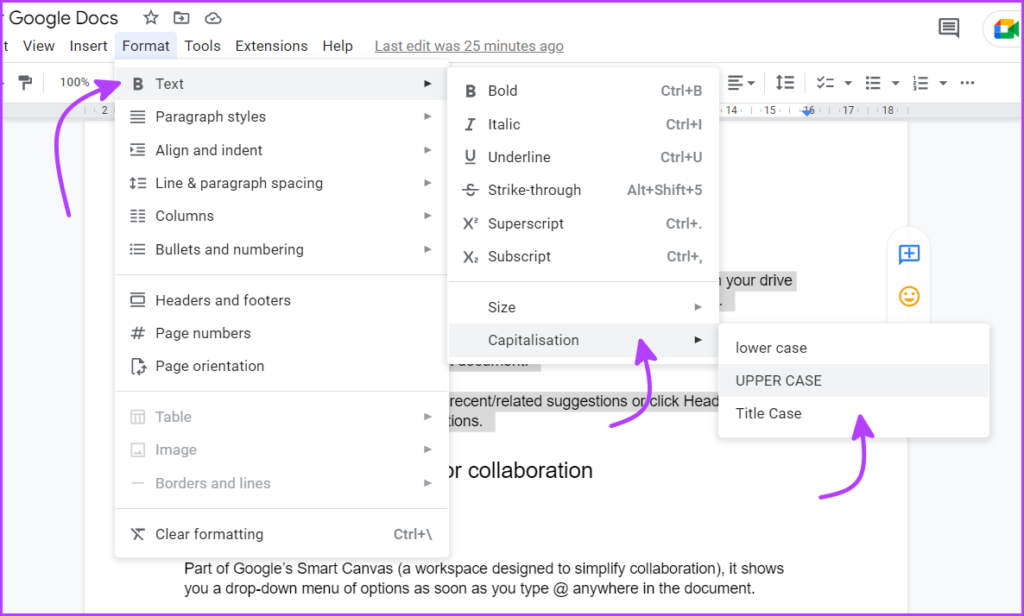
Select the text or simply press Crtl/Cmd + A to select all text. Next, go to Format → Text → Capitalization and select either of the three options:
- Lowercase: Convert all the text to lowercase.
- Uppercase: Makes all the select text capital.
- Title Case: It capitalizes the first letter of every word.
20. Get Real-Time Word Counts
When your study or work assignments demand a certain word count, keeping an eye out for it is surely a wise decision. You can go to Tools → Word count or click Ctrl/Cmd+Shift+C. However, here’s something better.
Next time you’re viewing the word count, check the box next to ‘Display word count while typing’. Here onwards, you’ll see a small bar on the bottom-left corner with the live word count.
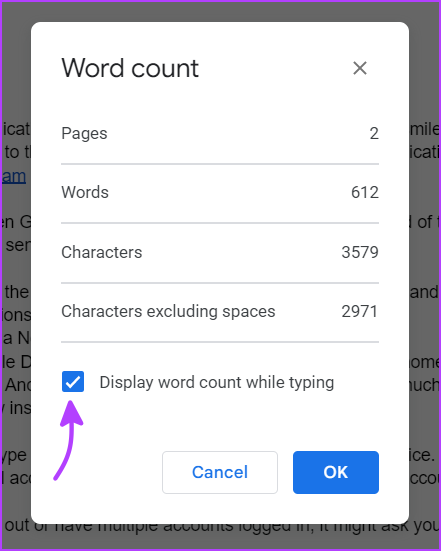

Moreover, if you just select a sentence or a few paragraphs, it will also show you the word count of the selected area.
21. Shift Text Faster With This Shortcut
Select the text you want to move, then press and hold Alt+Shift, and finally, use the arrow keys to move the text up or down.
22. Add Images as Watermarks in Google Docs
When I said you might not need any other app, I truly meant it. Here’s a trick for when you’re planning to make an invitation card, flyers, or an official document with the company seal.
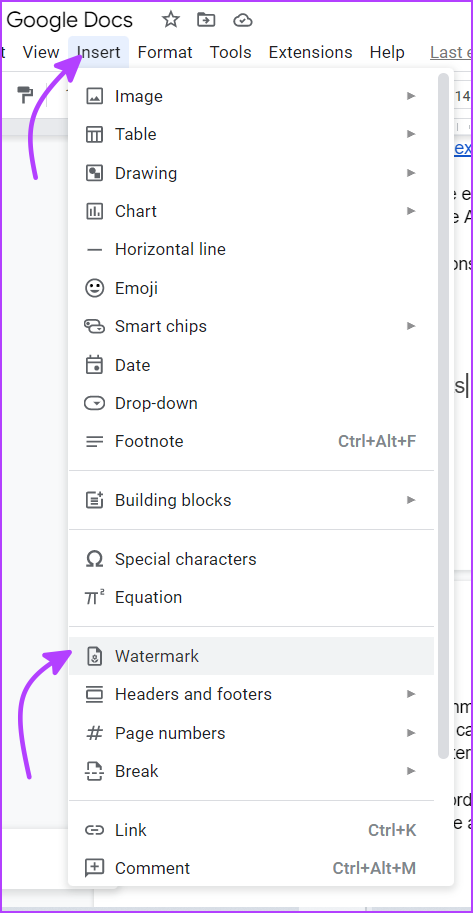
Click Insert → select Watermark → under Image tab, Add image → Done. You can scale the image or click More image options for additional editing options. Furthermore, click the Text tab to add Text.
Tip: Did you know that you can also crop an image into a circle in Google Docs? Check out the hack right now!
Become the Google Docs Pro
Google Docs packs plenty of punch if you know your way around. Sure, some options are not too obvious, and others are still missing, but it still works well if you want a word processor that works everywhere, is free for life and integrates nicely with other Google apps.
Do you have any Google Docs tips and tricks you’ll like to share with us? The comment section is all yours!
Was this helpful?
Last updated on 30 December, 2022
The article above may contain affiliate links which help support Guiding Tech. The content remains unbiased and authentic and will never affect our editorial integrity.


