1. Use Gestures for Fun Effects and Reactions
Making a heart shape with your hand triggers flying hearts, a thumbs-up displays a thumbs-up icon, a peace sign with one hand brings up floating balloons, a peace sign with two hands results in confetti, and so on.

Image Source: Apple
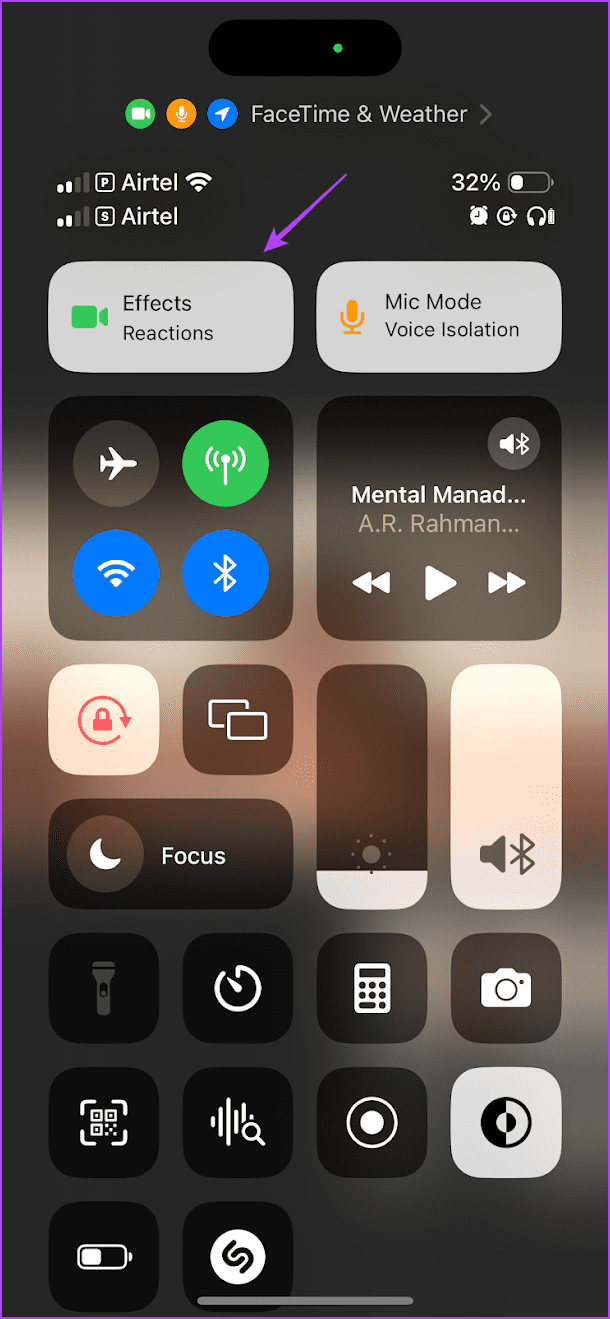
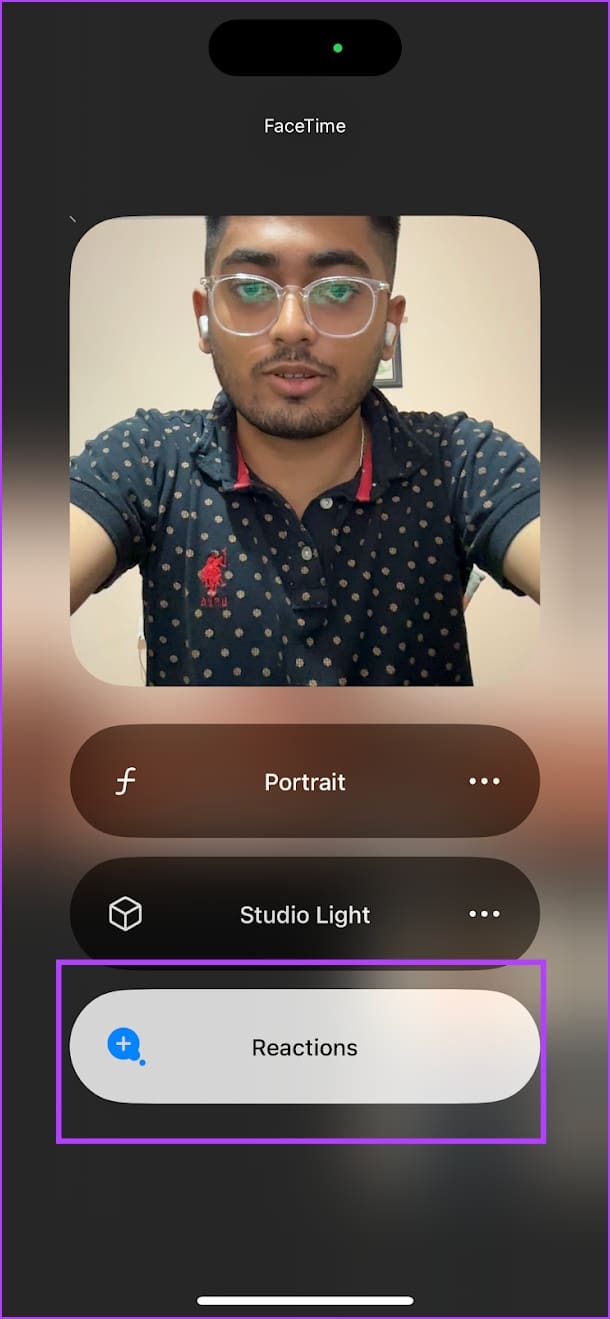
As soon as you make the gesture with your hand the reaction should appear. If not, open the Control Center, tap on the Effects icon, and ensure you’ve enabled Reactions.
If you’re facing any problems, check out these fixes for FaceTime reactions not working.
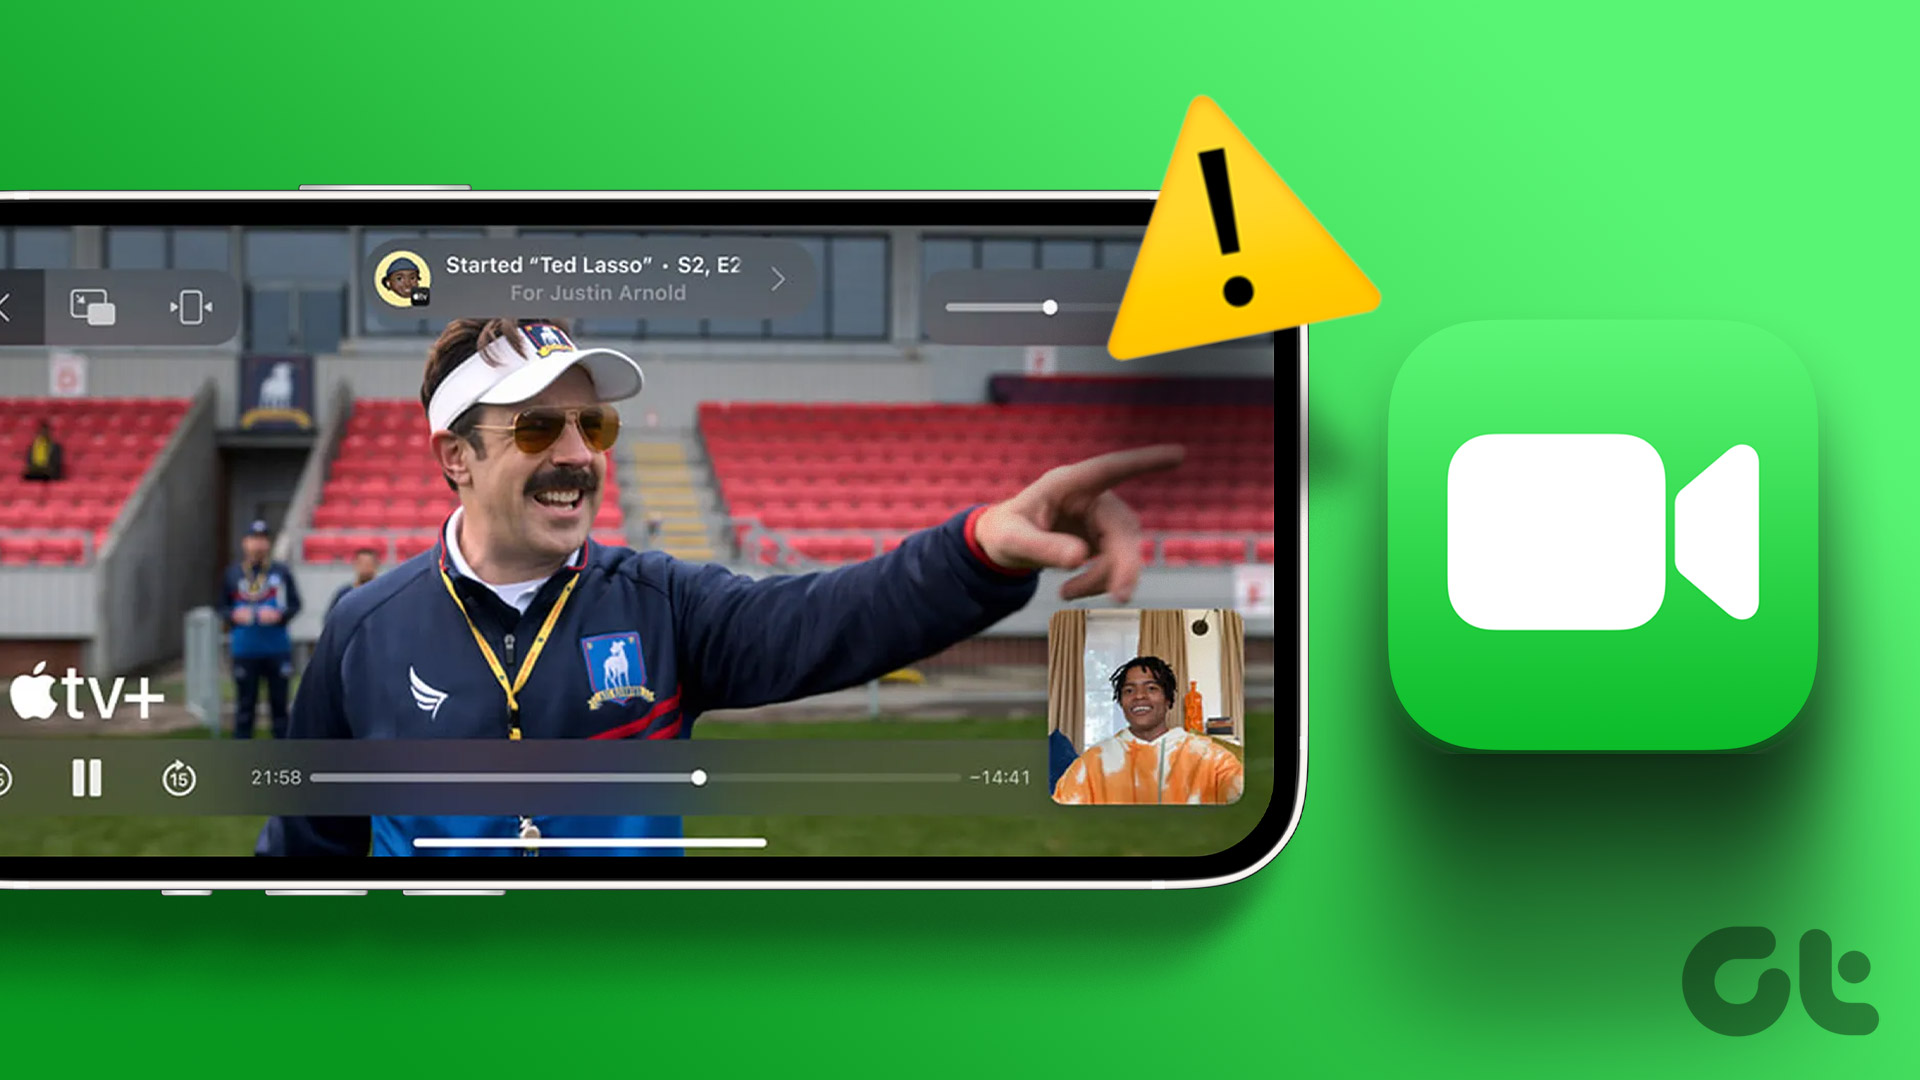
2. Use Handoff: Seamlessly Switch FaceTime to Mac
You can switch the FaceTime call from your iPhone and continue on your Mac and vice versa. Simply tap on the notification that lets you switch the FaceTime call over to another device.
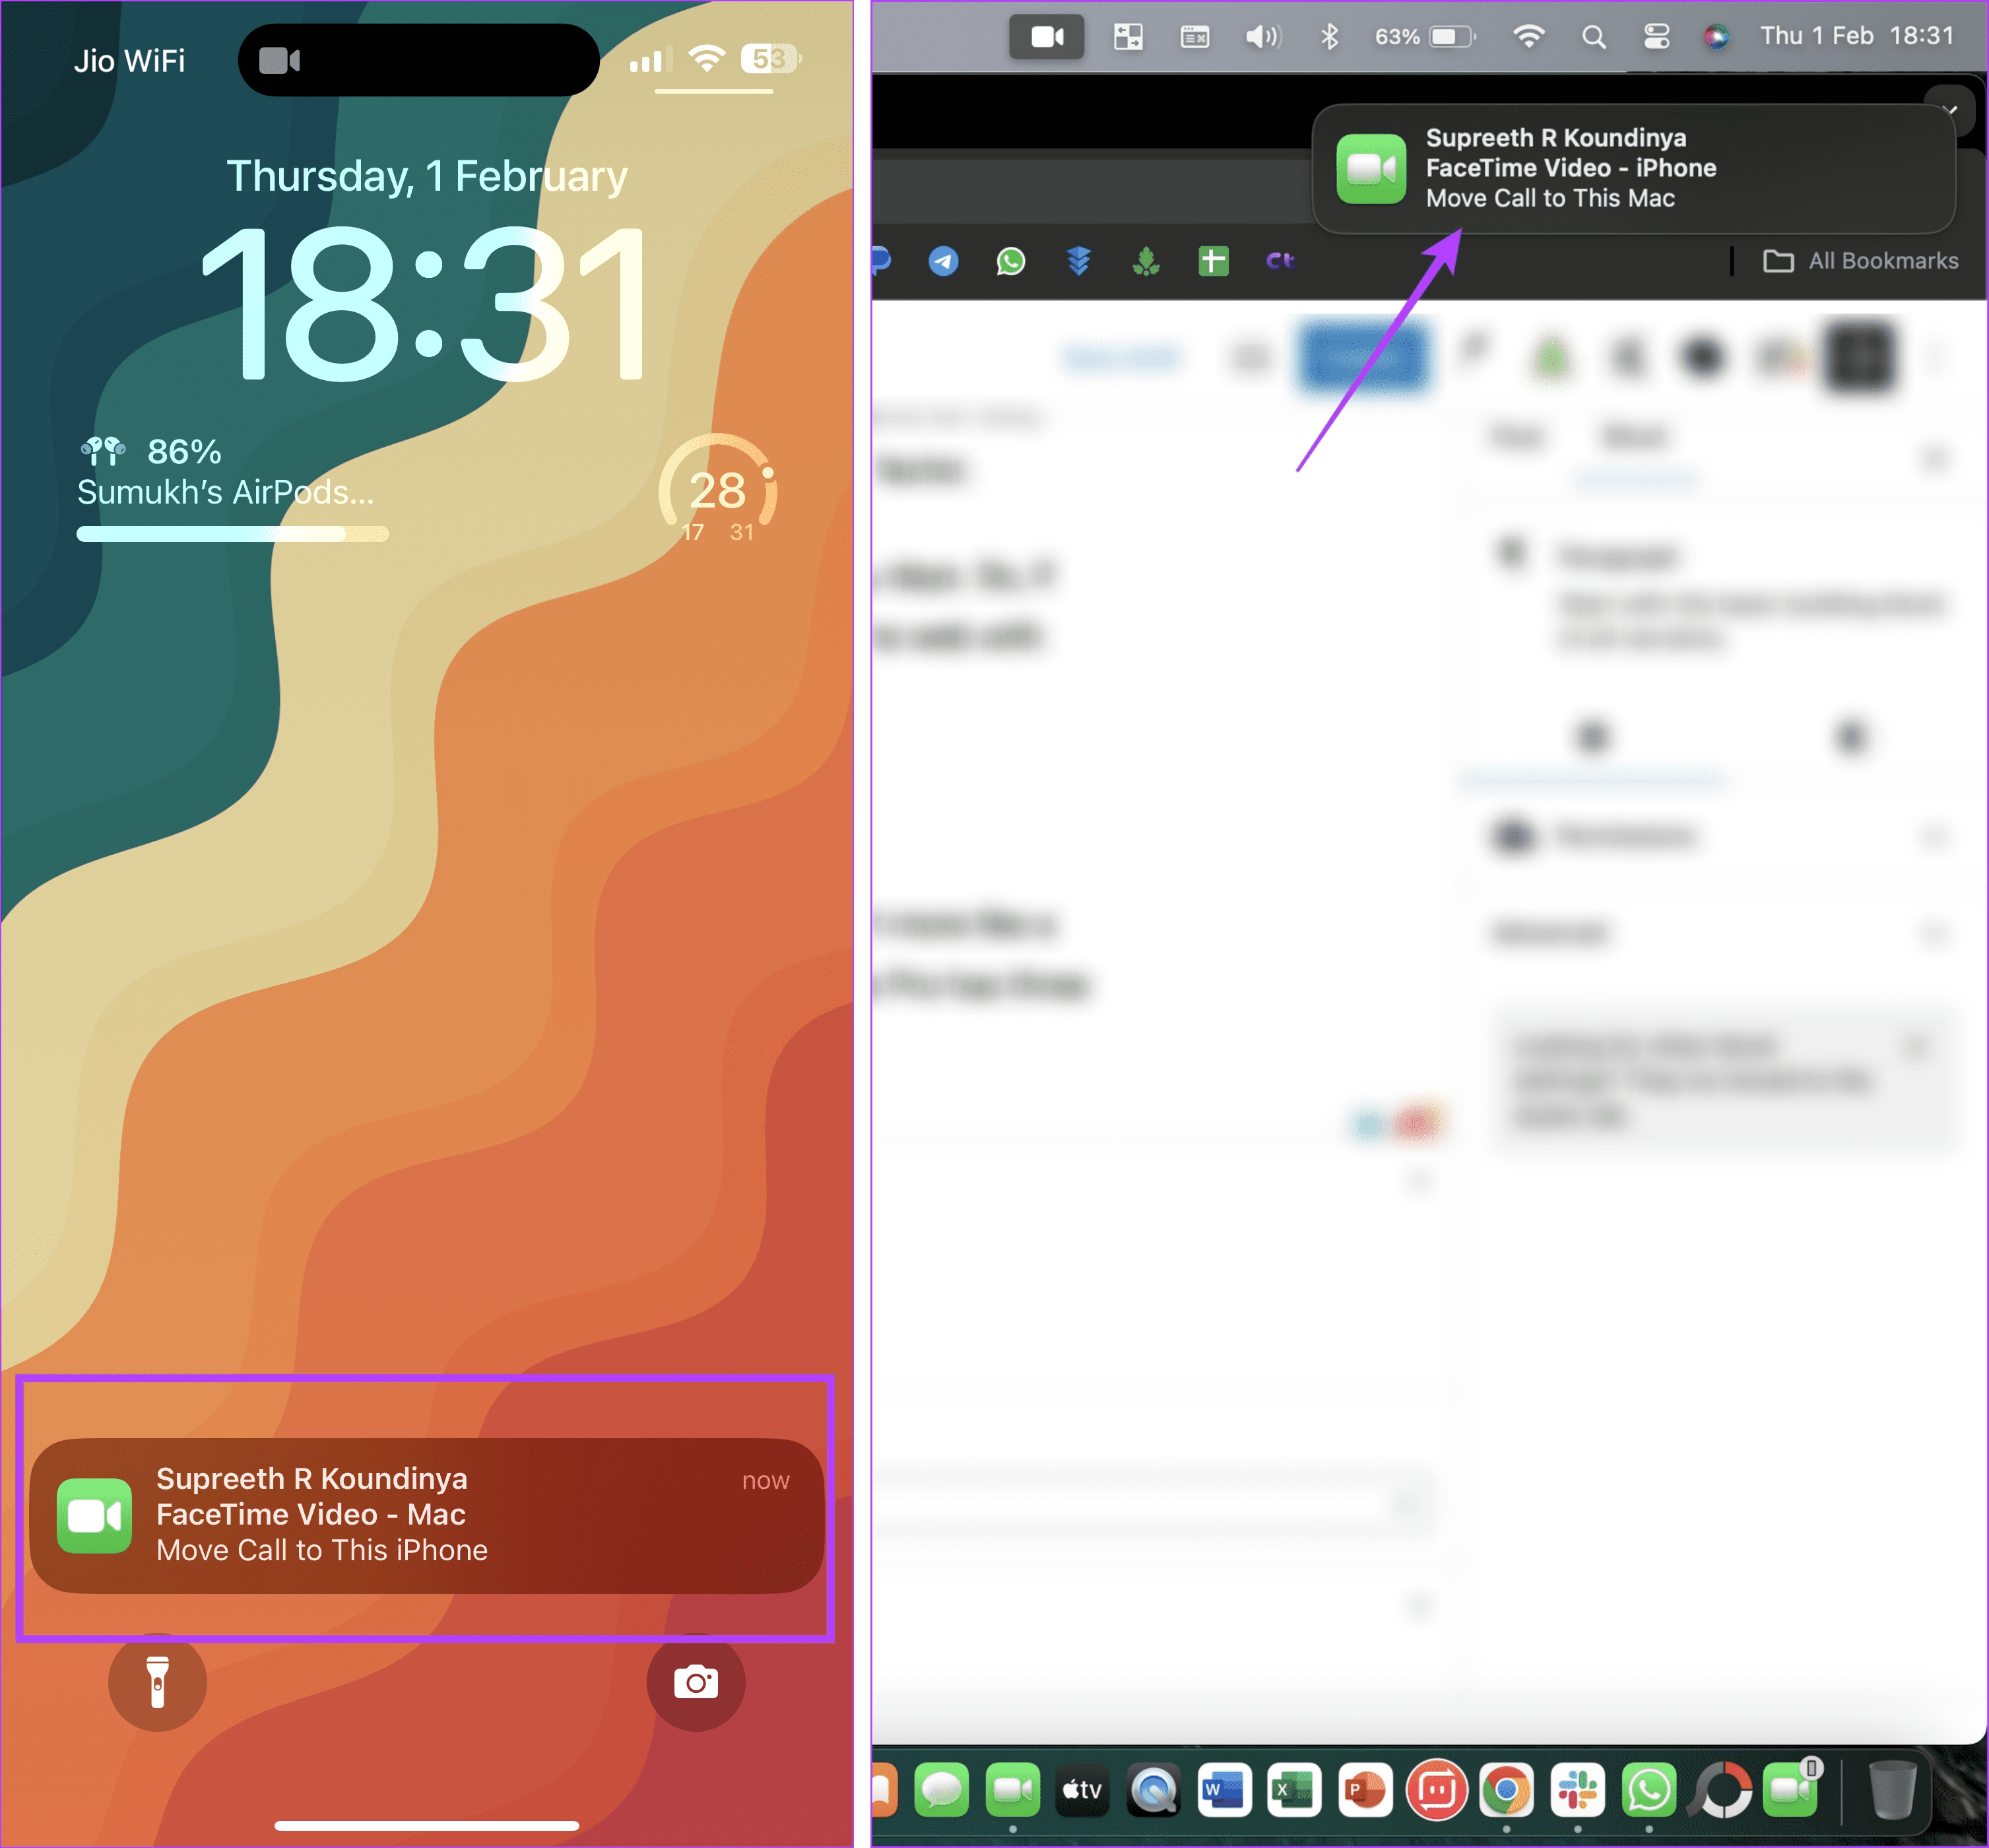
However, if you do not see this option, ensure Handoff is enabled in Settings. Open Settings > go to General > select AirPlay & Handoff. Ensure you turn on the toggle for Handoff.
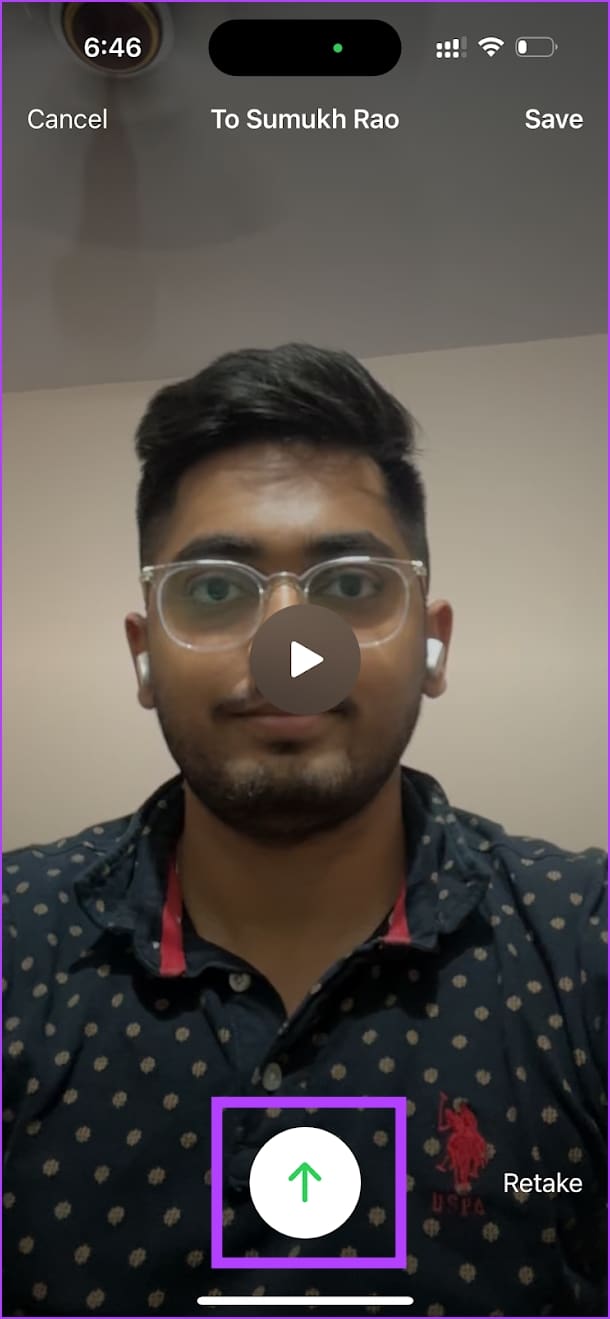
3. Leave a Video Message if Your Call Isn’t Picked Up
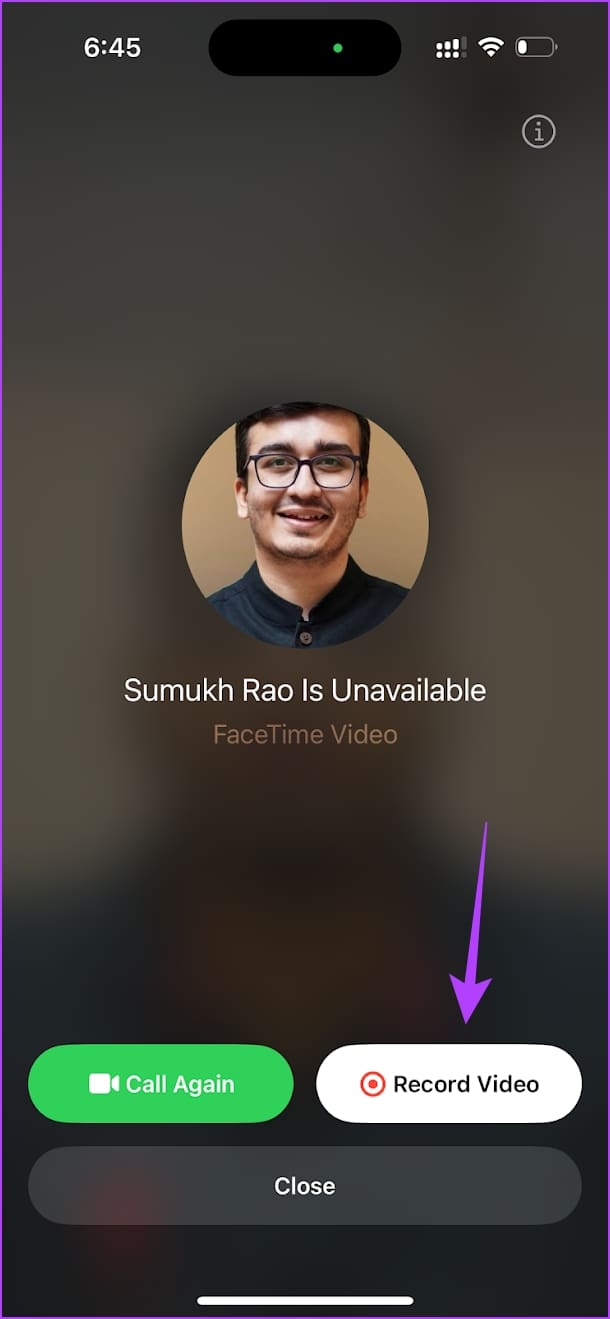
If your friend does not pick up your FaceTime call, you can leave a video message on FaceTime. Think of it as a voicemail for FaceTime but with a video.
Once your FaceTime call stops ringing, and your friend does not pick it up – you will see an option called Record Video. This lets you record a video message, and once you finish recording it, tap on the send button. This message will now reach your friend.
4. Enable Live Captions: Subtitles on FaceTime
Live Captions on FaceTime enables subtitles for your video call. Here’s how to enable it.
Tap on the i (info) button at the top right corner of your FaceTime call and turn on the toggle for Live Captions. You will now see captions for your FaceTime call.
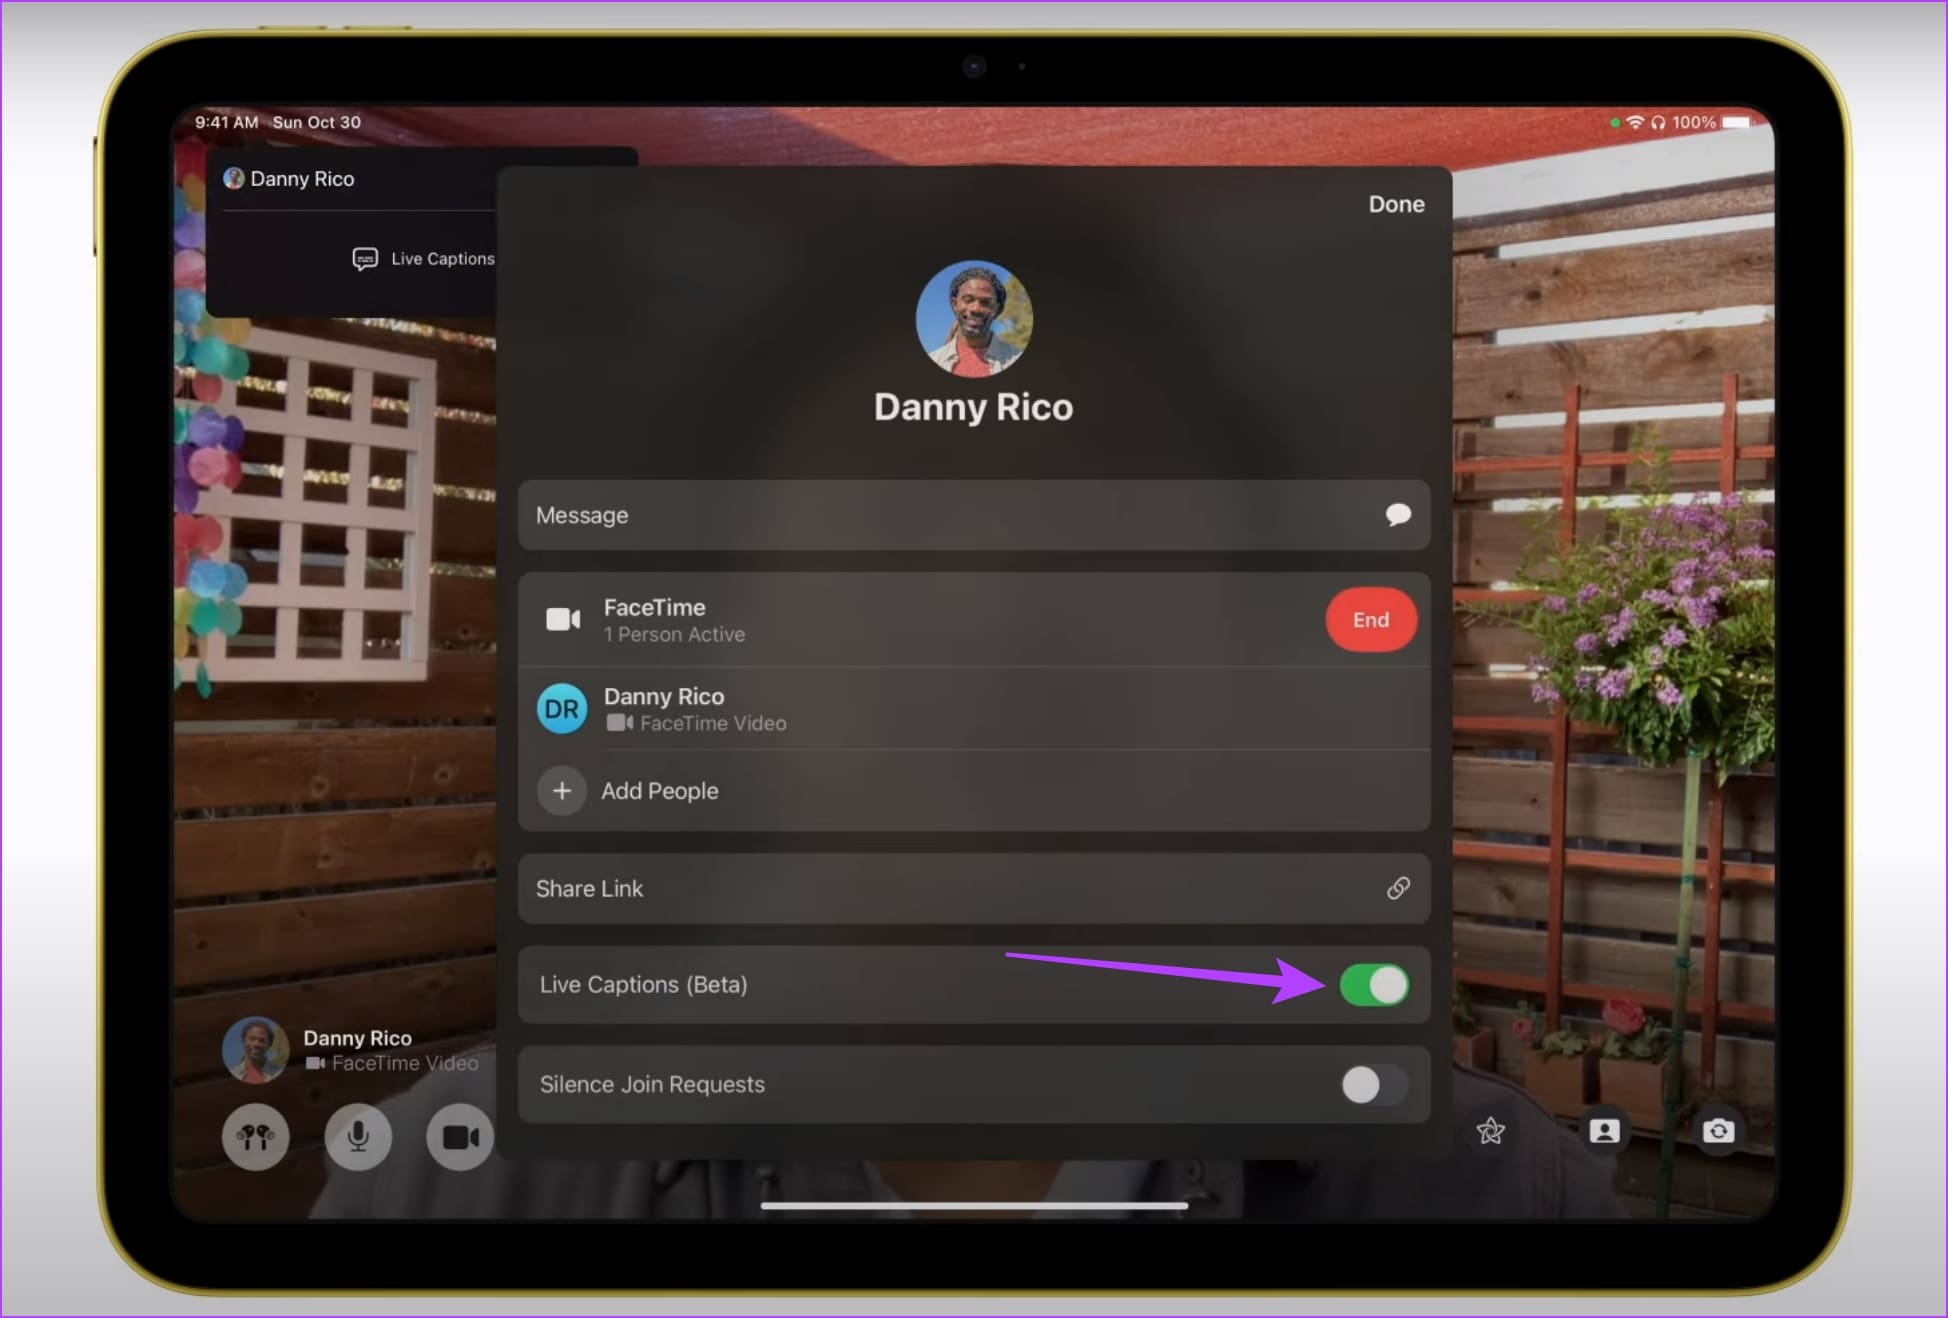
Image Source: Apple
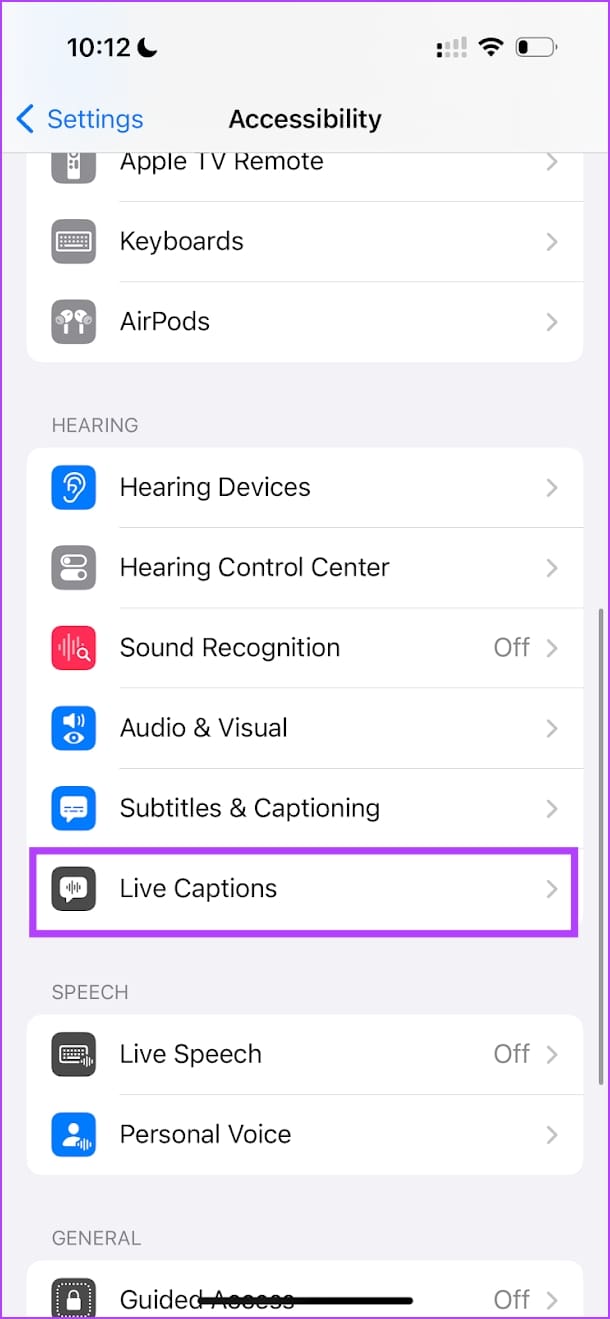
However, this feature is region-dependent and is only available in the US and Canada. If you do not see this, enable Live Captions on your iPhone, which essentially transcribes all the output audio from your device. Here’s how.
Step 1: Open the Settings app and go to General > Accessibility.
Step 2: Turn on the toggle for Live Captions under the Hearing menu.
You can now see Live Captions on your FaceTime calls.

5. Use Apps Together With SharePlay
You can now use apps together on FaceTime – play games, listen to music, watch videos and movies, and have loads of fun!
Tap on the Share icon, select an app from the list, and start watching content, or using the app together. You can also collaborate and work together using several built-in apps on your iPhone.

6. Enable Eye Contact for FaceTime
Apple added a feature with iOS 14 that alters the position of your eye to make it appear that you’re maintaining contact with the other person. This has to be one of the coolest FaceTime hacks for your iPhone.
Go to the Settings app > FaceTime and turn on the toggle for Eye Contact.
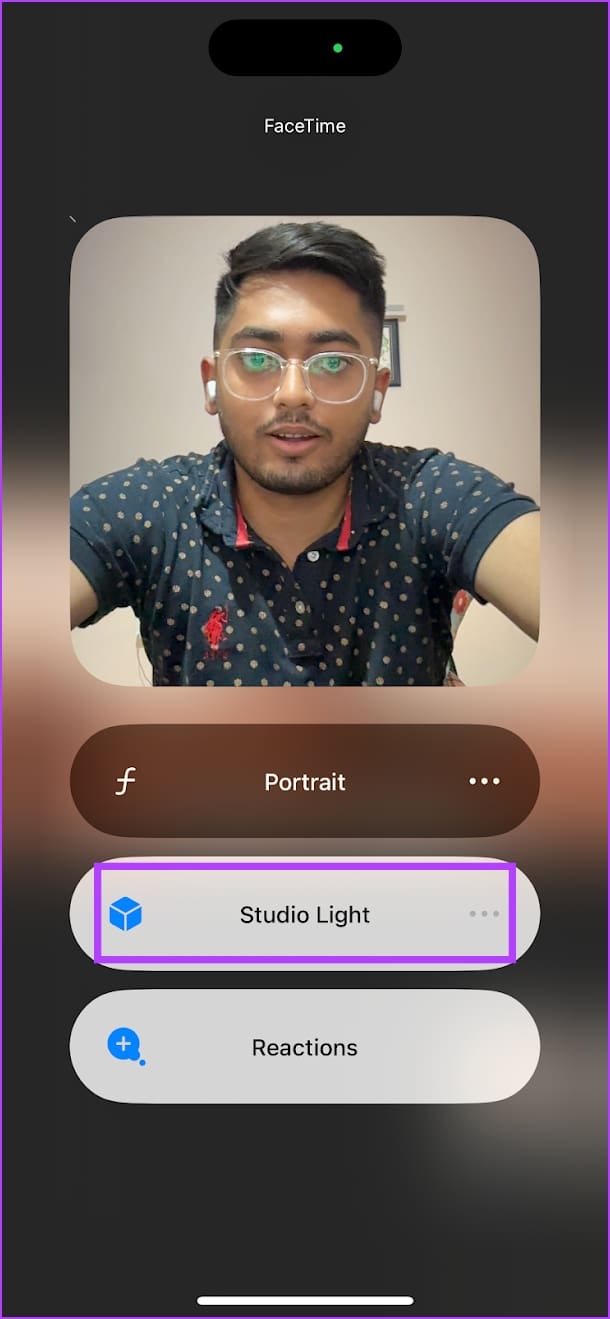
7. Enable Studio Light and Enhance Your Video
Are you stuck with poor lighting or a dull environment? Enable Studio Light to illuminate your face and enhance the video quality on your FaceTime calls.
Open the Control Center while on your FaceTime call, tap on Effects, and turn on Studio Light.

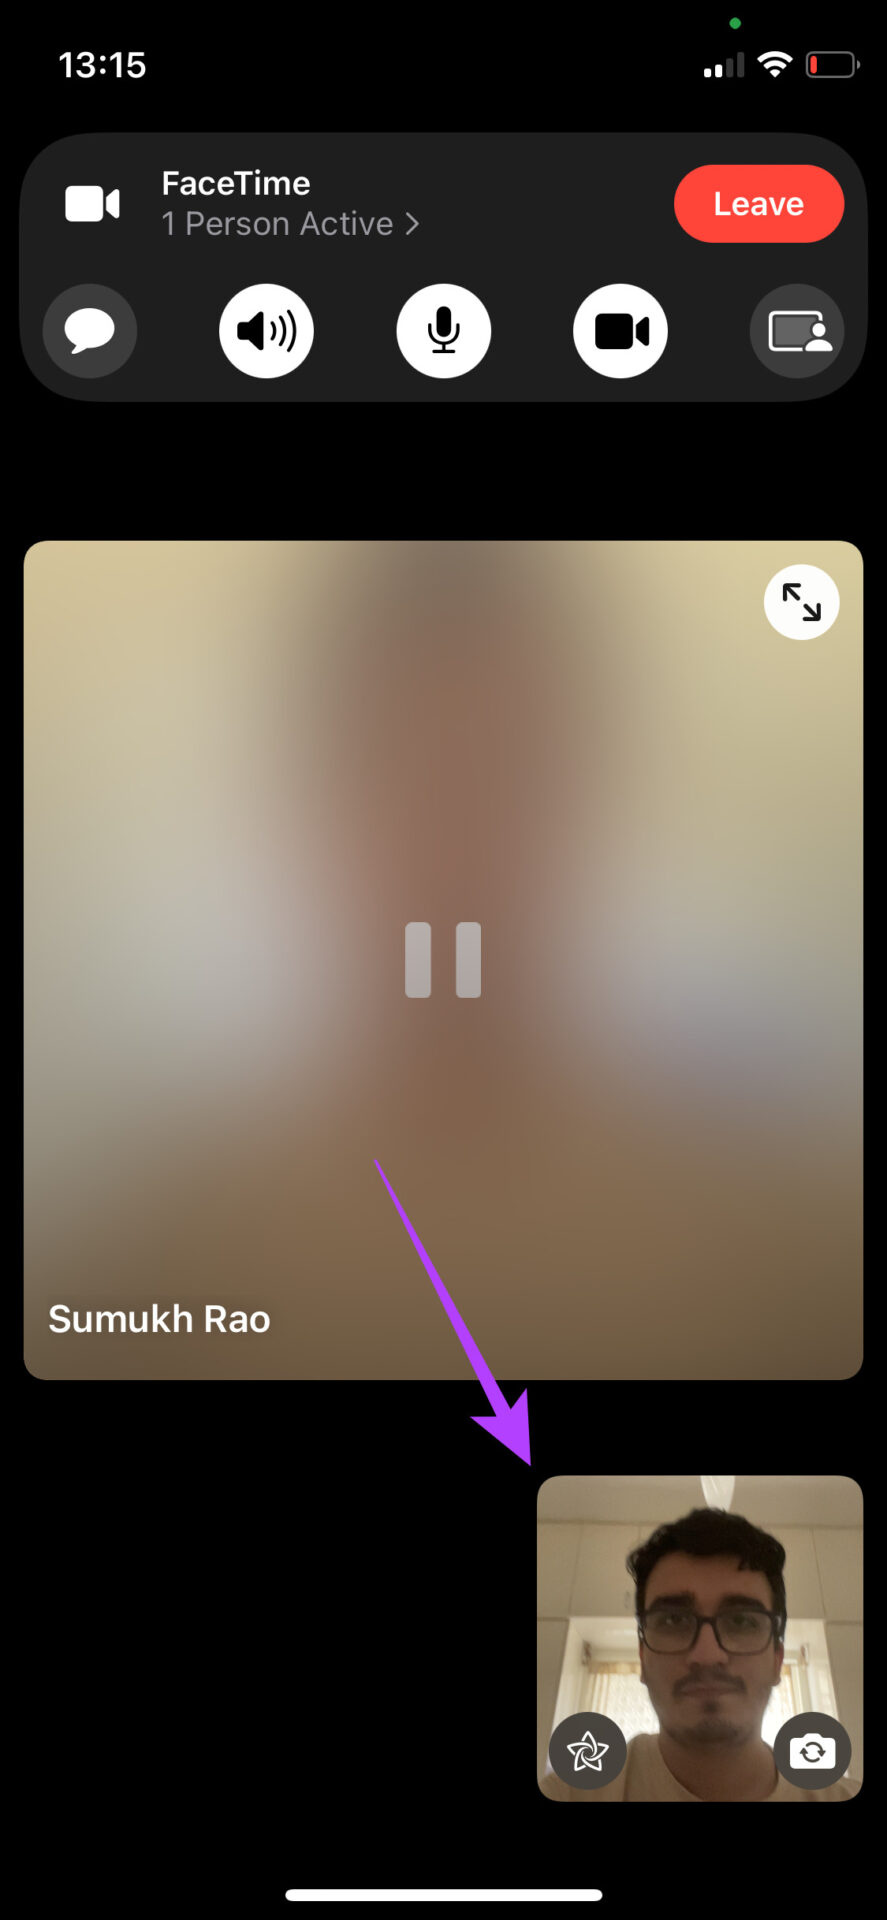
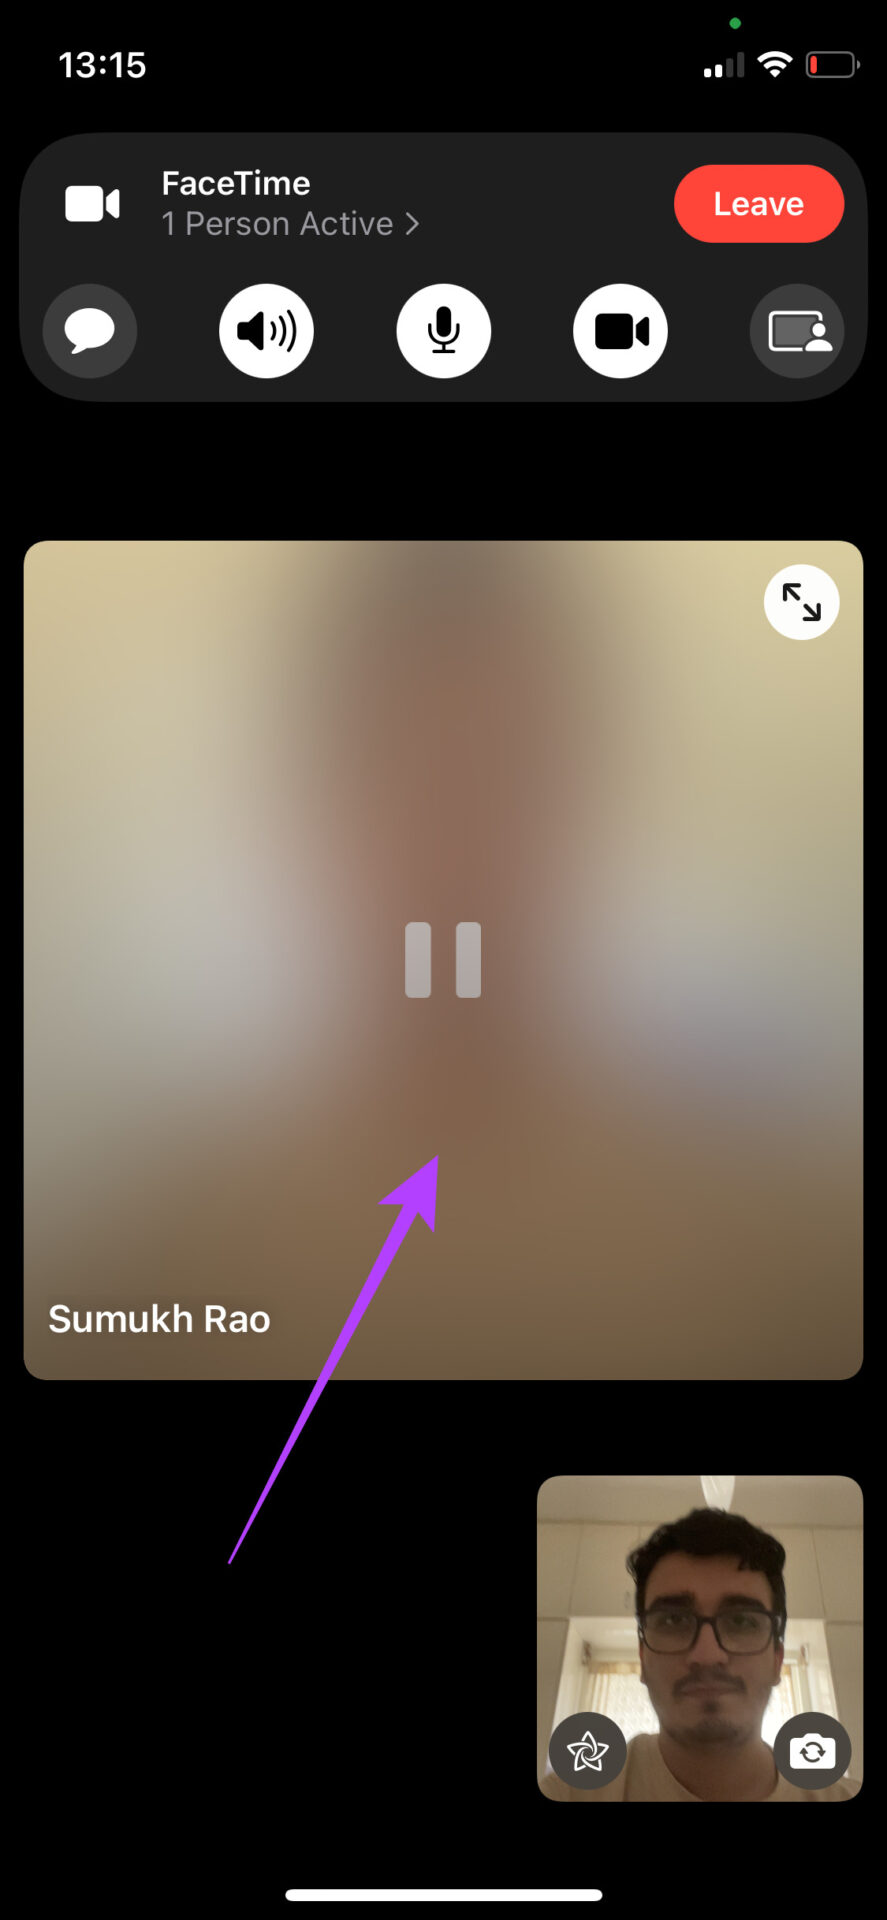
8. Portrait Mode for Background Blur
You can blur your background to avoid distractions from what’s happening behind you while on a FaceTime video call.
Step 1: While on a call, tap on your video preview to enlarge it.
Step 2: Tap on the toggle at the top-left corner of the preview.
This will enable portrait mode and blur your background. To disable portrait mode, tap on the same toggle once again.

9. Block Background Noise With Mic Modes
You can toggle between different mic modes on a FaceTime call to eliminate background noise to a certain extent or amplify it if needed.
Step 1: With a FaceTime call running, access Control Center by swiping down from the top-left corner on iPhones with Face ID and swiping up on iPhones with a physical home button.
Step 2: Tap and hold the Mic Mode toggle in Control Center. Choose the relevant mode.
- Standard is the default mode, which doesn’t change how the other party hears you.
- Voice Isolation will cut down the background noise while emphasizing your voice.
- Wide Spectrum will let through the sounds in the background, so if you’re in a conference or a concert, it’ll pick up the sound from far away.


Also Read: How to fix Voice Isolation not working in FaceTime
10. Capture Photos During a FaceTime Call
You can capture whatever you see on the viewfinder for future reference. Every time you capture a photo during a call, the other party is notified.
Step 1: During a call, tap on the video feed of the opposite party.
Step 2: Tap on the small capture button at the bottom-right corner.
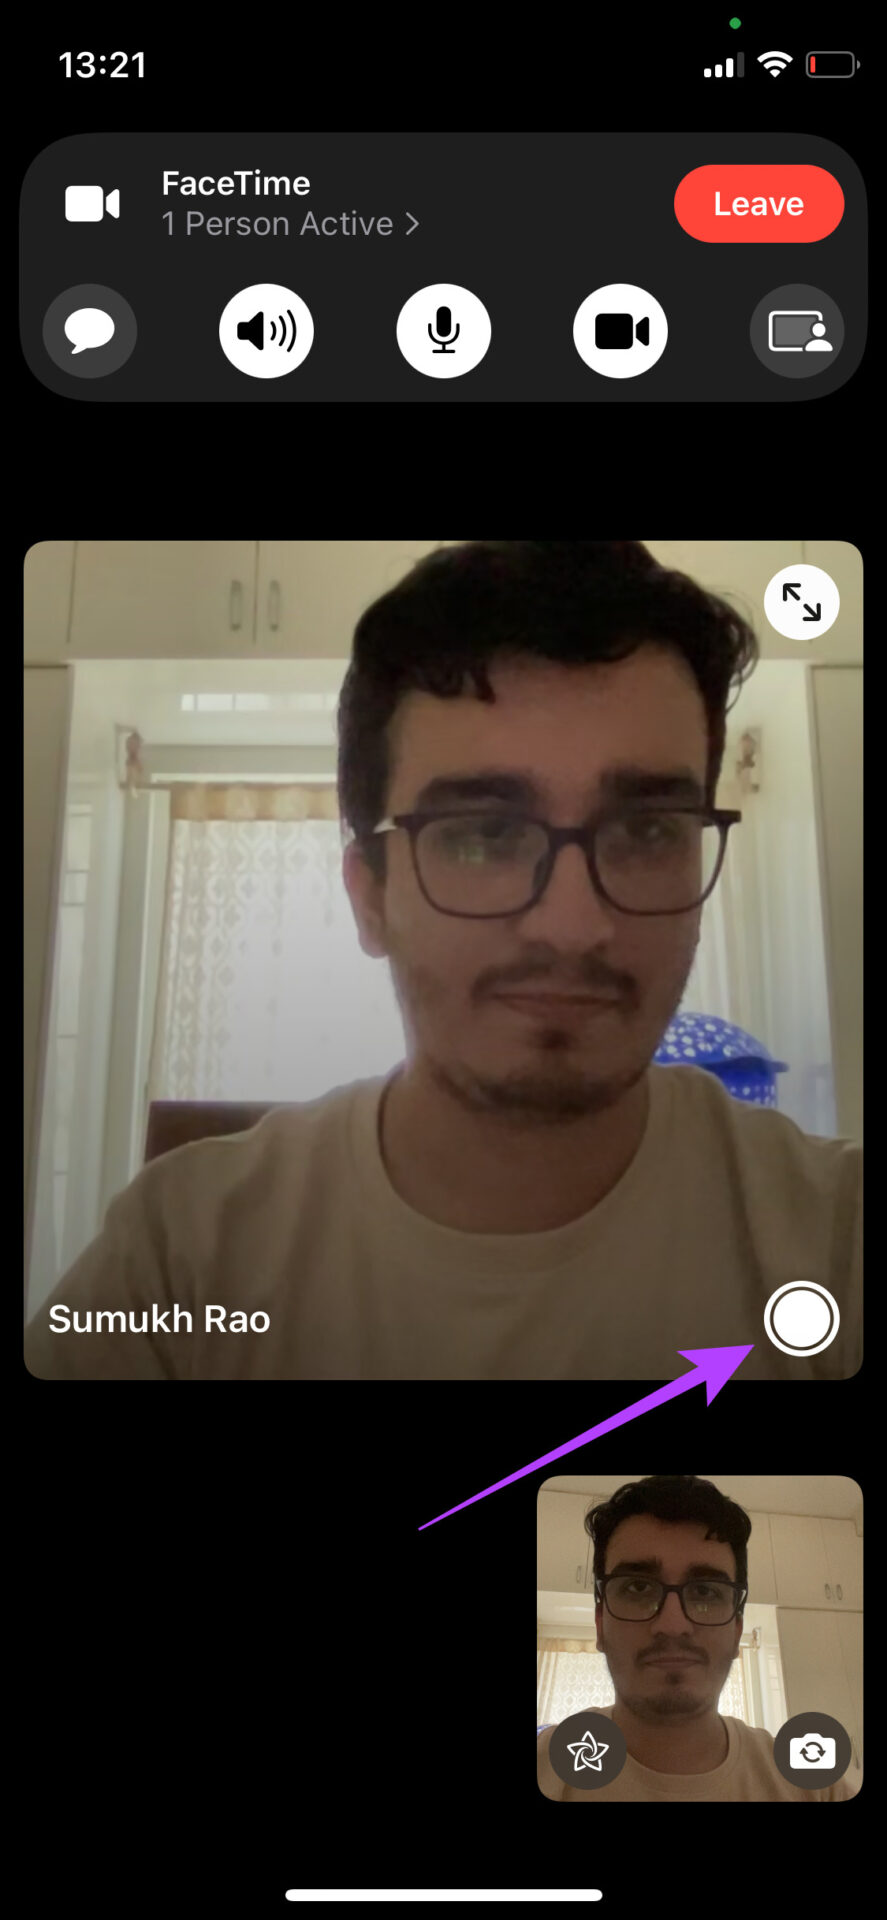
Your iPhone or iPad will capture the picture and save it in the Photos app.
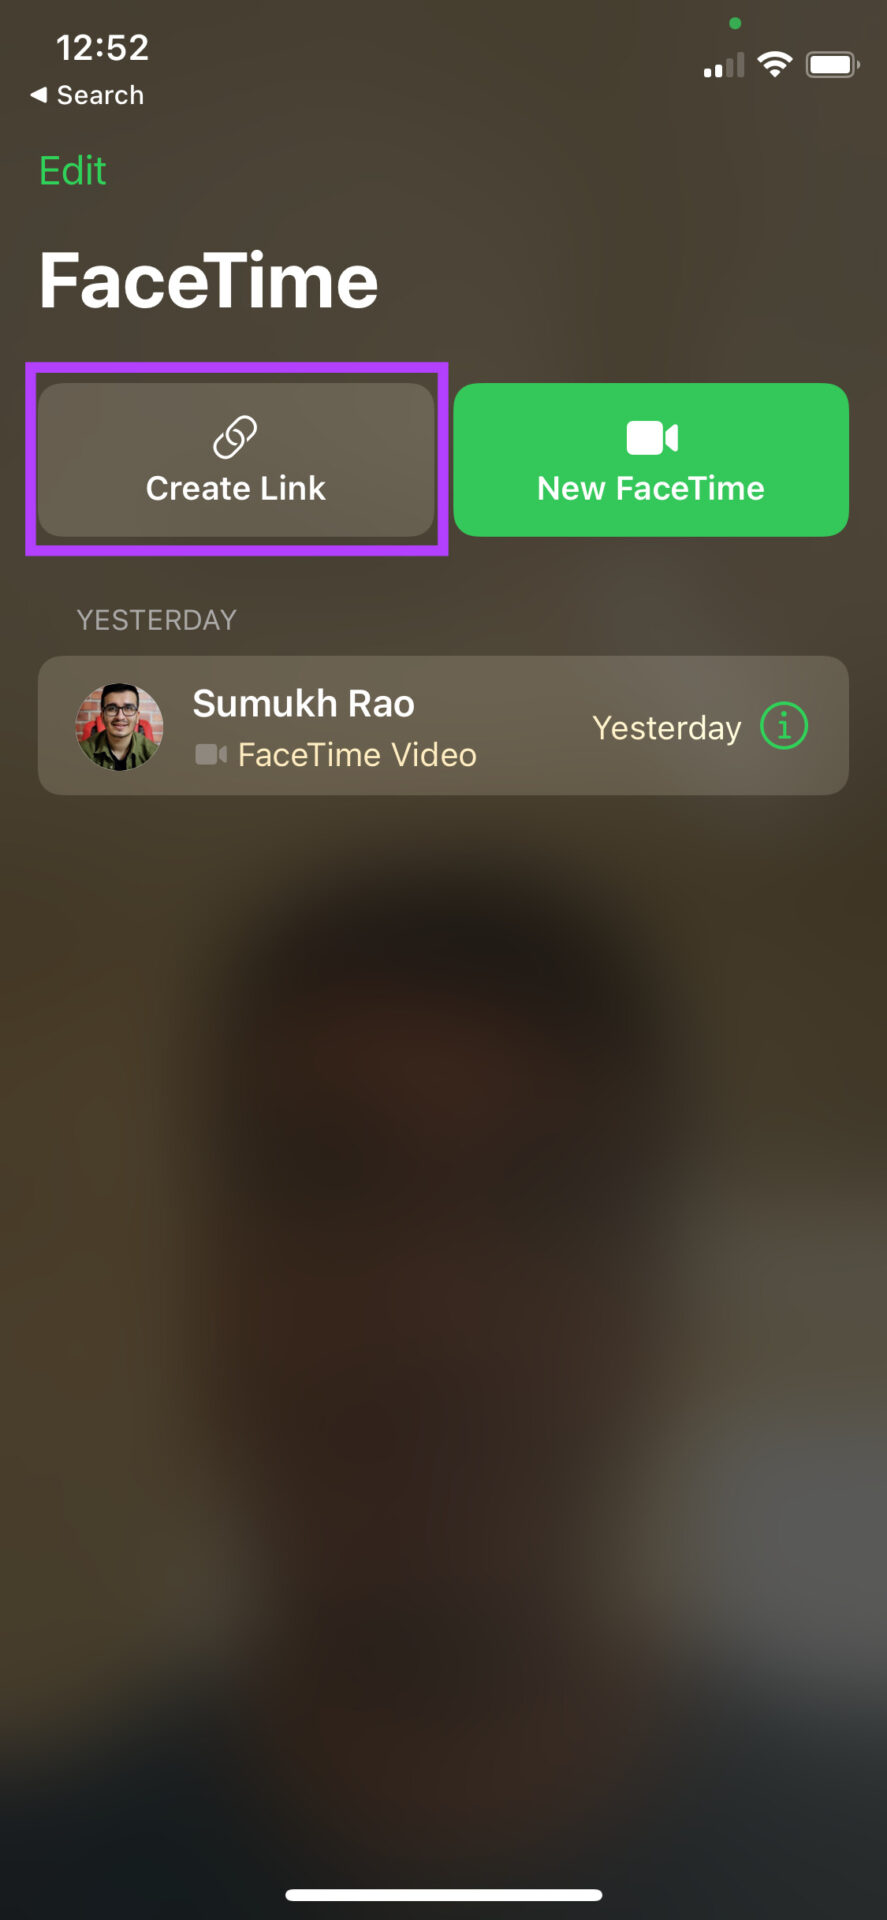
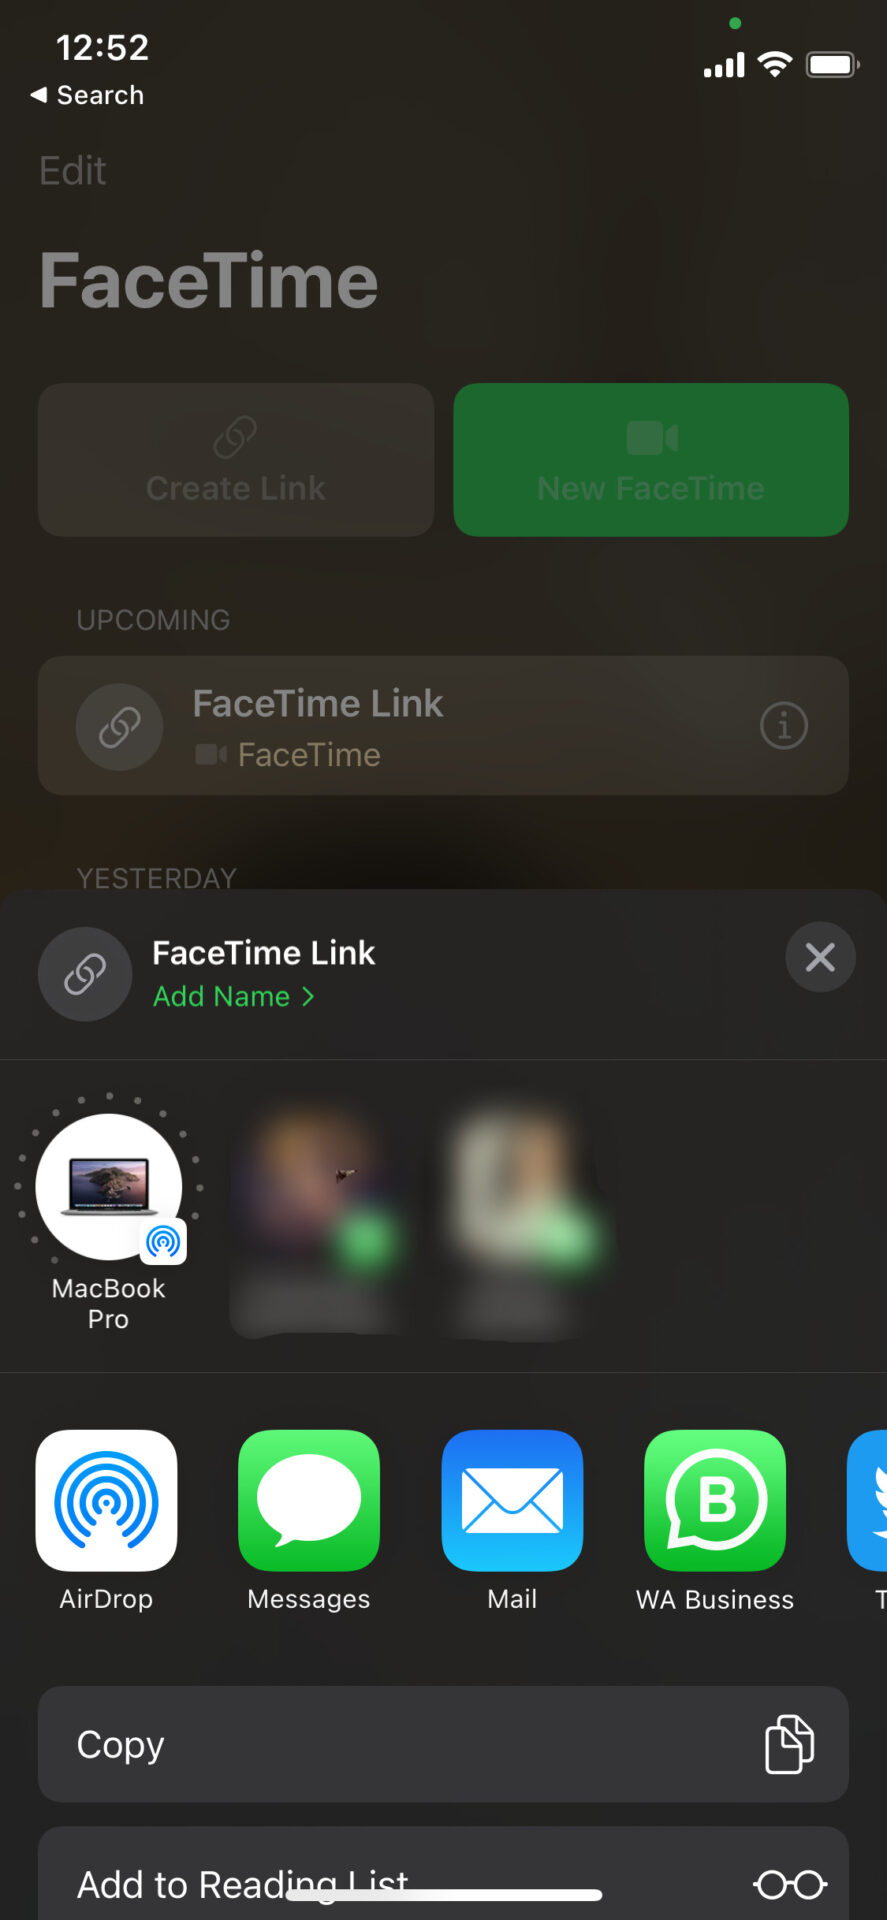
11. Create a FaceTime Call With Android and Windows Users
You can now share a link with Android and Windows users and ask them to join a FaceTime call. You will still need an iPhone, iPad, or Mac to generate the link.
Step 1: Open the FaceTime app on your iPhone and tap on the Create Link option.
Step 2: You can copy the link to paste it elsewhere or share it with a contact directly from the Share Sheet.
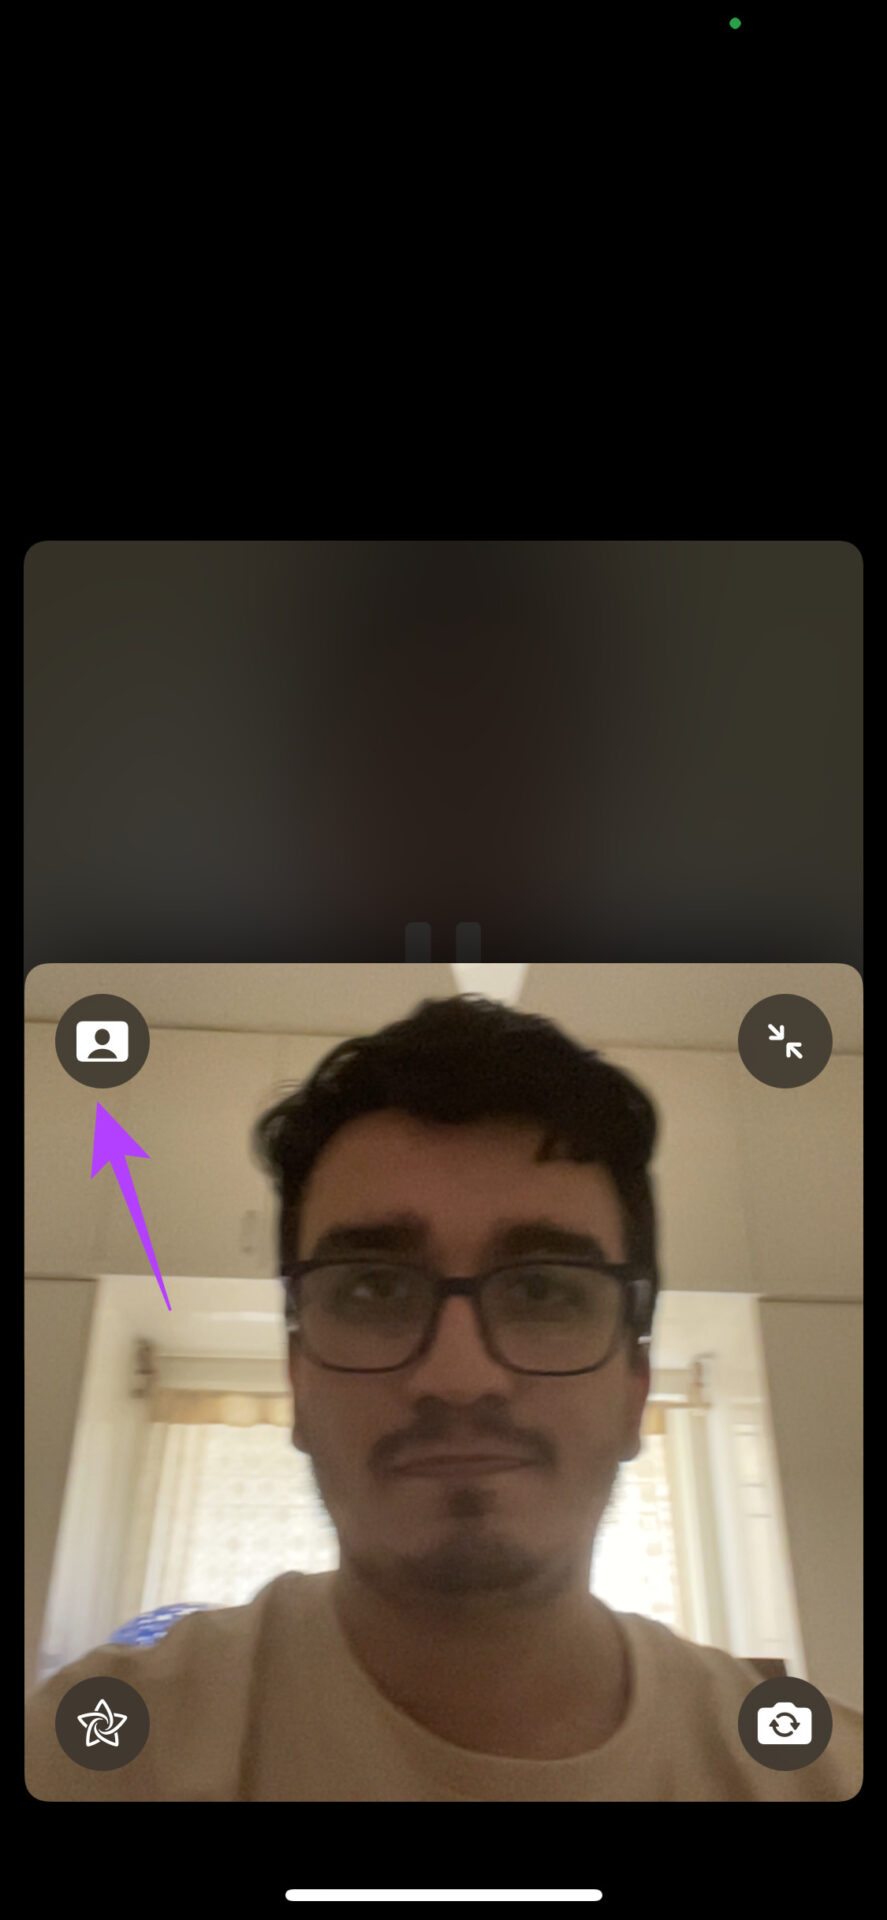
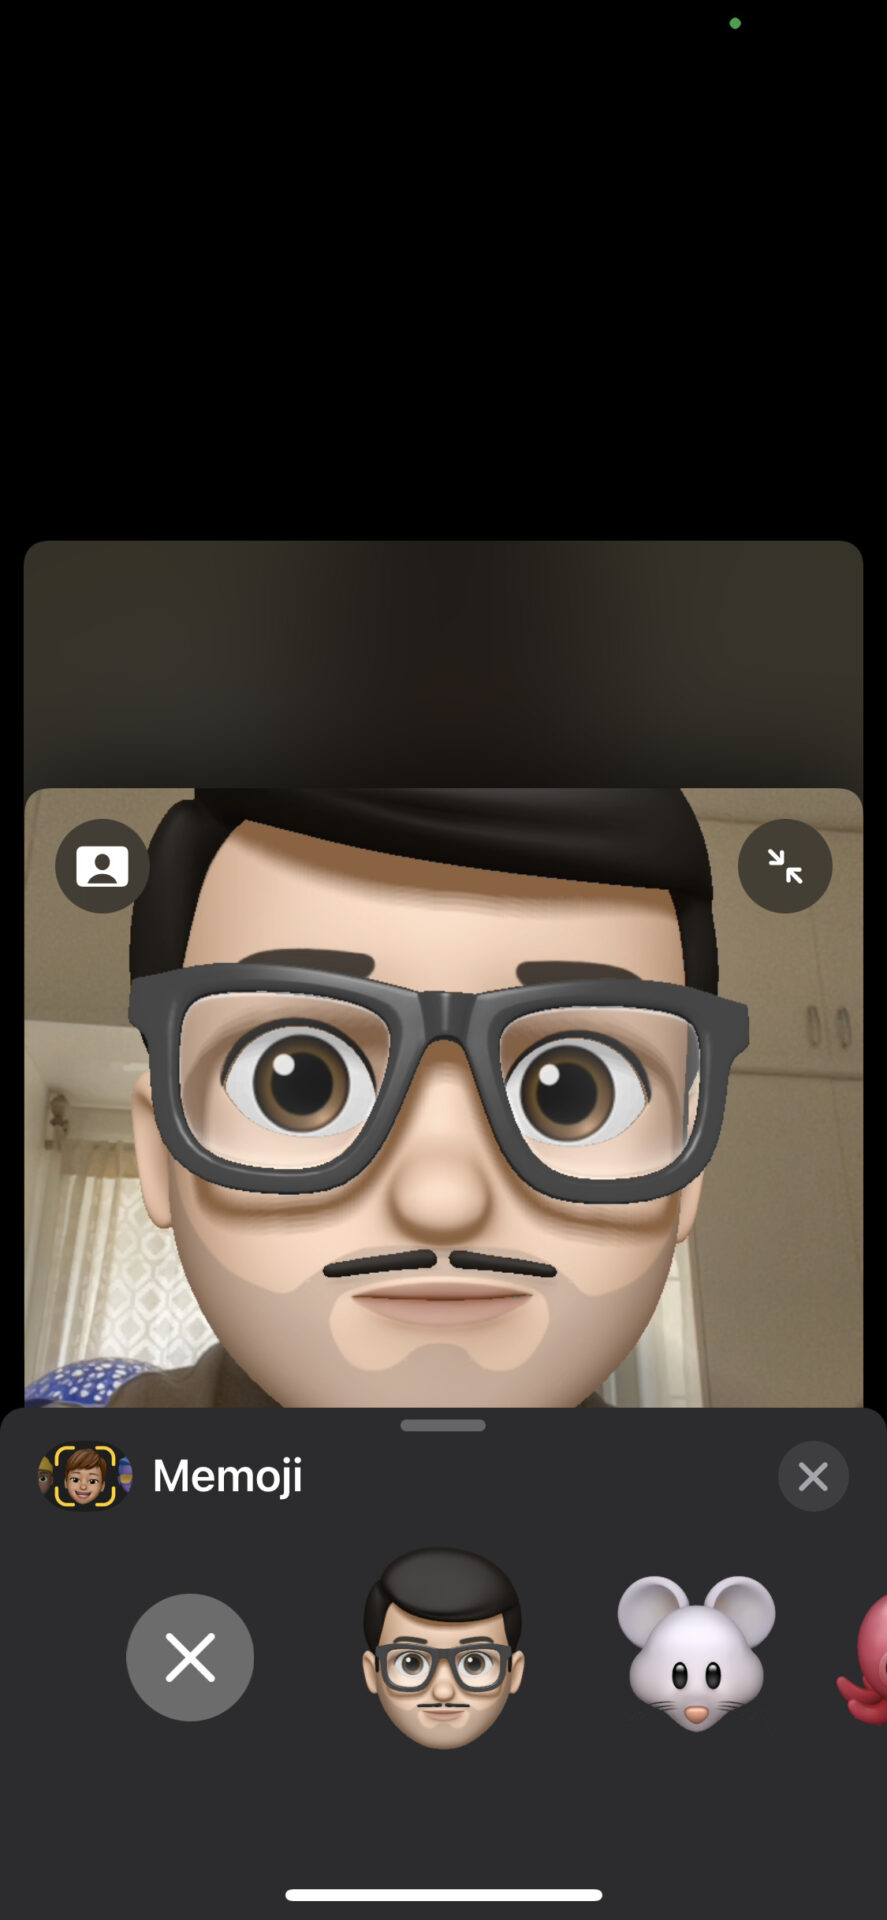
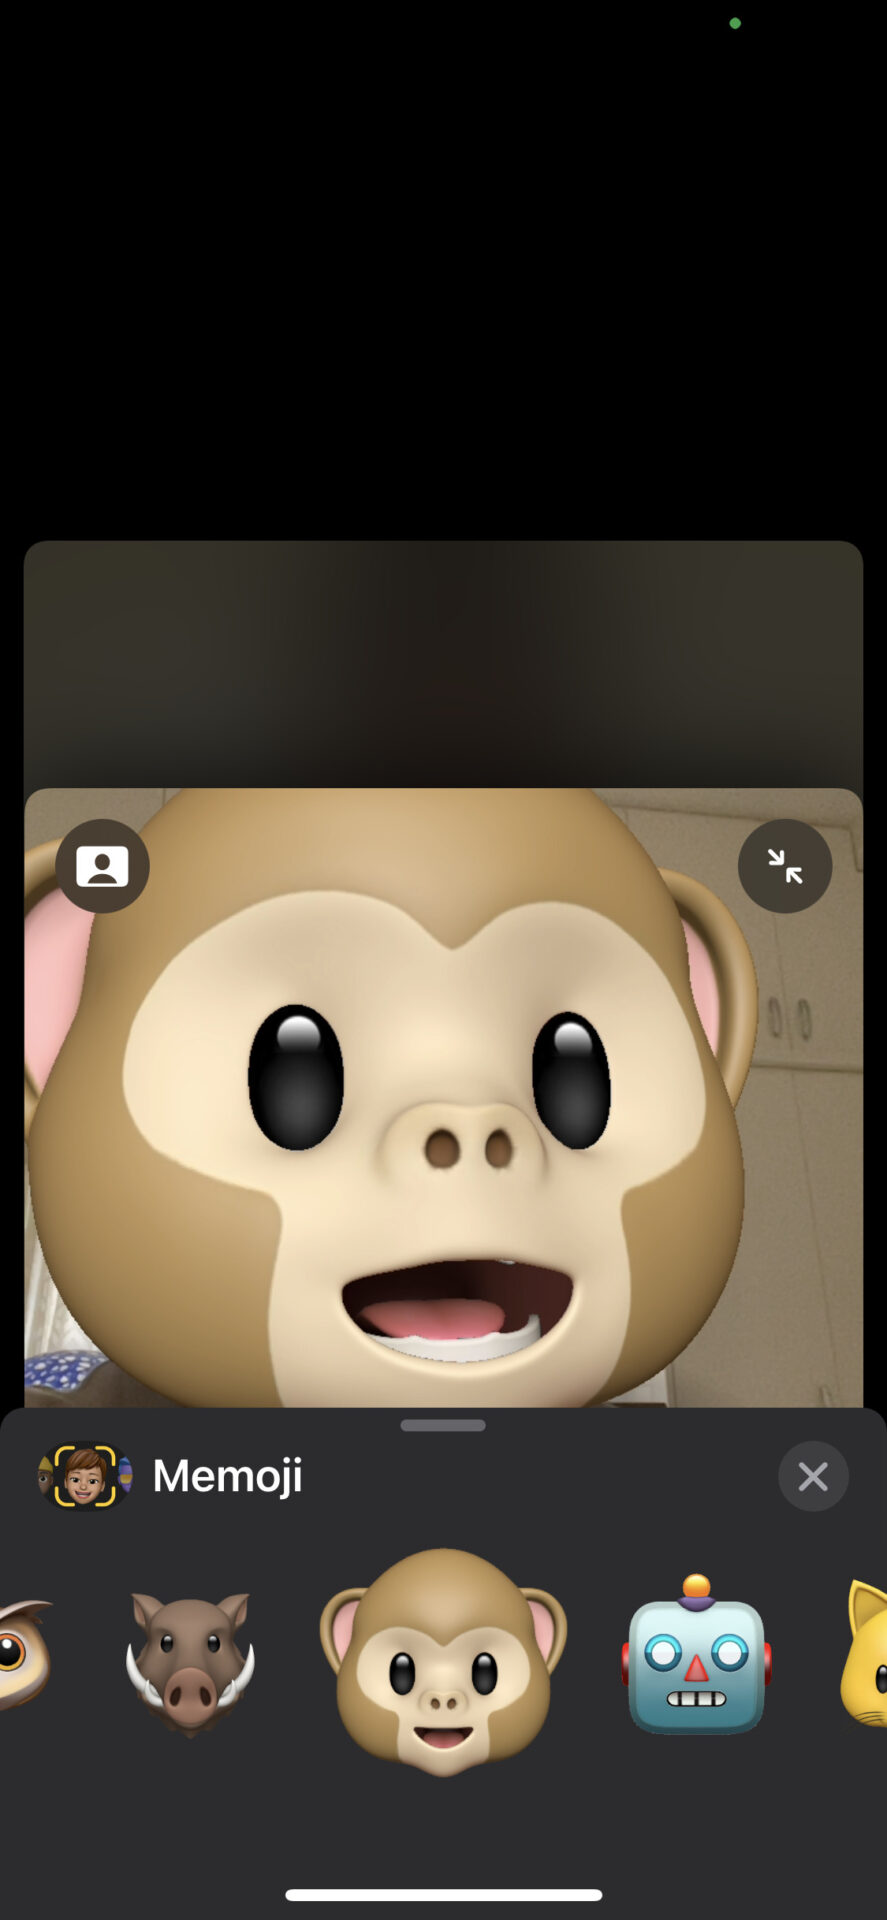
12. Replace Your Face With Memojis
You can use memojis and animojis during a FaceTime call as a mask on your face.
Step 1: While on a call, tap on your video preview to enlarge it.
Step 2: Tap on the toggle at the bottom-left corner of the preview. This will enable effects. Select the first option at the bottom to enable memojis and animojis.


Step 3: Scroll through the options, tap on one to use it, and replace your face in the preview.
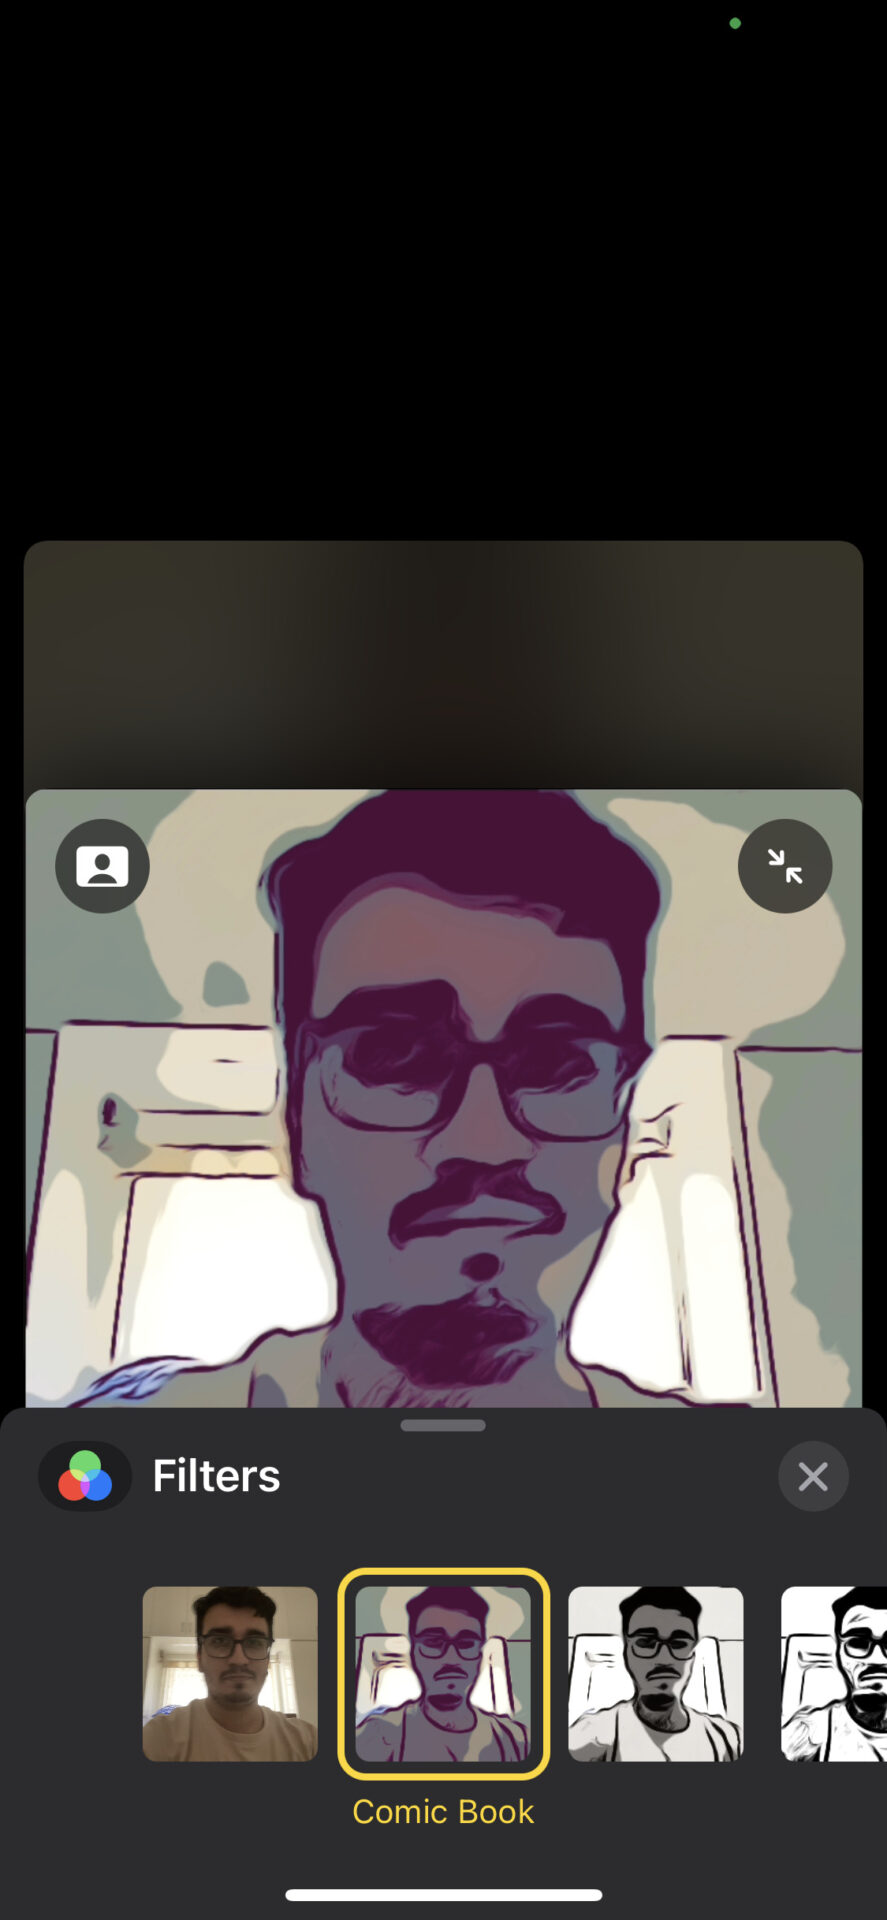
13. Use Filters for a Distinct Look
You’ve probably used filters in social media apps like Instagram and Snapchat to add flair to your photos or play around with colors and hues. You can do the same on a FaceTime call.
Step 1: While on a call, tap on your video preview to enlarge it.
Step 2: Tap on the toggle at the bottom-left corner of the preview. This will enable effects. Select the second option at the bottom to enable filters.
Step 3: Scroll through the options and tap on one to use it. The change will be visible in the preview window.

14. Add Floating Text to Your Video
If you want to convey a message or constantly display your name on a Group FaceTime call, use a floating text bubble or banner that will stay persistent in your video.
Step 1: While on a call, tap on your video preview to enlarge it.
Step 2: Tap on the toggle at the bottom-left corner of the preview. This will enable effects. Select the third option at the bottom to add text.
Step 3: Choose from the wide array of styles for your text. You can add a chat bubble, a banner, or an emoji. Enter the text you want to add.
Step 4: As long as your face is visible in the video, the text will float next to it. You can drag and drop the text anywhere in the video to change its position.


You can also examine a few other effects, such as sharing activity rings on the screen or adding stickers.
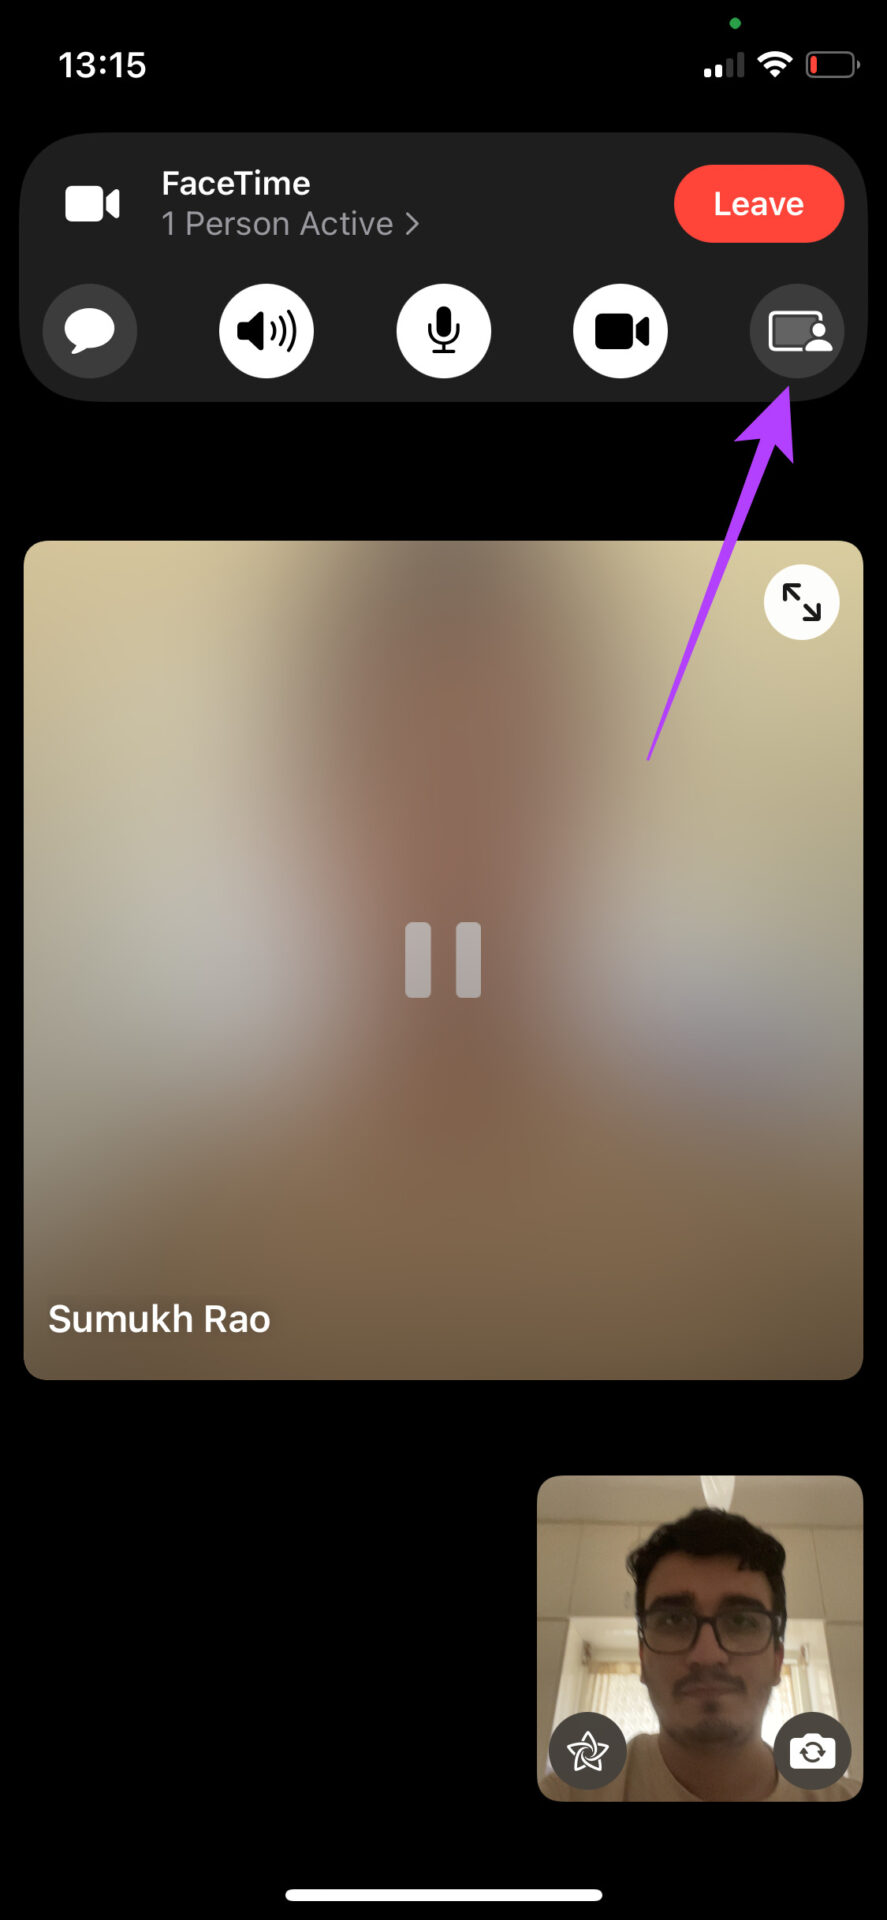
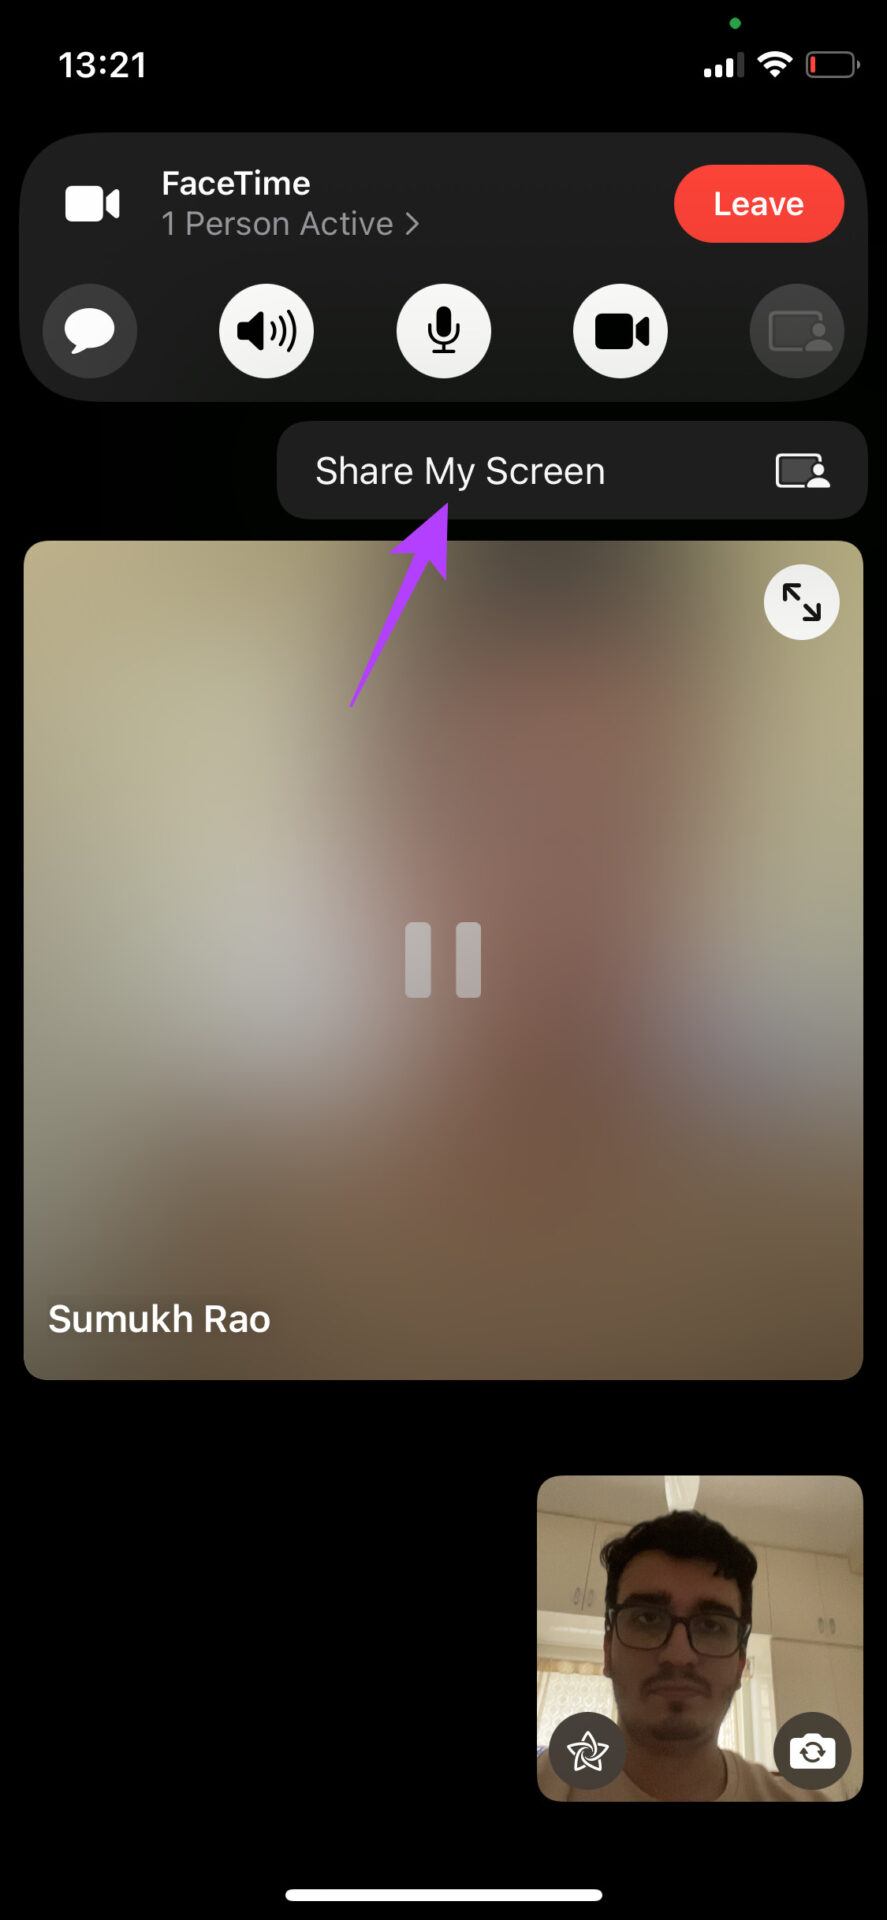
15. Share Your Screen on FaceTime
You share your screen with the participants to show presentations or enjoy a movie or TV show with friends and family.
Step 1: In the banner at the top of the call screen, tap on the last option.
Step 2: Select the Share My Screen option.
The contents of your screen will now be shared. The purple pill can identify this at the top of the screen around the time.
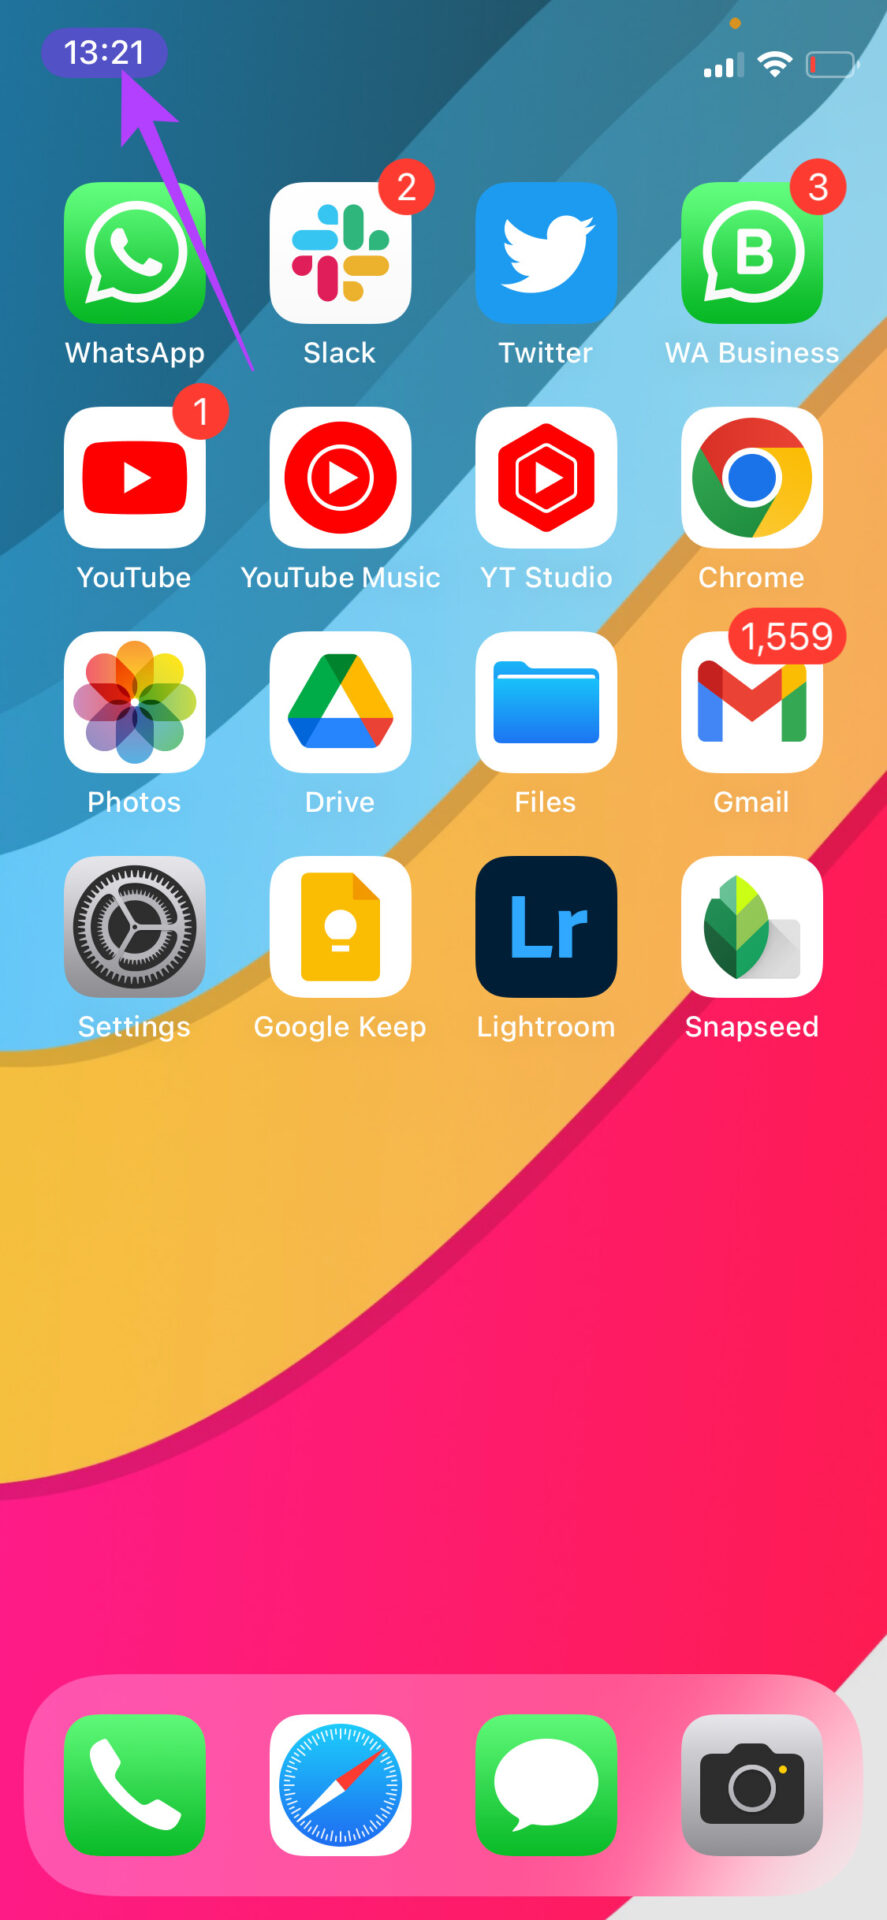
Return to the FaceTime app to stop sharing your screen. You can check out these ways to fix FaceTime Screen Sharing not working if you’re having issues with it on your Mac.
Was this helpful?
Last updated on 14 May, 2024
1 Comment
Leave a Reply
Read Next
 Top 11 Fixes for FaceTime Audio Not Working on iPhone and iPad
FaceTime is a fantastic video-calling service that Apple users cherish.
Top 11 Fixes for FaceTime Audio Not Working on iPhone and iPad
FaceTime is a fantastic video-calling service that Apple users cherish.
 Top 6 Fixes for Facetime Picture-in-Picture Not Working on iPhone & iPad
With the Picture-in-Picture (PiP) mode, multitasking is easy on iPhone and iPad.
Top 6 Fixes for Facetime Picture-in-Picture Not Working on iPhone & iPad
With the Picture-in-Picture (PiP) mode, multitasking is easy on iPhone and iPad.
 4 Ways to Fix FaceTime Not Working on iPhone
https://youtu.be/I4u79xaUaeI Fix 1: Check if Data Usage Is Enabled and Force Restart Your iPhone Reboot your router if you're connected to a Wi-Fi network.
4 Ways to Fix FaceTime Not Working on iPhone
https://youtu.be/I4u79xaUaeI Fix 1: Check if Data Usage Is Enabled and Force Restart Your iPhone Reboot your router if you're connected to a Wi-Fi network.
 3 Fixes for FaceTime Screen Sharing Not Working on iPhone
Basic Fixes Switch to 5G or Wi-Fi: The ability to share the screen of your iPhone during a FaceTime call depends a lot on your internet speed.
3 Fixes for FaceTime Screen Sharing Not Working on iPhone
Basic Fixes Switch to 5G or Wi-Fi: The ability to share the screen of your iPhone during a FaceTime call depends a lot on your internet speed.
 How to Optimize FaceTime Audio and Video Settings on iPhone
The FaceTime app is commonly available across all Apple devices, including the iPhone.
How to Optimize FaceTime Audio and Video Settings on iPhone
The FaceTime app is commonly available across all Apple devices, including the iPhone.
 How to Fix Echo on iPhone During Voice Calls or FaceTime
We make or receive numerous calls daily.
How to Fix Echo on iPhone During Voice Calls or FaceTime
We make or receive numerous calls daily.
 How to Mute Yourself or Others on FaceTime
Mute Yourself on FaceTime (iPhone and iPad) You can take FaceTime calls using your iPhone or iPad while you are outside and don't have access to your Mac.
How to Mute Yourself or Others on FaceTime
Mute Yourself on FaceTime (iPhone and iPad) You can take FaceTime calls using your iPhone or iPad while you are outside and don't have access to your Mac.
 How to Change FaceTime Phone Number
Change FaceTime Phone Number on iPhone Your phone number and Apple ID become your FaceTime Caller ID on your iPhone.
How to Change FaceTime Phone Number
Change FaceTime Phone Number on iPhone Your phone number and Apple ID become your FaceTime Caller ID on your iPhone.
The article above may contain affiliate links which help support Guiding Tech. The content remains unbiased and authentic and will never affect our editorial integrity.


When you hit the toggle on the preview and all those stickers show up…..how do you add/delete or edit those? I’ve googled with no answers.
Thanks!