Option 1: How to Move a Single Picture or Video Present in an iPhone or iPad Folder From Files to Photos App
Step 1: Launch the Files app on your iPhone or iPad.
Step 2: Go to the folder with the photo or video that you want to move to the Photos app.
Step 3: Touch and hold the photo or video. Select Share from the menu.
Step 4: The Share sheet will open. Slightly scroll up and tap on Save Image or Save Video.
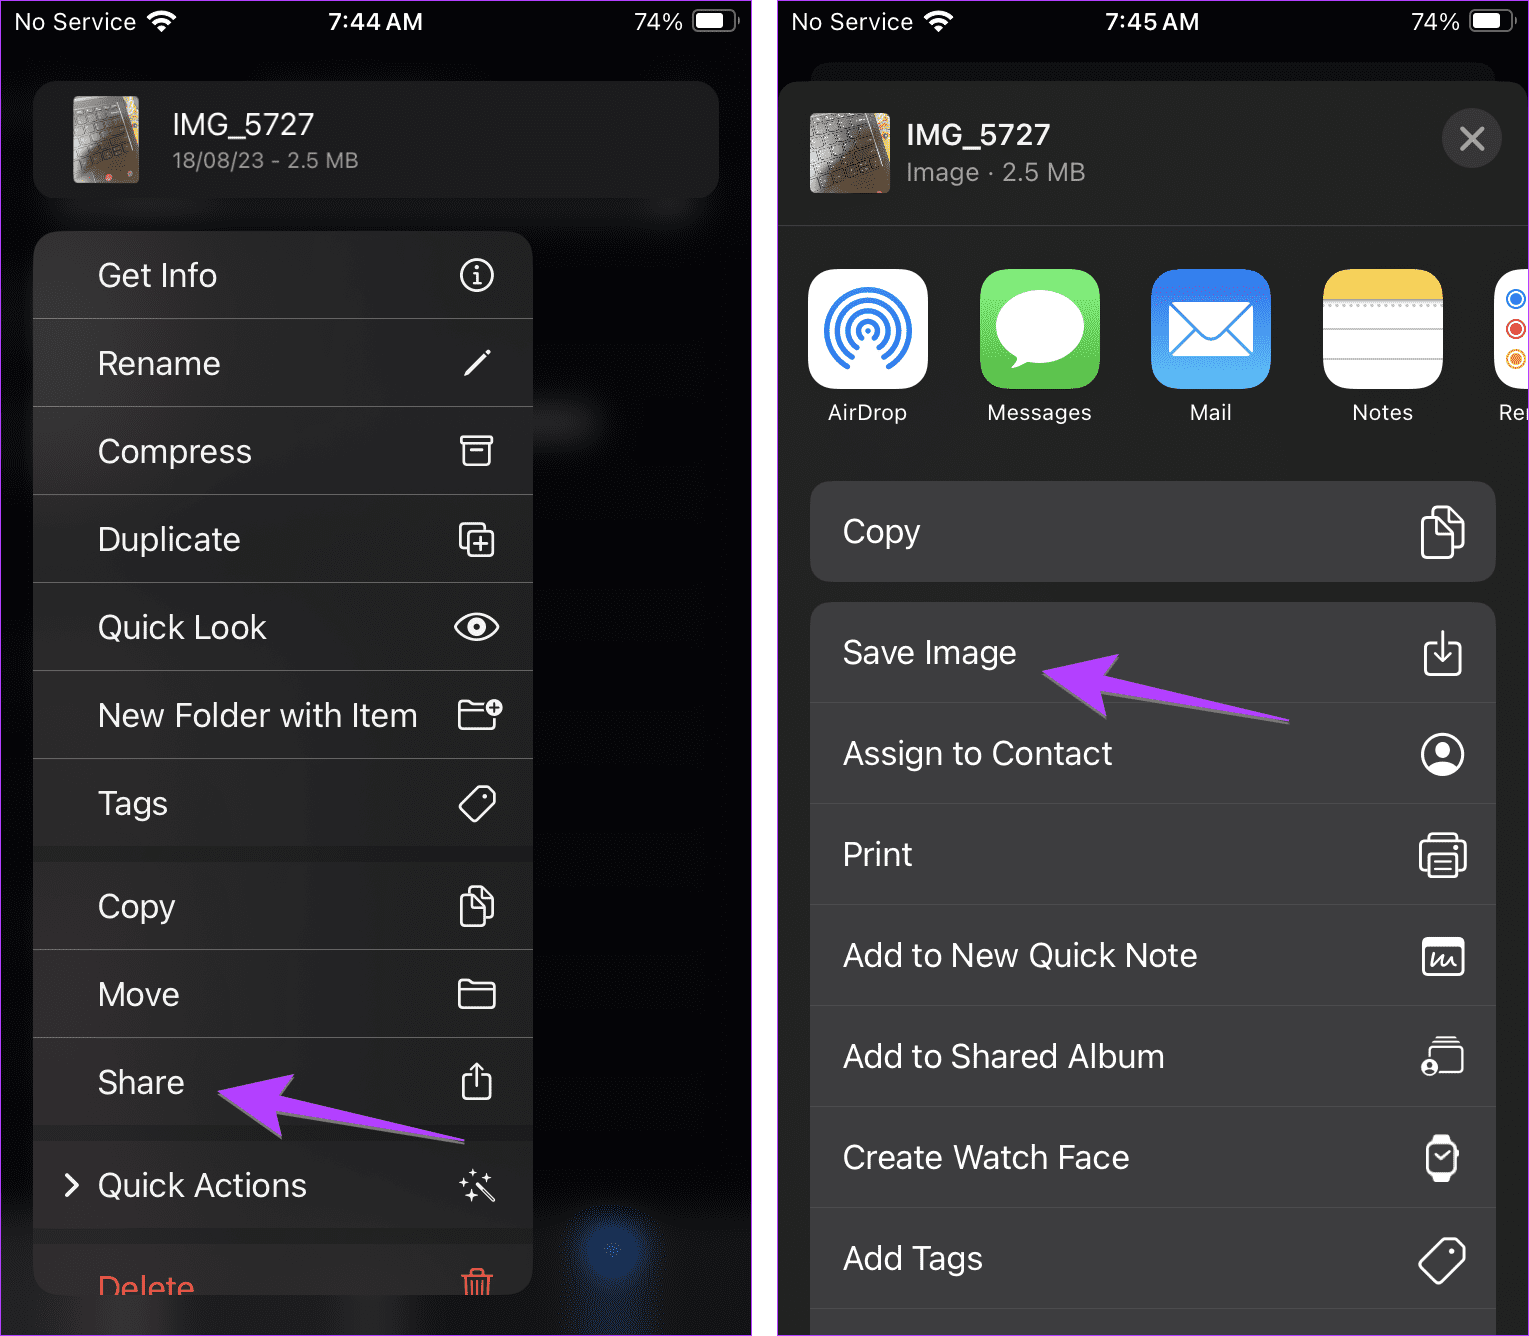
That’s all you need to do. Open the Photos app, and your photo or video should be visible.
Also Read: Know where to find your downloaded files on iPhone
Option 2: How to Move Multiple Pictures or Videos Present in iPhone or iPad Folder From Files to Photos App
Step 1: Launch the Files app and open the folder containing photos or videos.
Step 2: Tap on the three-dot icon at the top and choose Select from the menu.
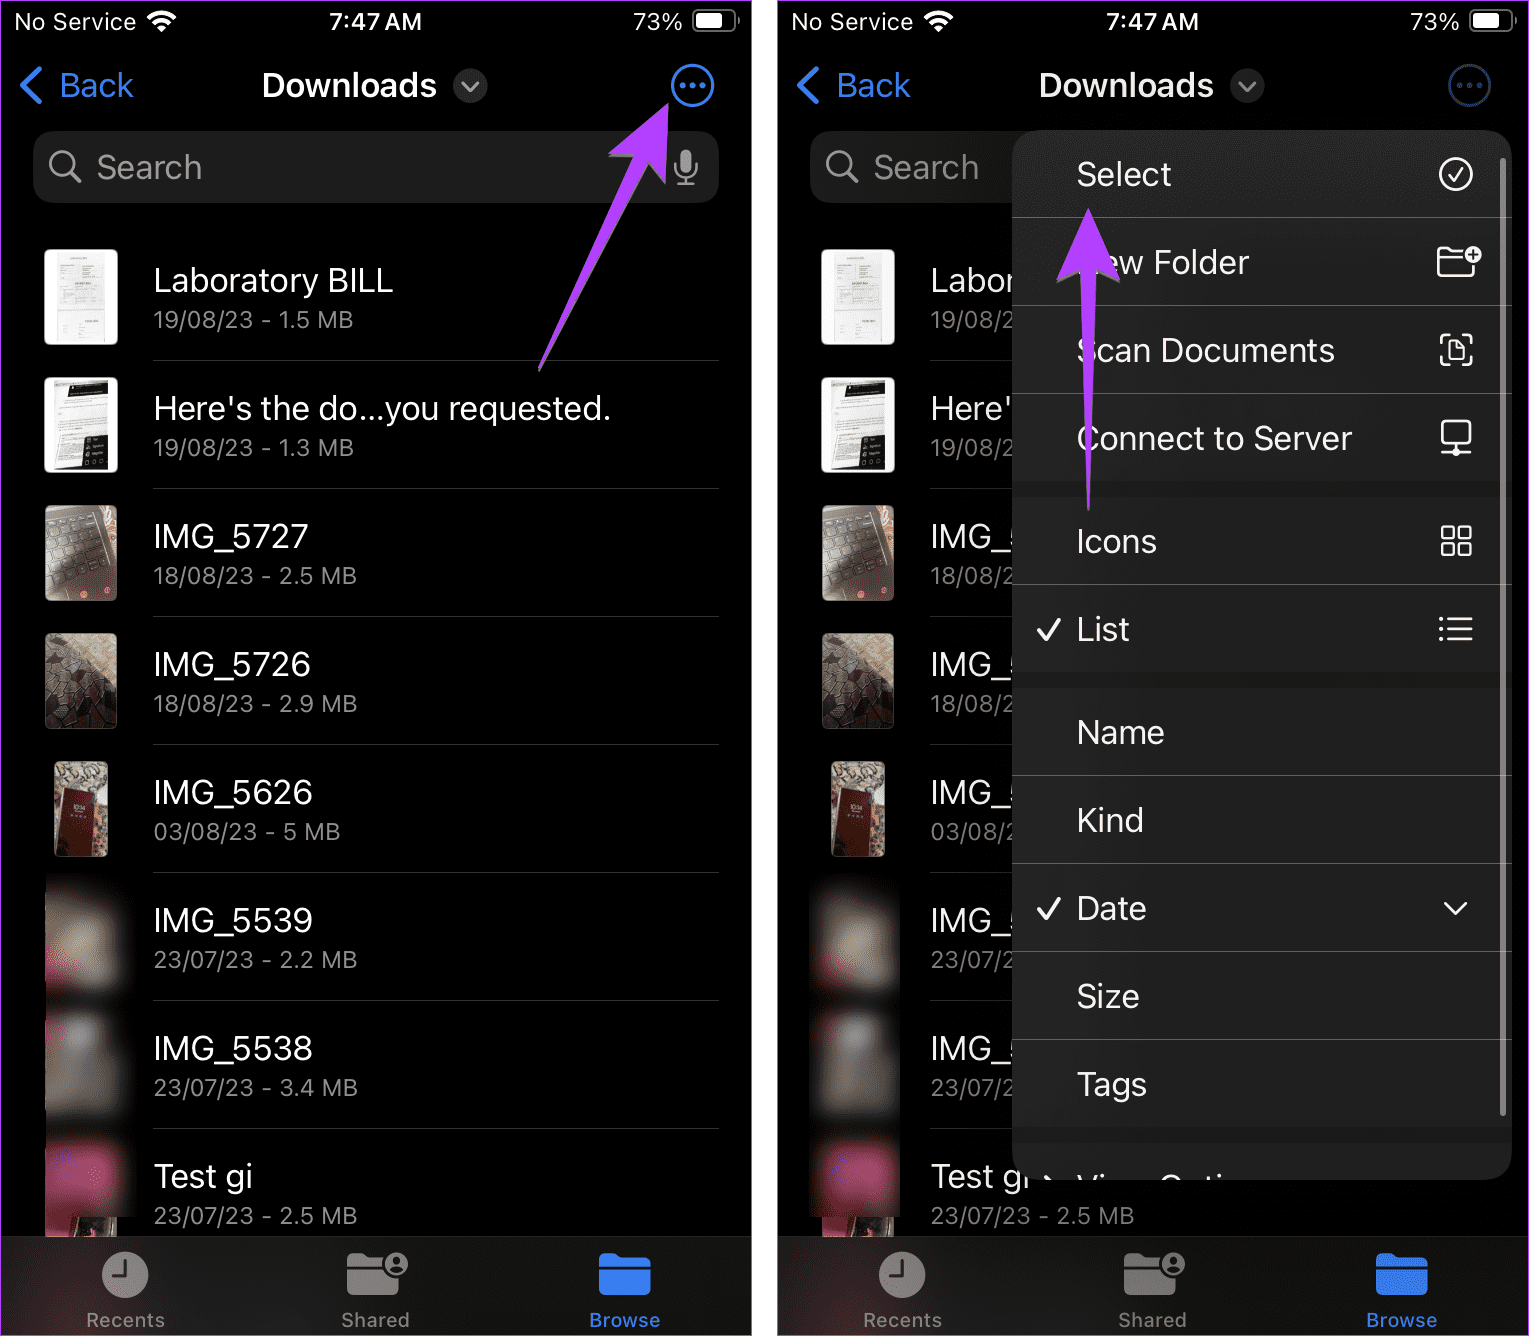
Step 3: Now tap on the photos or videos to select them. A blue checkmark will appear on the selected items.
Step 4: Once selected, tap on the Share icon (or More followed by Share) and choose Save X Images or Save X Videos from the menu.
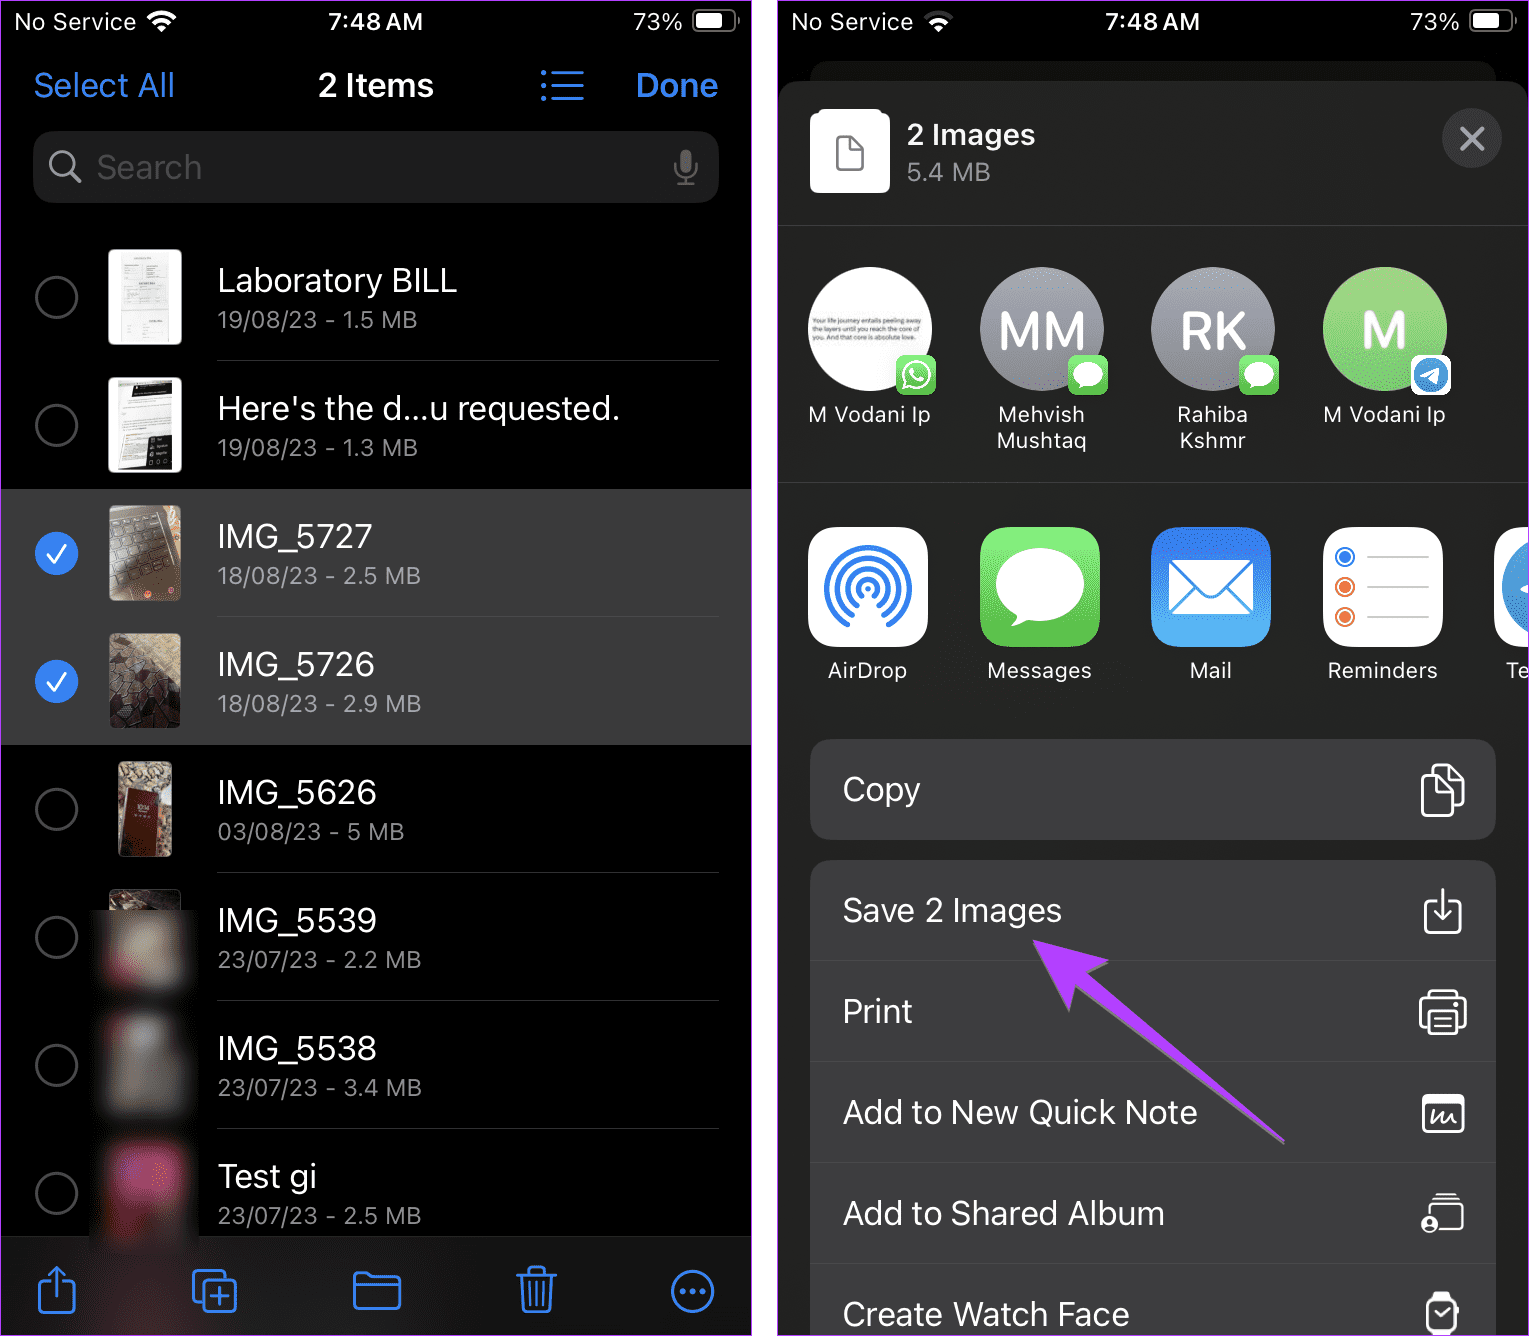
That’s it. The selected photos or videos will be downloaded to the Photos app.
Also Read: How to view only camera photos on iPhone
Option 3: How to Move One Picture or Video Present on a Cloud Folder in Files to Photos App
The Files app supports viewing media from both iCloud storage and other cloud services, like Google Drive. So if you want to move photos and videos from any of those services to the Photos app, you need to download the file first to the Files app.
Step 1: Launch the Files app > tap the Browse tab, followed by the cloud service like iCloud, Google Drive, etc.
Step 2: Then open the folder from which you want to download the file.
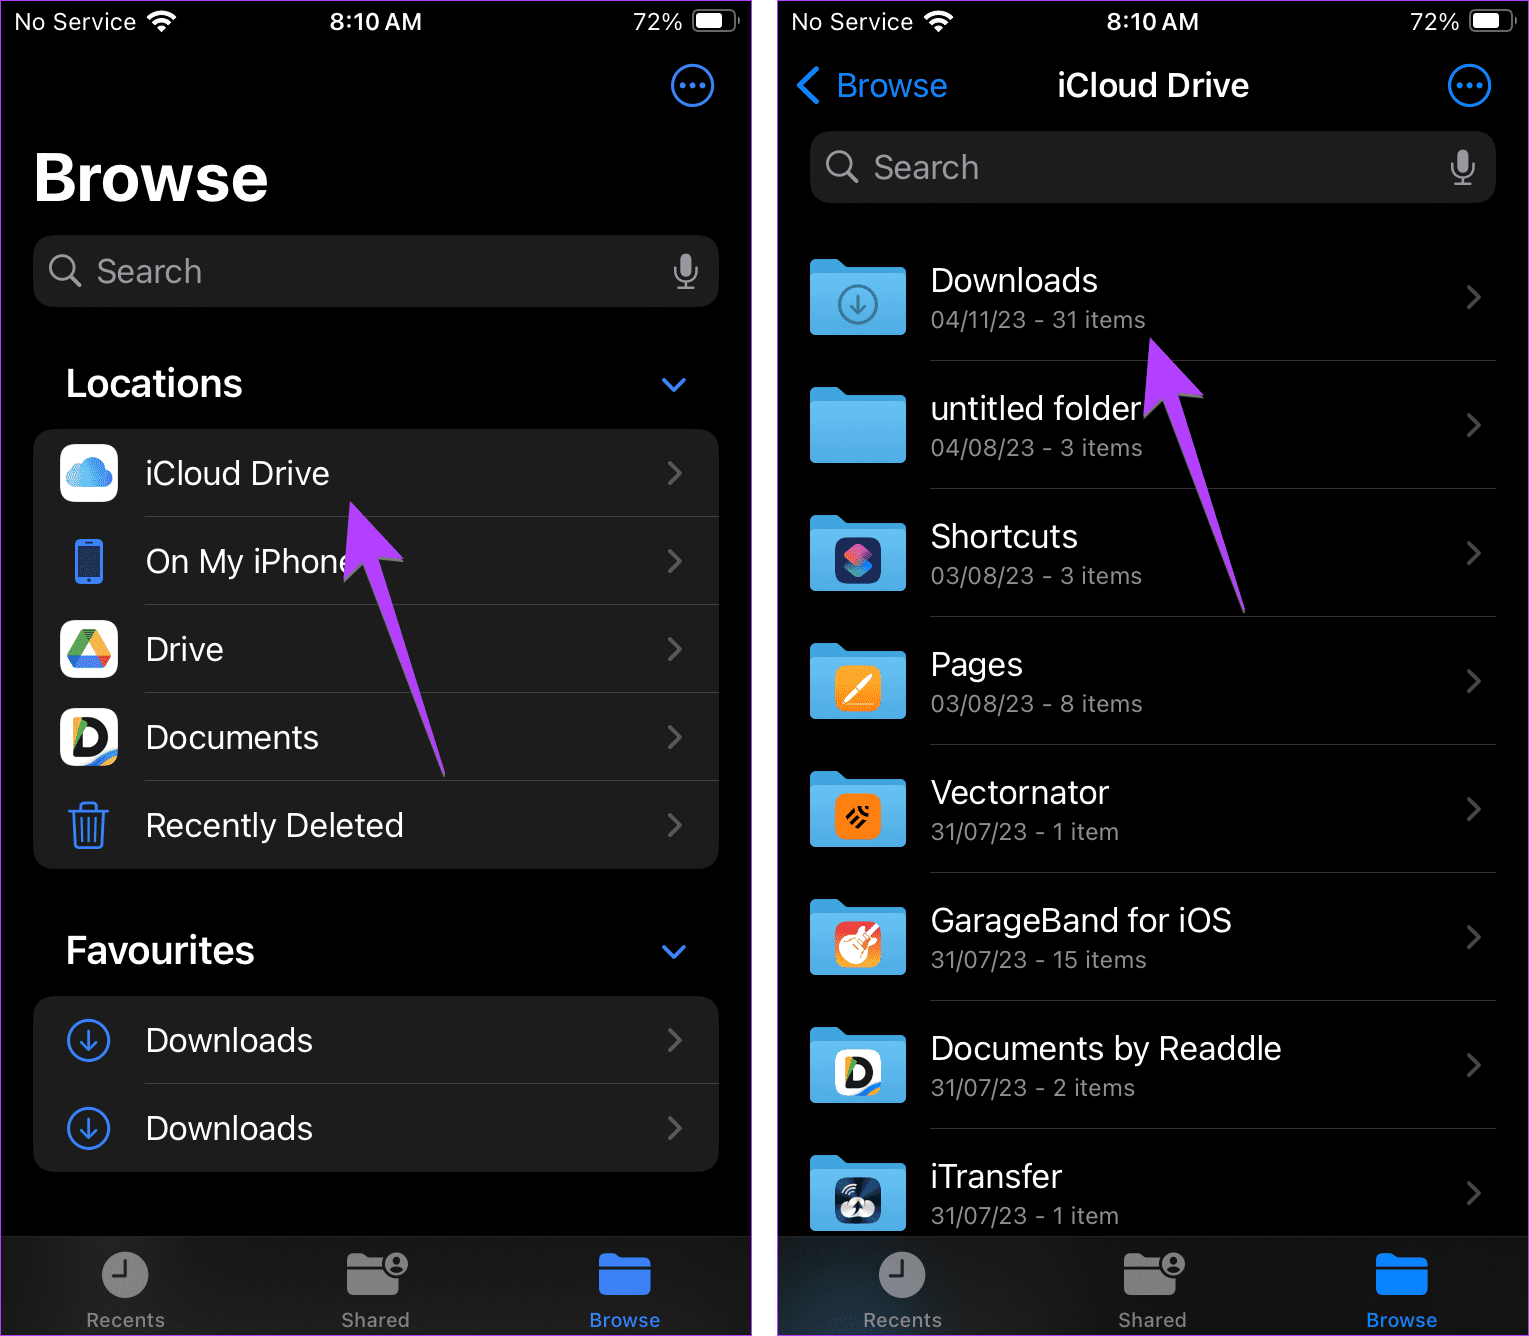
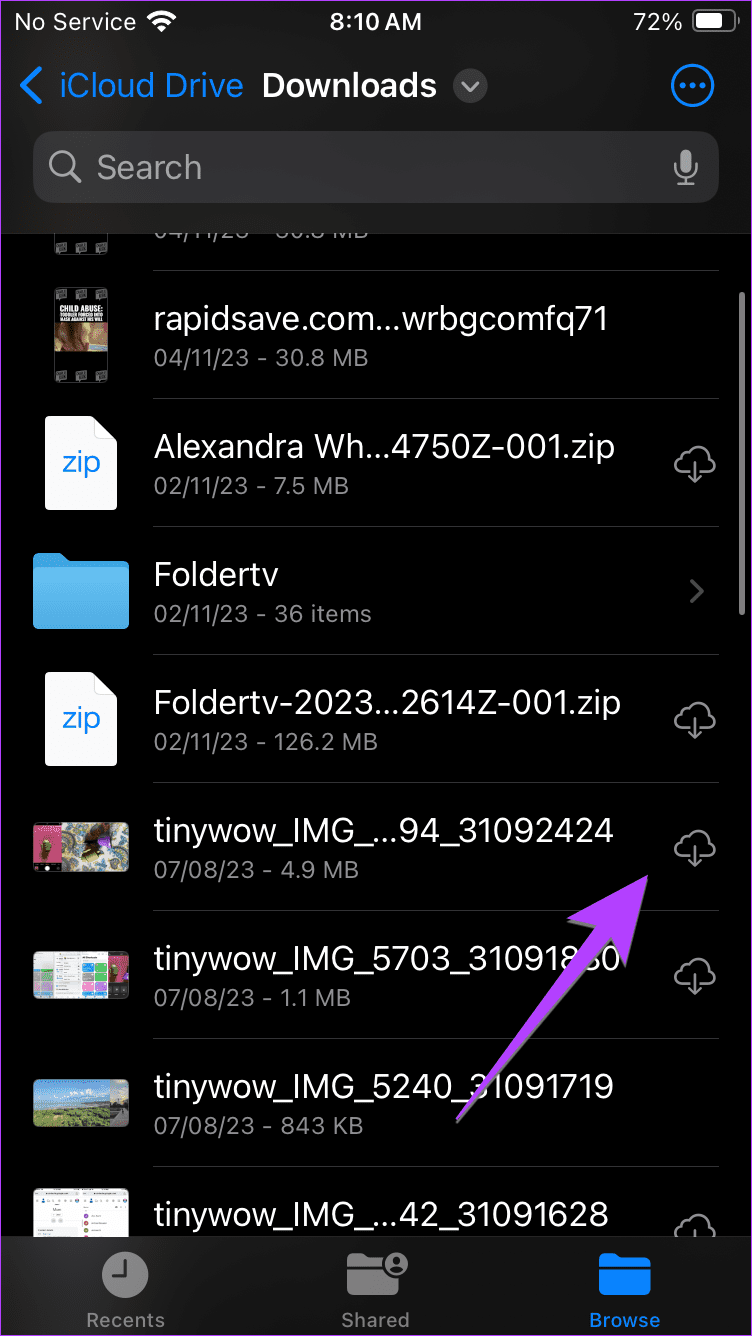
You will see a Download icon next to the photo or video.
Step 3: Tap on the file to download it to the Files app.
Note: At this stage, the photo or video can be viewed in the Files app only.
Step 4: Now, to view it in the Photos app, touch and hold the downloaded file and select Share.
Step 5: Choose Save Image or Save Video from the menu.

Note: Tap on the file to download it only if you see a Download icon on the file. If the icon isn’t there, touch and hold the file directly and select Share, followed by Save Image.
Option 4: How to Move Multiple Photos or Videos Present on a Cloud Folder from Files to Photos App
Step 1: In the Files app, go to the cloud folder with the photos or videos that you want to download.
Step 2: Tap on the three-dot icon at the top and choose the Select option.
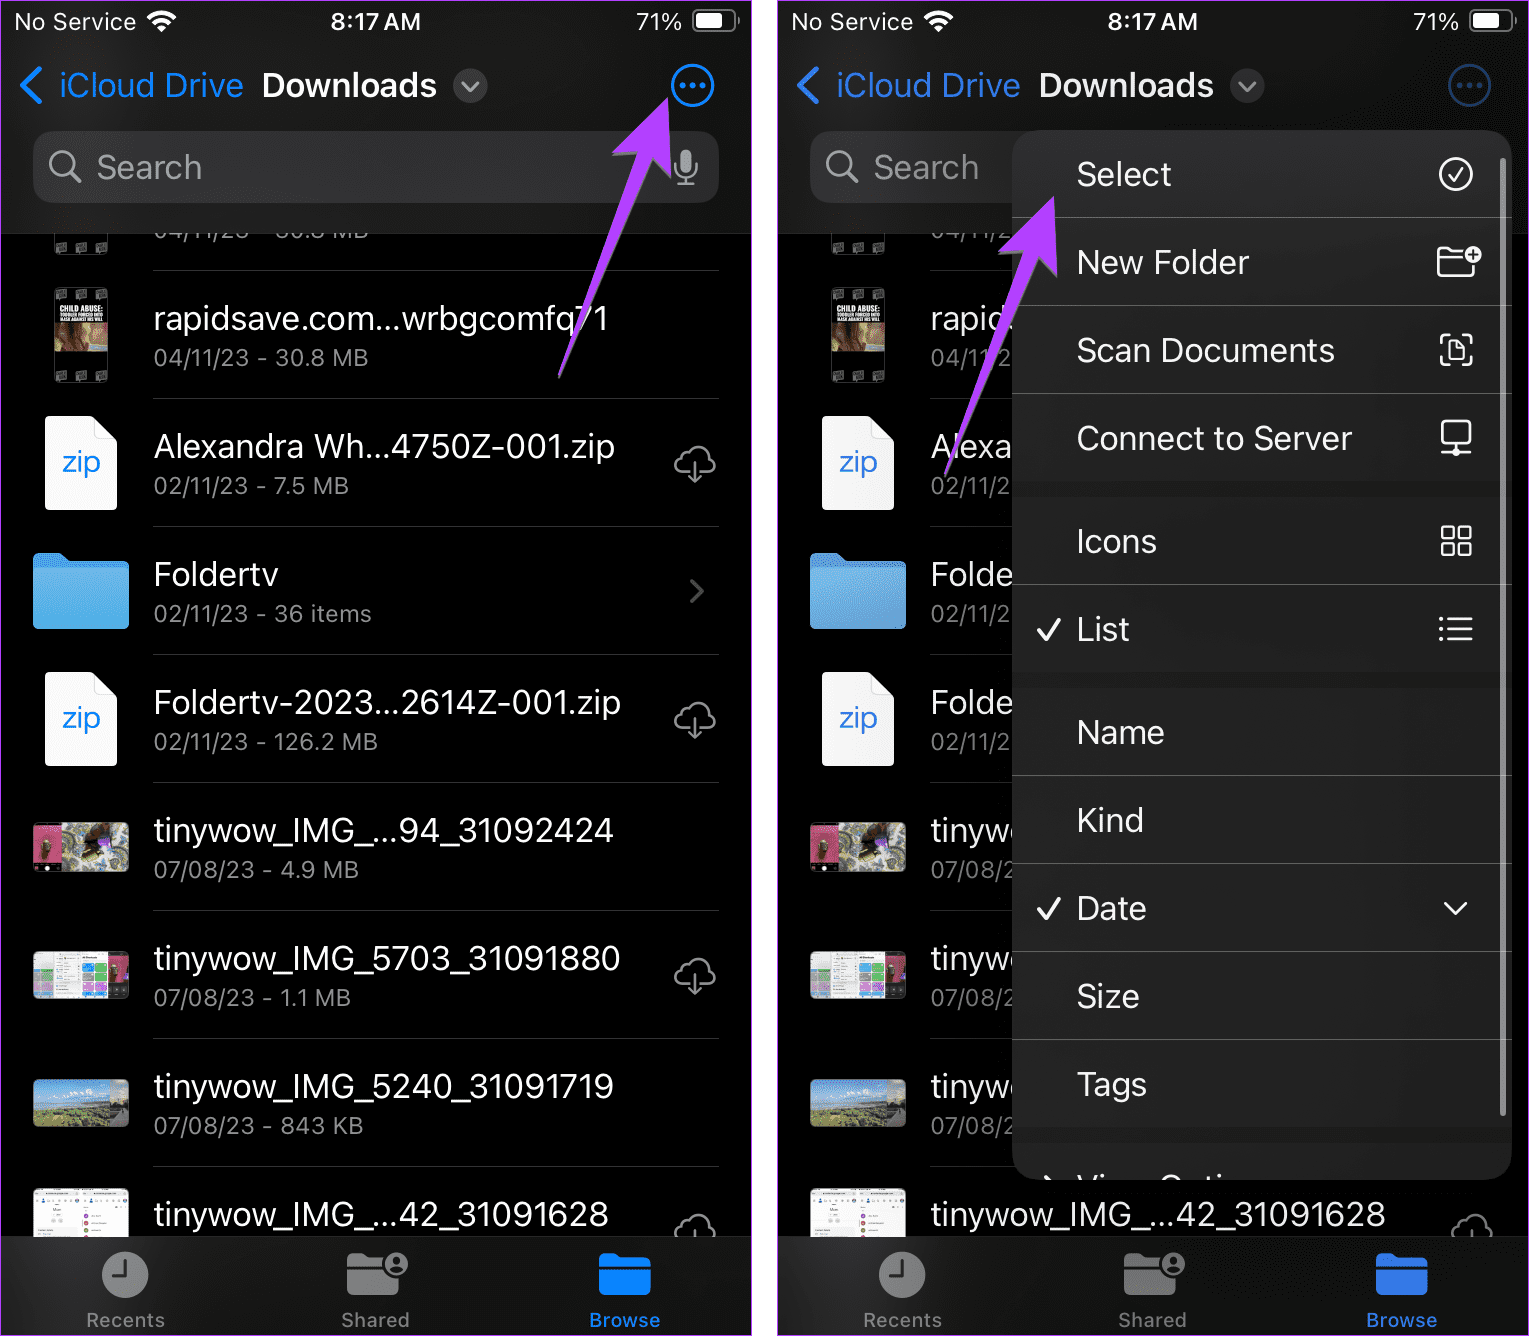
Step 3: Tap on the pictures/videos that you want to save to the Files app (and eventually to the Camera Roll).
Step 4: Press the three-dot icon at the bottom and select Download Now.
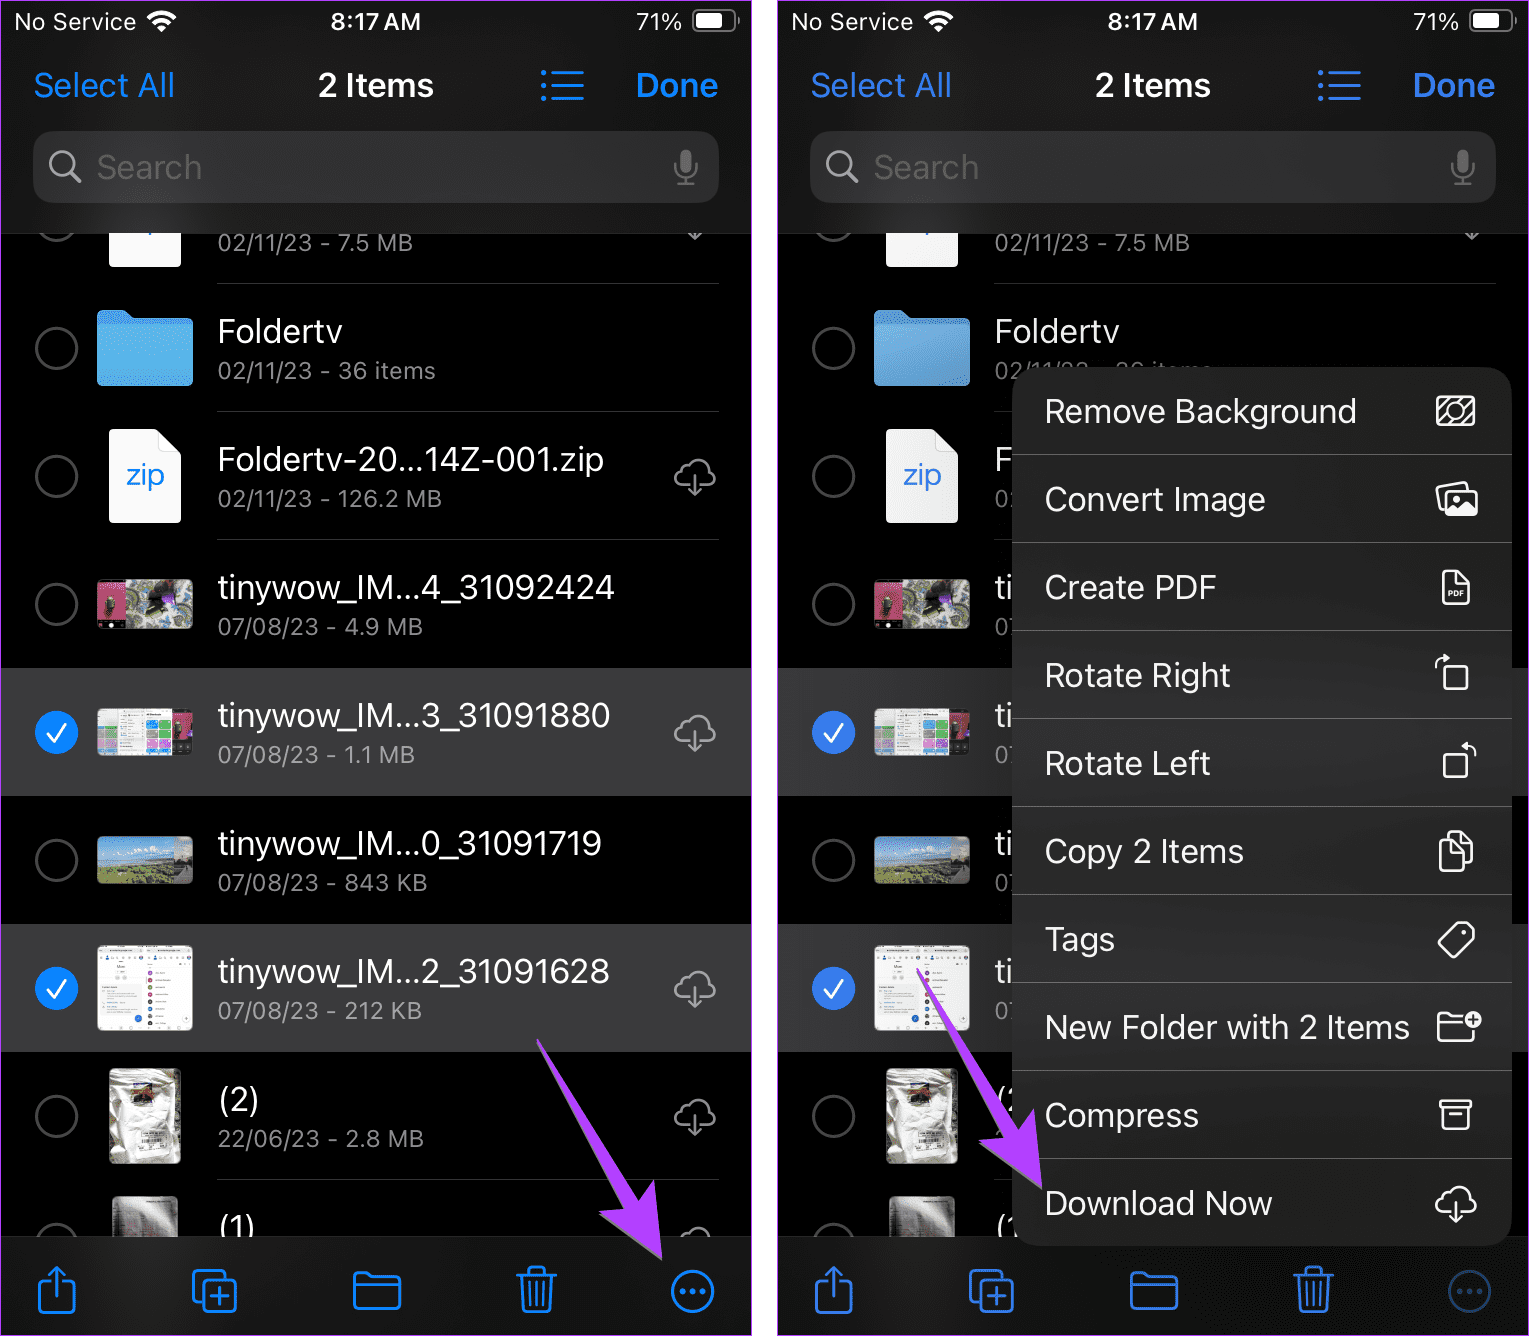
Wait for the multiple items to download to the Files app. The Download icon will vanish once all the items are downloaded.
Step 5: Then, again, tap the three-dot icon and hit Select.
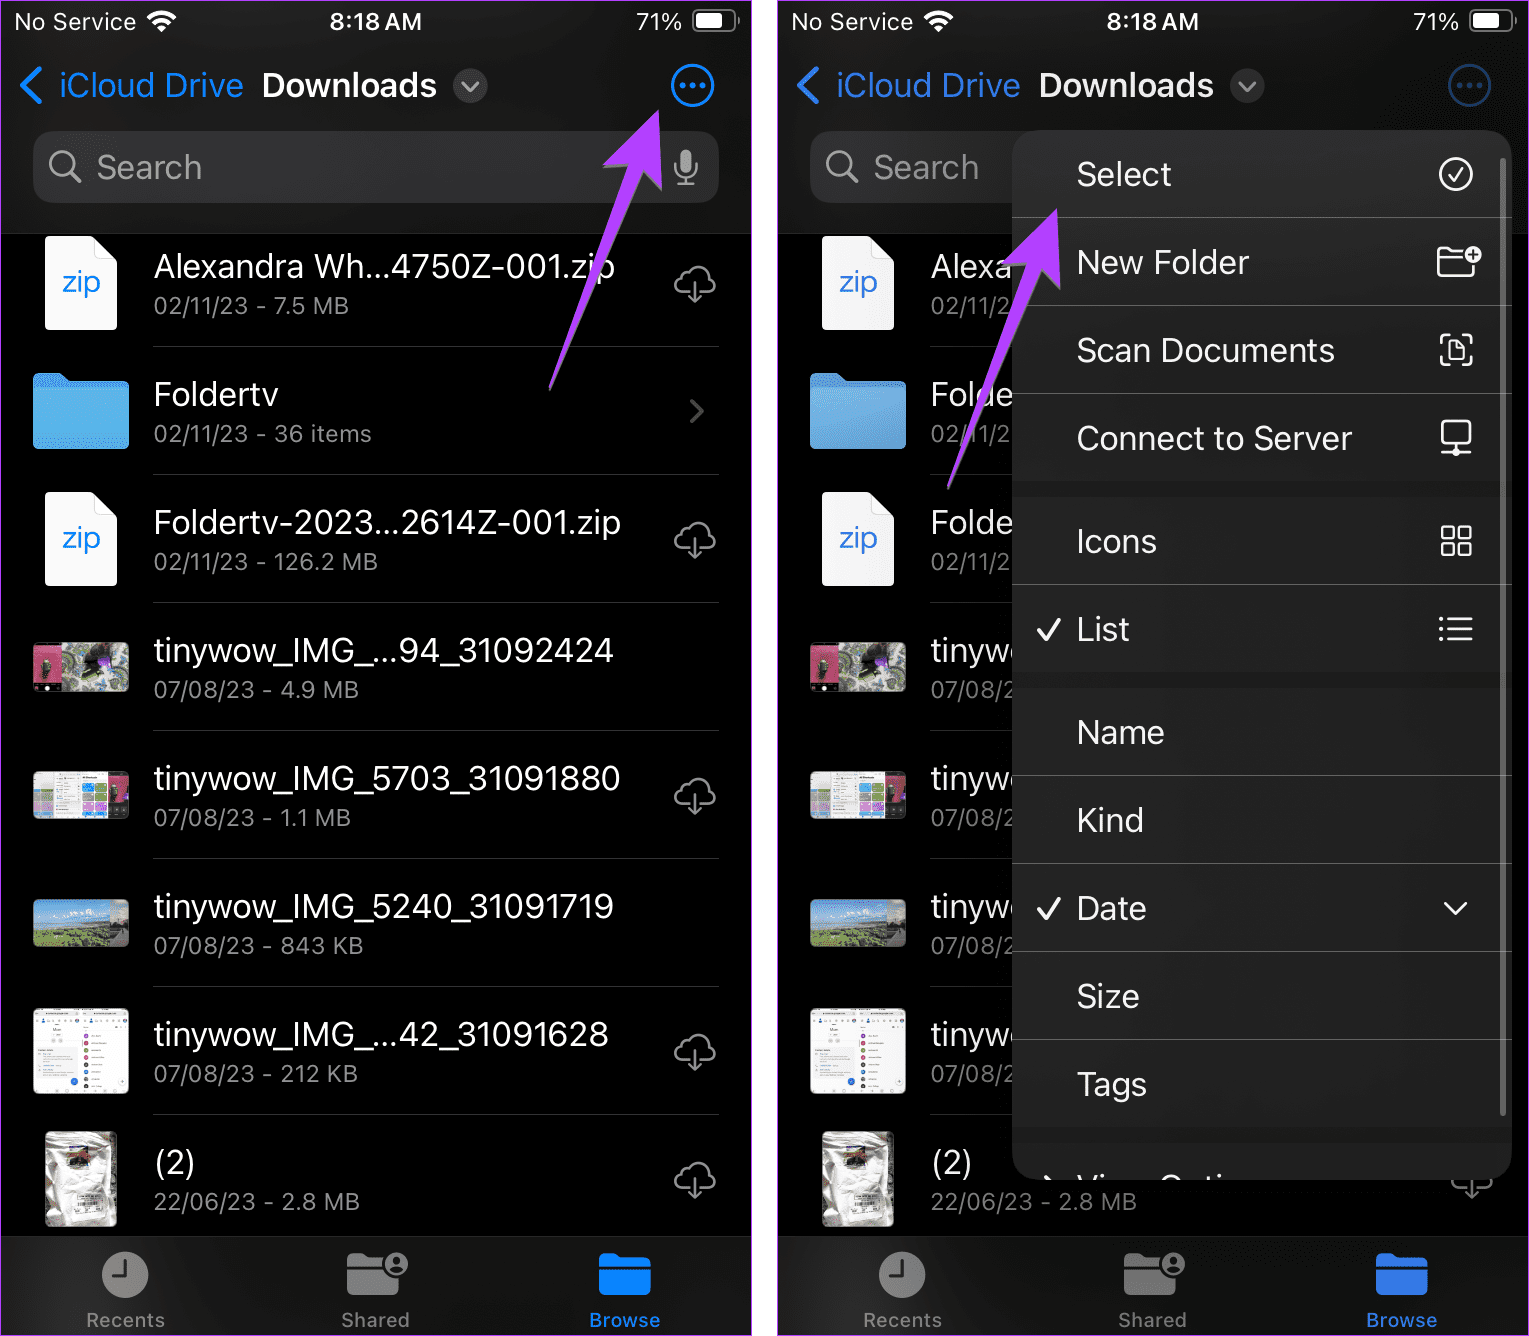
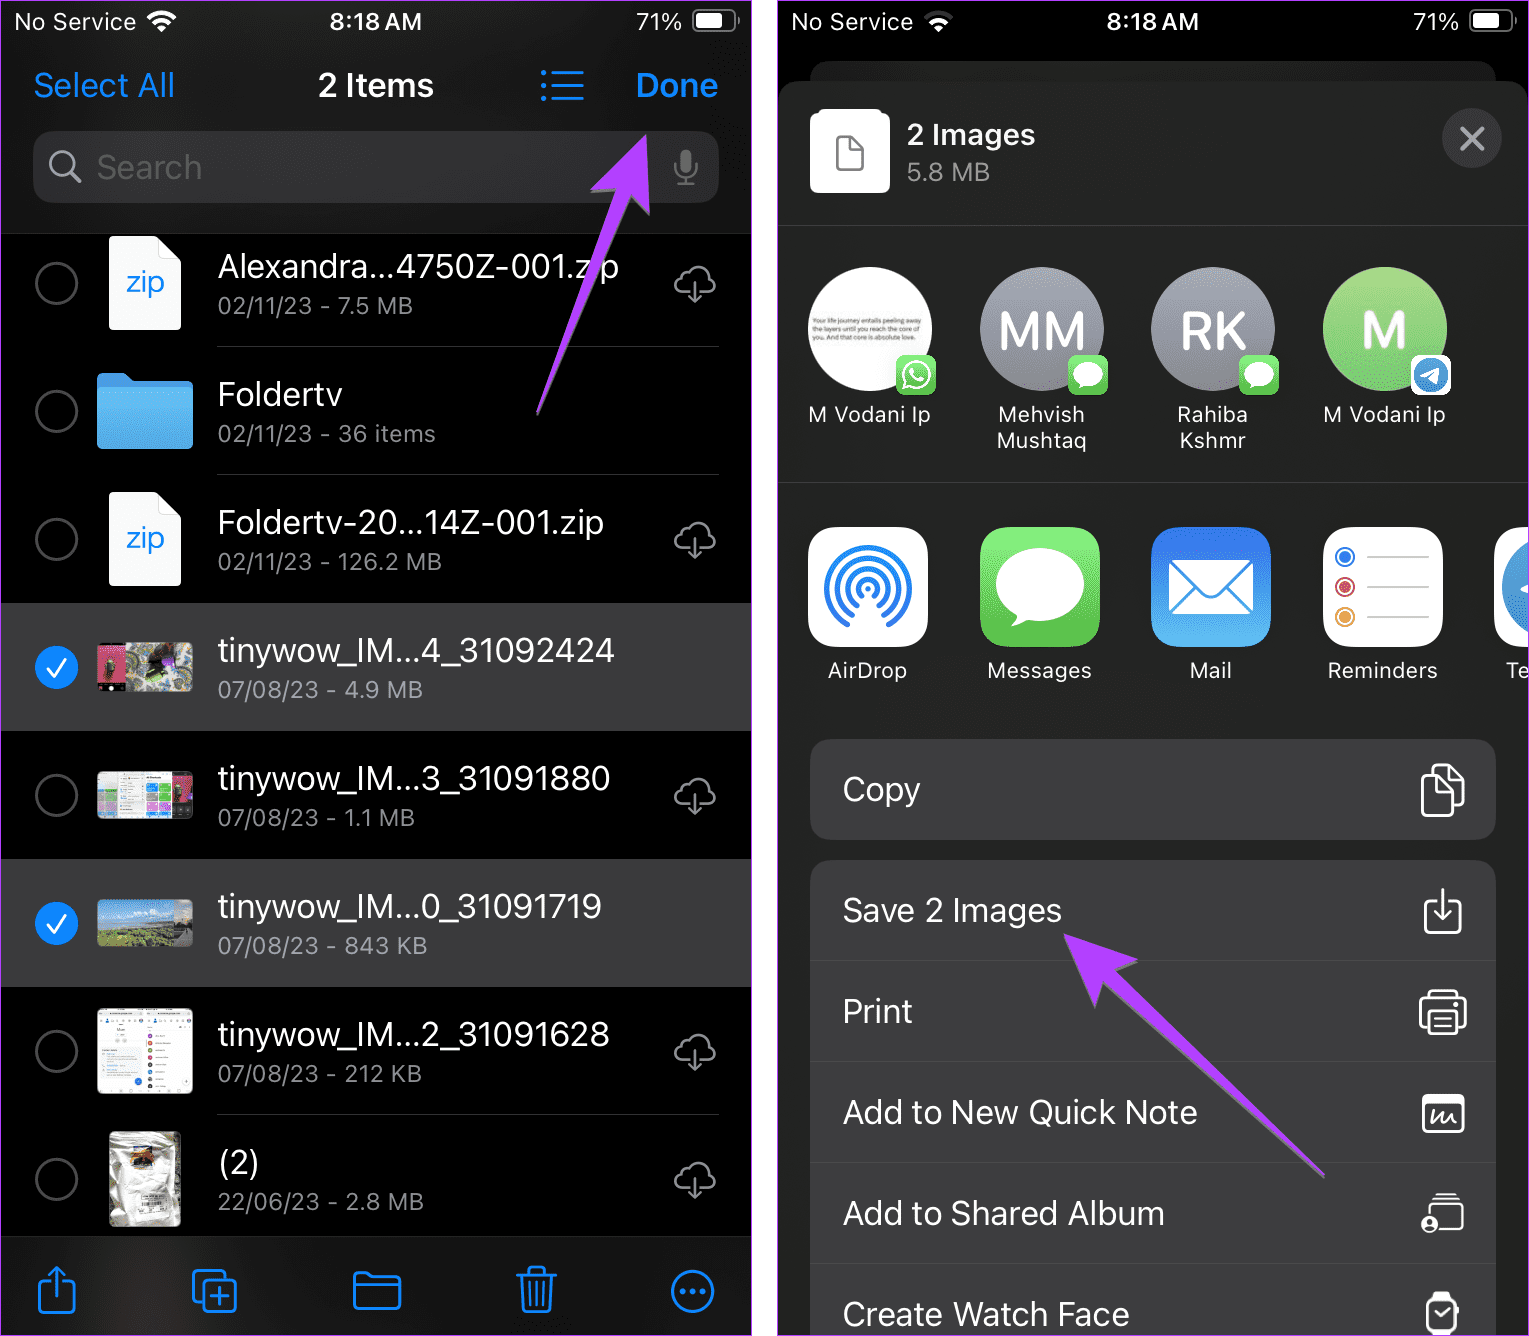
Step 6: Tap on the files to select those that you want to save to the Photos app.
Step 7: Press the Share icon, followed by Save X Photos or Save X Videos.
Also Read: How to add and remove Google Drive from Files app on iPhone
Option 5: How to Save Photos or Videos from Third-Party Apps
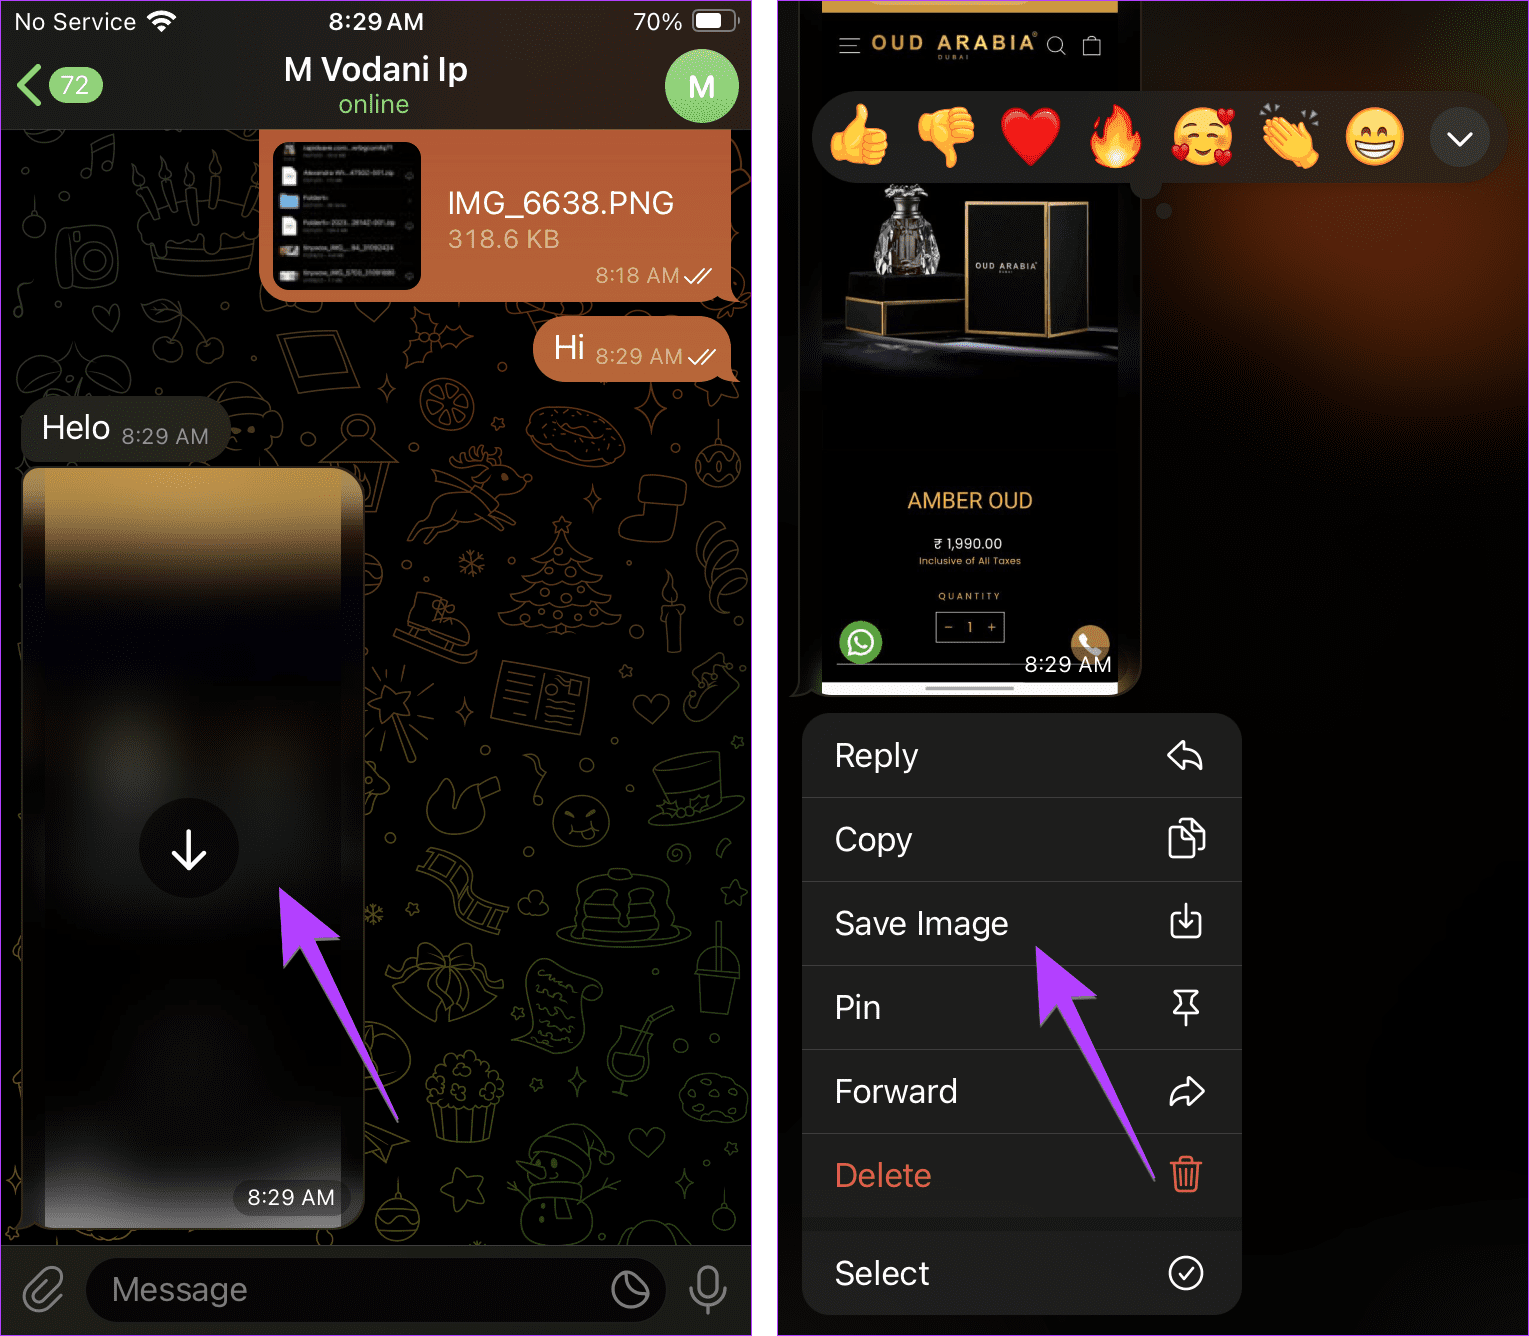
Some third-party apps, such as Telegram, do not directly save photos or videos to the Photos app. If you want to view media files from such apps in the Photos app, you will need to save them manually. Here’s how.
Step 1: Launch the app and download the file first by tapping on it.
Step 2: Then touch and hold the file and tap on the Save Image or Save Video option.
Note: If you don’t see it, open the image first and then tap on the Share button (or More followed by the Share). Choose Save Image or Save Video from the menu.
Tip: You can even save the photo or video from the third-party apps to the Files app. For that, select Save to Files when you tap on Share.
Option 6: Create a Shared Album if your iPhone Lags While Saving Multiple Pictures
In case you have lots of pictures and videos that you want to move from the Files app to the Photos app, you can create a shared album from the Files app, add your photos and videos to it, and share it with yourself. It will show up in the Photos app, where you can download the photos and, finally, delete the shared folder.
Step 1: In the Files app, go to the folder having the photos or videos.
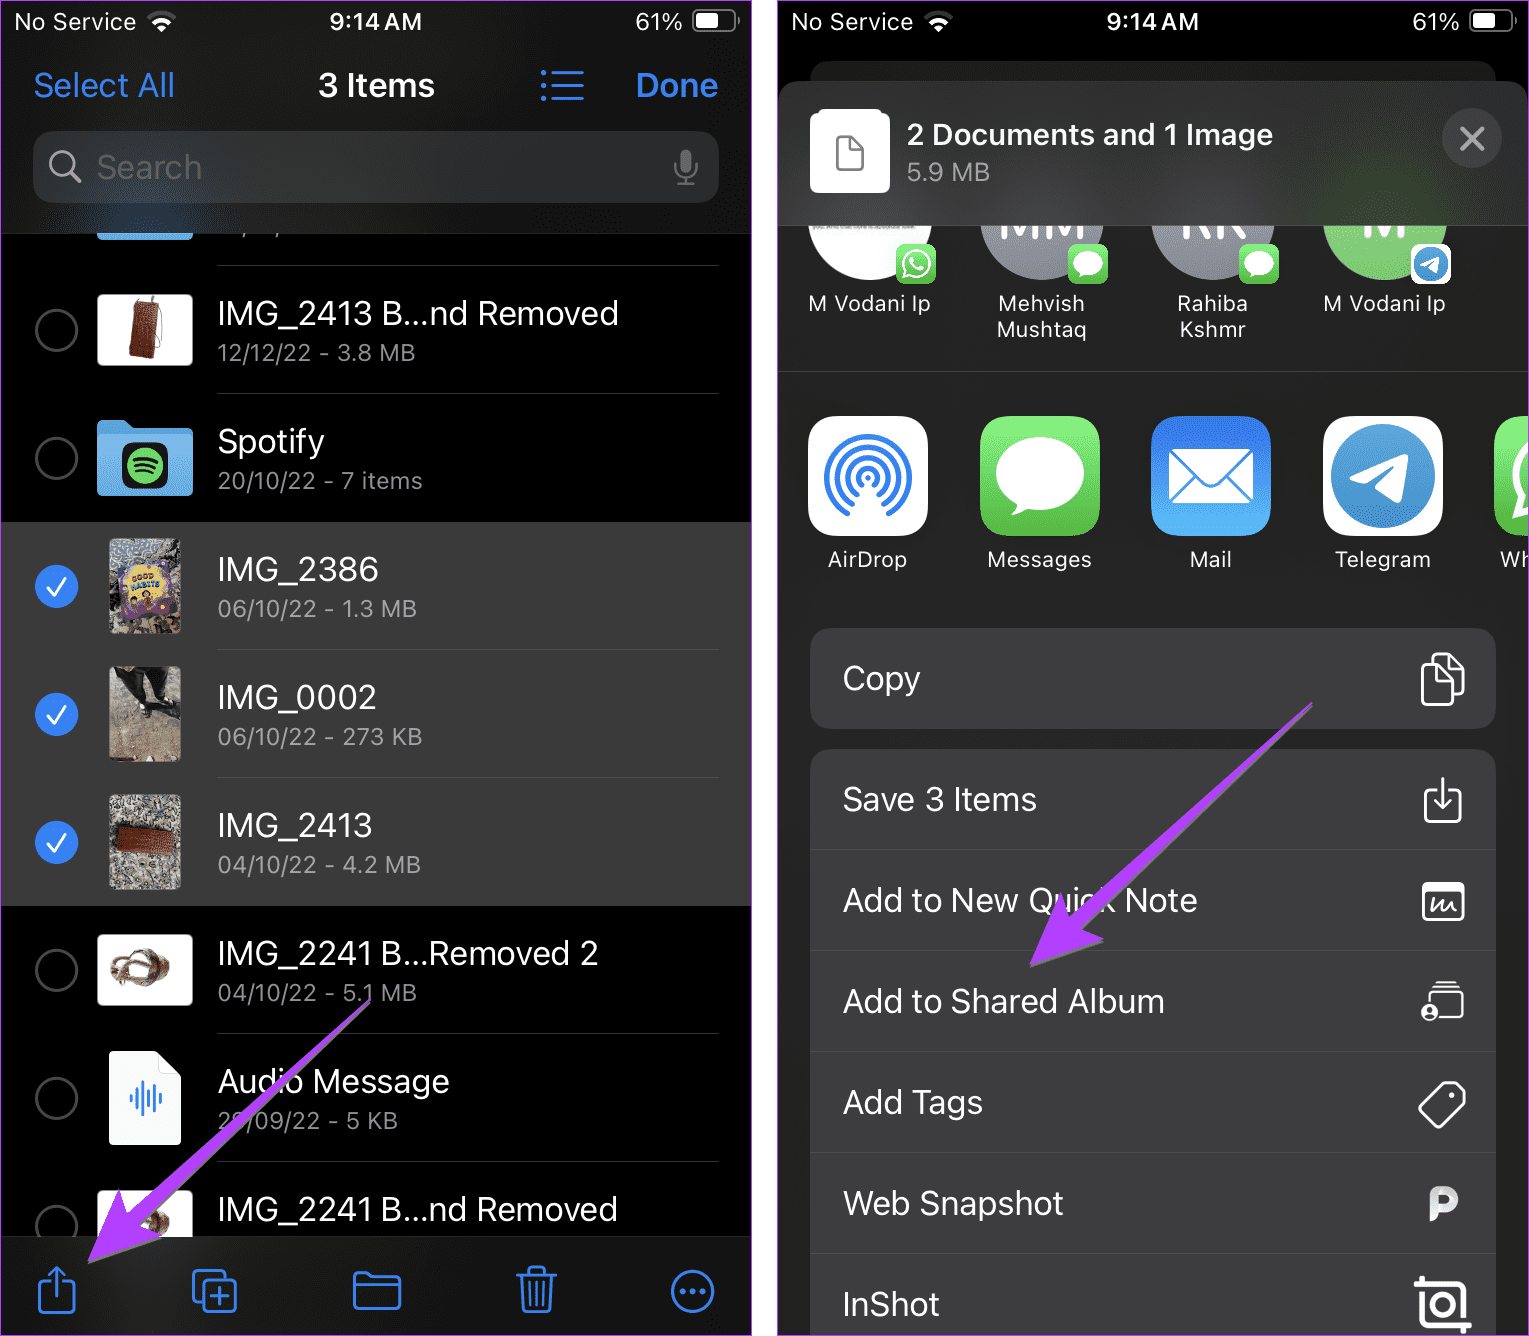
Step 2: Tap the three-dot icon and choose Select. Then, tap on the items that you want to select.
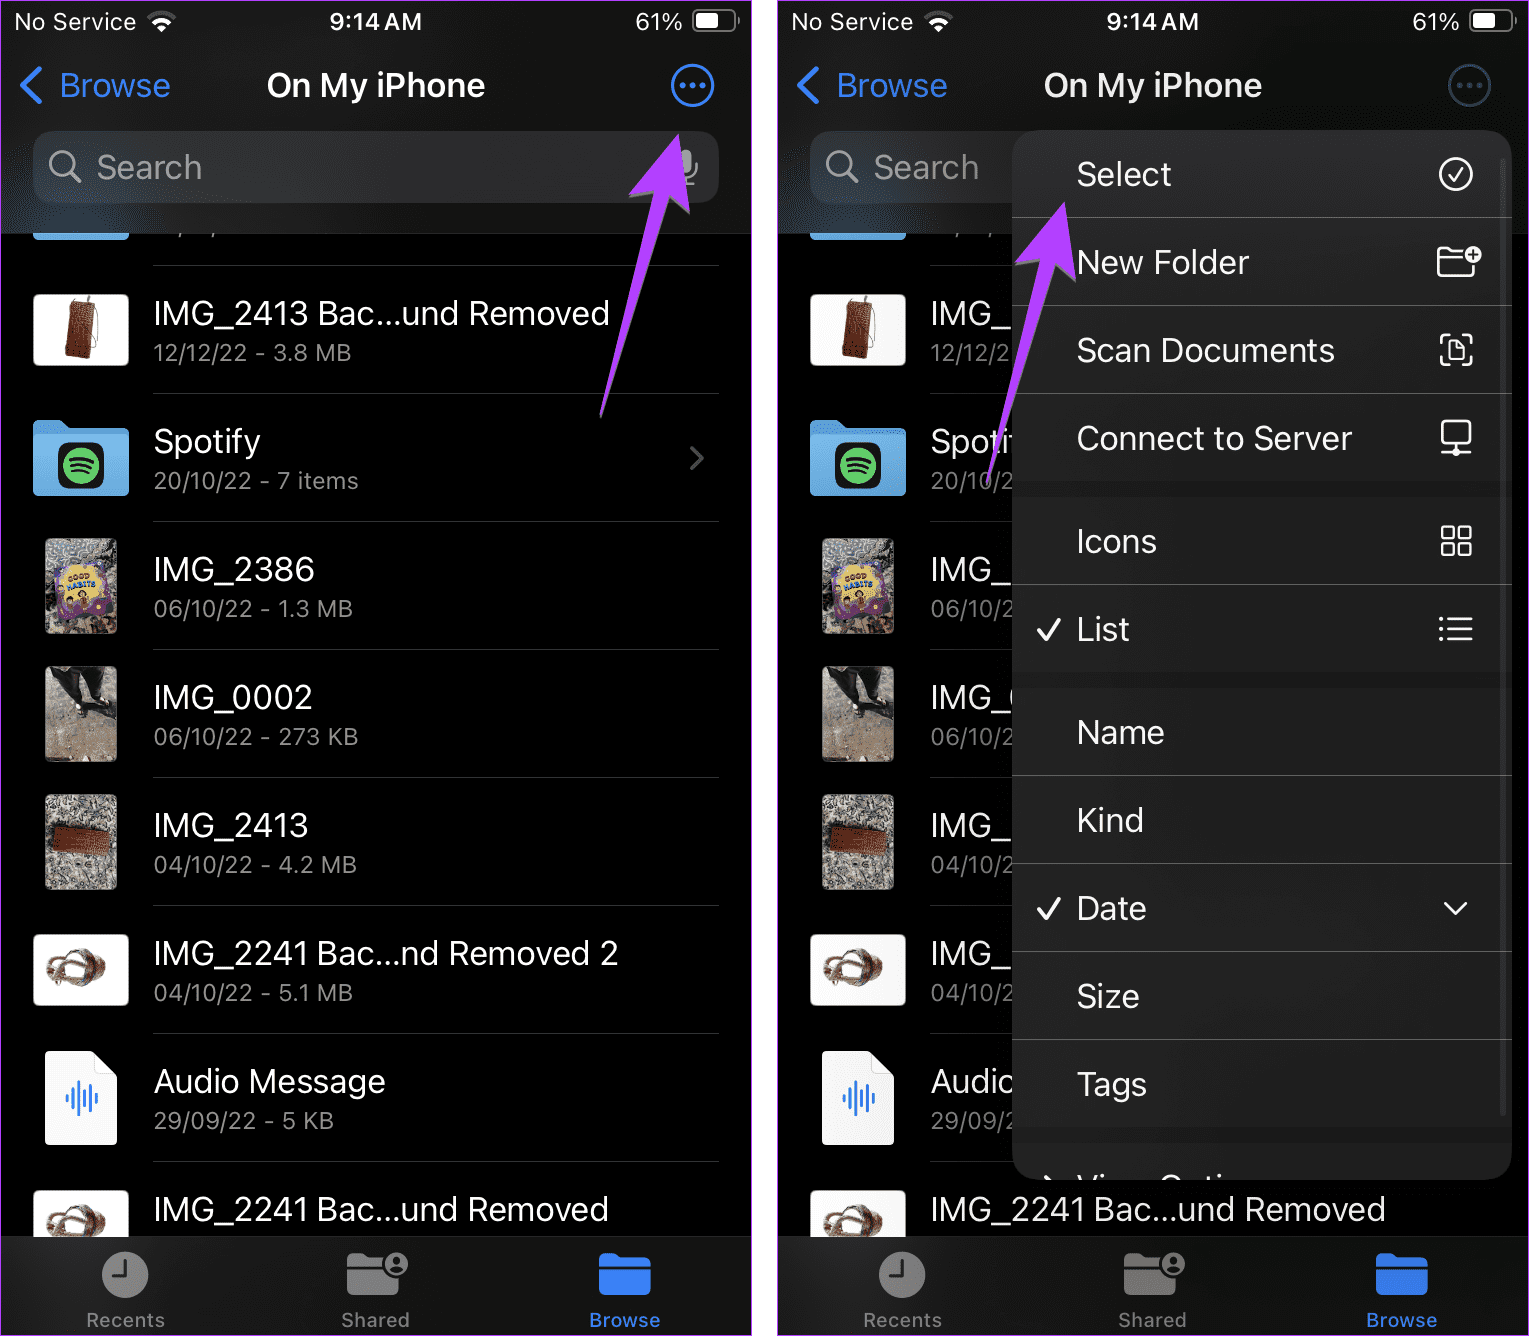
Step 3: Tap the Share icon and choose Add to Shared Album.
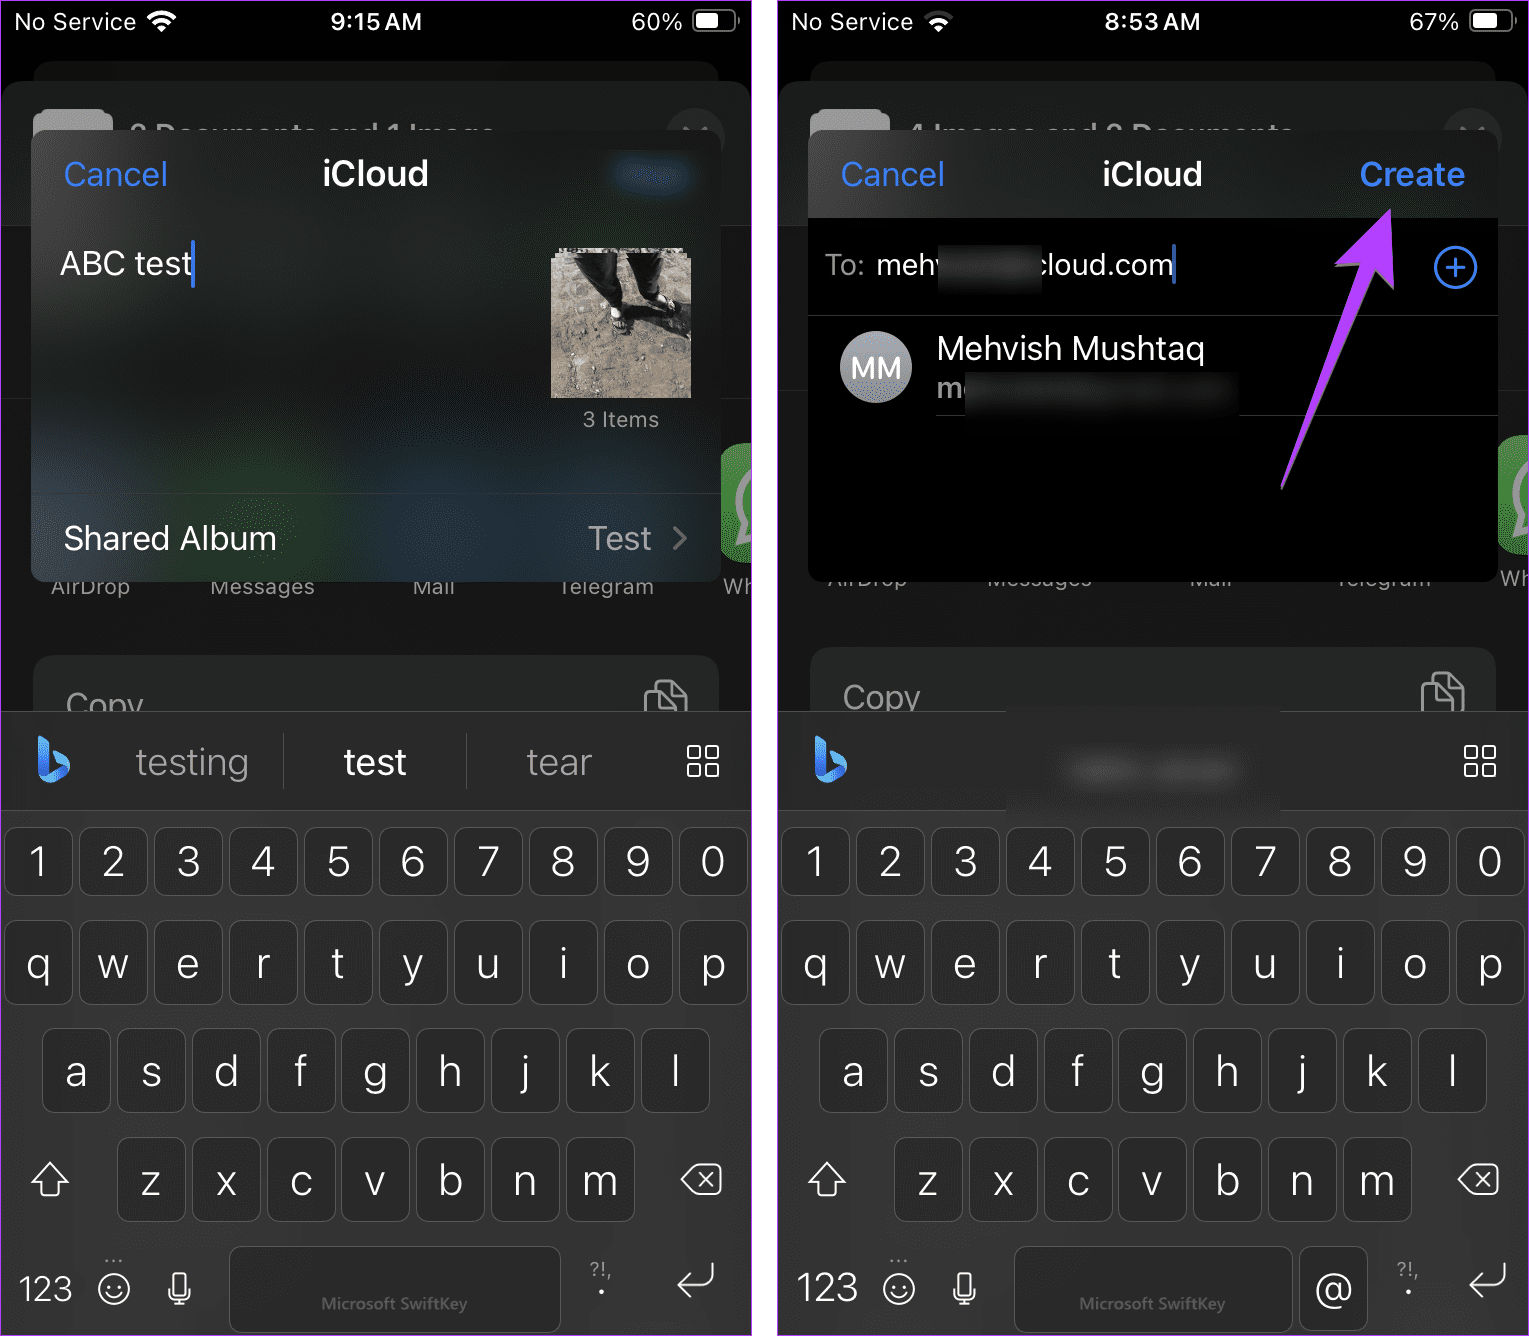
Step 4: Give a name to your album and add your own iCloud email address when asked for an email. Tap the Create button.
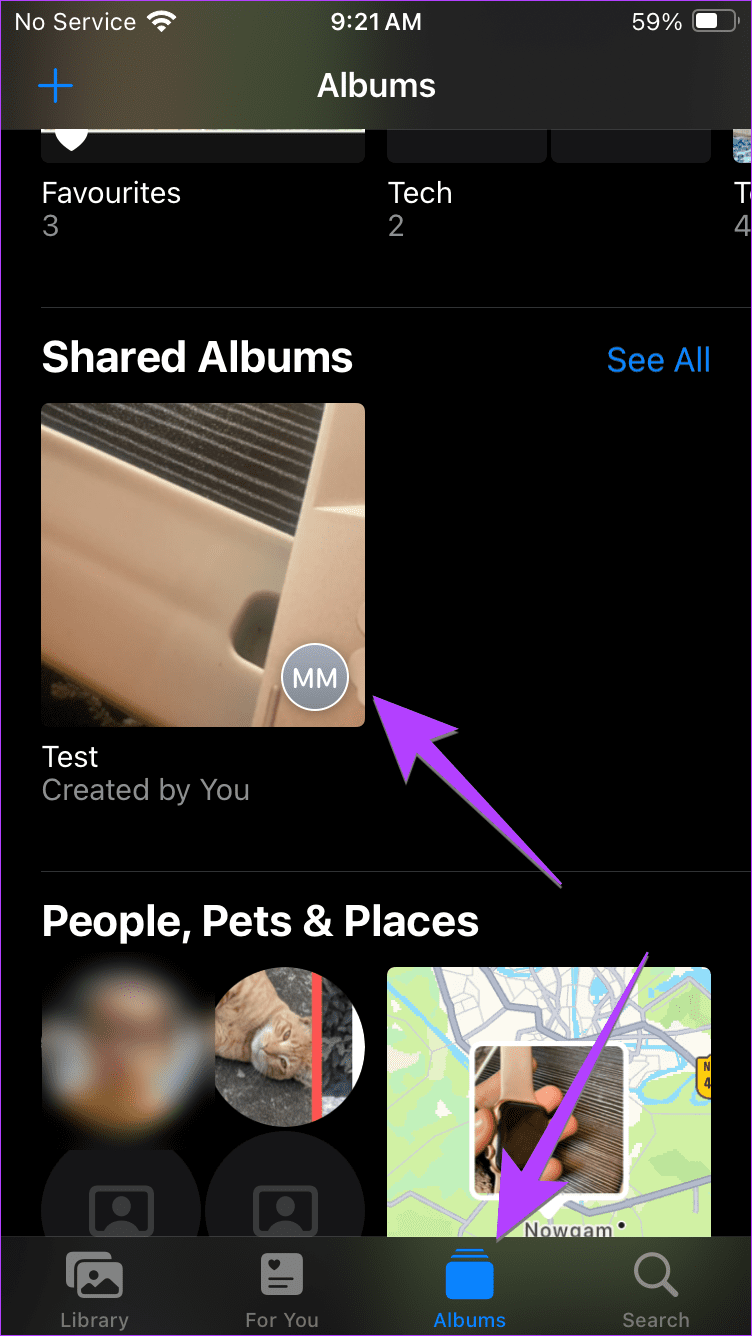
Step 5: Once the album is created, open the Photos app on your iPhone and tap on the Albums tab at the bottom.
Step 6: Go to the Shared Albums section and tap on the album that you created.
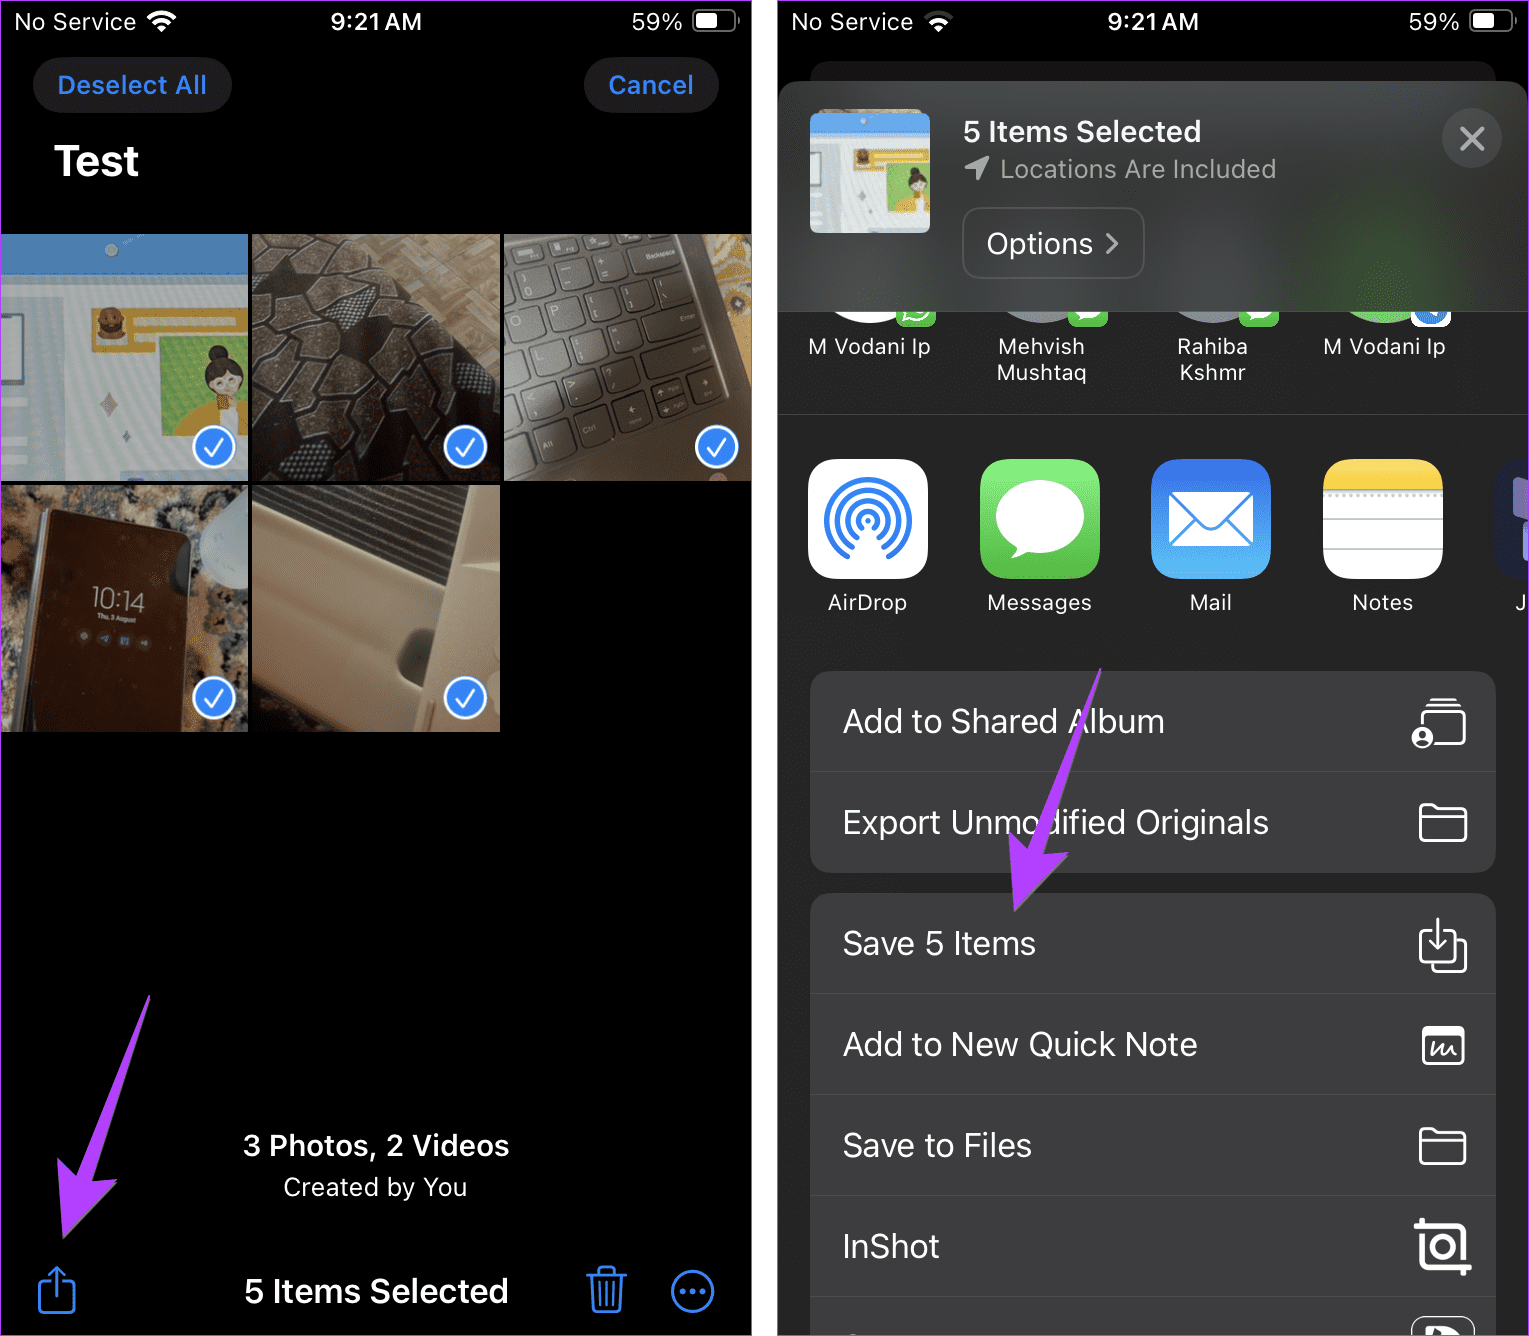
Step 7: Tap on Select and choose the photos to select. Or, press the Select All button at the top.

Step 8: Tap on the Share icon and choose Save X items.
Wait until all your images and videos show in the Camera Roll. It might take some time, depending on the number of items.
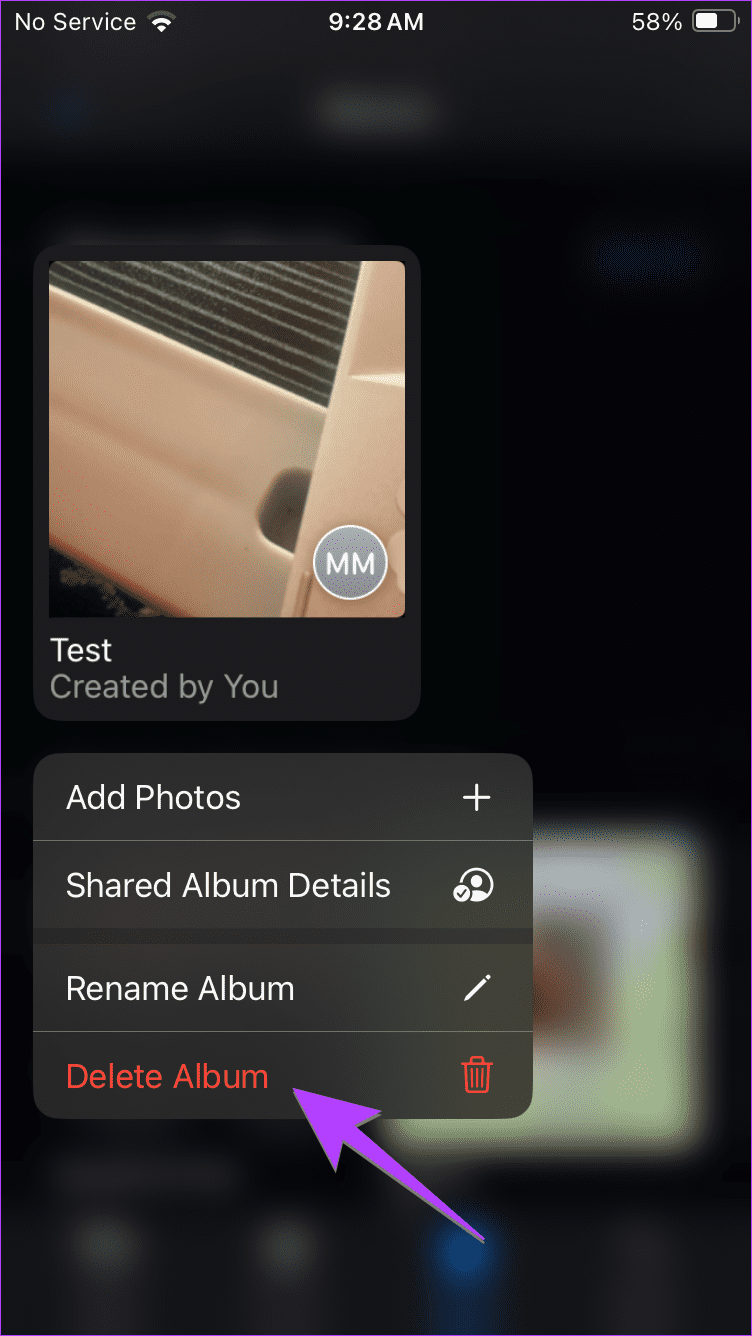
Step 10: Once all the photos and videos show up in the Library tab, go to the Albums tab again and long-press on the shared album. Select Delete Album.
FAQs on Saving Pictures or Videos from Files to Photos App
When you save a photo or video to the Photos app from the Files app, it will create a duplicate copy of the file. So the said file will occupy double storage on your iPhone/iPad—one in the Files app and also the Photos app.
After that, if you delete the photo from the Files app, it will still be available in the Photos app. The same goes for the vice-versa situation. That is if you delete anything from the Photos app, the original file can still be accessed on the Files app. So whenever you move photos or videos to the Photos app, try to keep a single copy only to save storage space on your iPhone or iPad.
First, make sure you have enough storage on your iPhone. Secondly, check the storage location of the file. If it’s saved in cloud storage, you need to follow different steps as explained above. Also, check that no restrictions are set on the Photos app. For that, go to Settings > Screen Time > Content & Privacy Restrictions > Photos. Select Allow changes.
You cannot move or save PDF files from the Files app to the Photos app using the above methods.
That’s how you can save photos or videos from files to the Camera roll on your iPhone or iPad. If you don’t like the default Files app, check out the best file manager apps for your iPhone.
Was this helpful?
Last updated on 02 August, 2024
The article above may contain affiliate links which help support Guiding Tech. The content remains unbiased and authentic and will never affect our editorial integrity.


